| . 1 . 2 . >> |
| Author |
Message |
mick968
Member
|
# Posted: 18 Nov 2015 21:46
Reply
the "flooring ideas" post is of interest as well but as we finish the lower level of our cabin beating around how to finish off ceiling area? wood,corrugate metal look,open and maybe dress up the beams?Some pics of drop ceiling area that is framed going to finish that off before Xmas.
11825805_11789315621.jpg
| 
11828743_11789315454.jpg
| 
11822530_11789315287.jpg
|  |
|
|
Steve961
Member
|
# Posted: 19 Nov 2015 11:19 - Edited by: Steve961
Reply
I personally like the idea of a corrugated metal ceiling. Easy to install, no mudding/taping/painting, long lifespan, and low/no maintenance. I would go with a galvanized much like your wood stove heat shield. For visual interest you could even artificially start the rusting process. One of the pics below shows an interesting twist on a drop ceiling using corrugated metal tiles. This would still allow access to everything above the ceiling.
corrugated_1.jpg
| 
corrugated_2.jpg
| | |
|
|
mick968
Member
|
# Posted: 19 Nov 2015 14:47
Reply
I do too(metal) look. I have recessed light (light) cut opening I'd like to find some already (rusted) no luck so far thanks for the reply i needed something to sway me one way or the other.
|
|
turkeyhunter
Member
|
# Posted: 19 Nov 2015 20:56
Reply
I used the galvanized tin like you have behind your wood stove in the master bedroom ceiling of my camp. I like it and it is not dark like some of the rusted tin ceiling I have seen over the years. I have a friend that gave his new TIN a good bath with a pump up sprayer with apple cider vinegar...which gave it a nice patina ....after leaving it out door for a few nights with the dew and sun on it~~ before he installed it.
|
|
KinAlberta
Member
|
# Posted: 21 Mar 2017 14:02 - Edited by: KinAlberta
Reply
Since the thread title is nice and generic, I thought I'd just continue to use this thread for further ceiling idea posts:
I recently came across a photo of a ceiling done with lattice. It looked quite impressive. Unfortunately, I can't find that photo now.
However, here's other uses of lattice:
At 25 seconds:
https://www.youtube.com/watch?v=AvsalsPu8p4
https://i.ytimg.com/vi/AvsalsPu8p4/hqdefault.jpg

To avoid tiles, I wonder if one could staple up some sort of fabric (say black landscape fabric) put rockwool on top and then hide it all above lattice across the ceiling. Or would that instantly fail all fire codes? If so, use black painted drywall on the ceiling then the lattice.
|
|
Cowracer
Member
|
# Posted: 21 Mar 2017 17:16 - Edited by: Cowracer
Reply
There are some really neat looking faux metal ceiling panels out there that are really inexpensive. If you like the look, but cannot bring yourself to pay $35-$55 for a true copper 2x2 panel, try one of these:
URL
They are about 2.7 sq ft each (19.5x19.5) and run about $3.80 each. They are about a quarter inch thick, and can be glued or nailed in place. If you want to do a drop ceiling grid, you can get true 2x2 panels for about $5
Tim
|
|
KinAlberta
Member
|
# Posted: 21 Mar 2017 21:09
Reply
Yeah, does it matter at all what they are made of if they are going up on the ceiling?
|
|
Eddy G
Member
|
# Posted: 26 Mar 2017 09:56
Reply
Quoting: mick968 I have recessed light (light) cut opening
I have the same situation...I'm wondering what you used to cut the holes, how did you get them centered accurately, and how did you finish them of ...trim wise?
|
|
|
mick968
Member
|
# Posted: 27 Mar 2017 22:13
Reply
Just a update on my ceiling finish
IMG_0956.JPG
| 
IMG_0958.JPG
| 
20170215_160452.jpg
| 
IMG_2876.jpg
|
|
|
Kudzu
Member
|
# Posted: 29 Mar 2017 10:23
Reply
Looks great, that is how we did ours and we really like it. I like the new look over the rusted look.
|
|
mick968
Member
|
# Posted: 29 Mar 2017 13:42
Reply
Thanks.. as far as new over rusted.I don't know.I didn't have access to (rusted) and didn't feel like doing it (acetone) process or whatever. since I had the new (behind wood stove) it was consistent (as consistent as it could be considering each wall-ceiling somewhat different (wood,look,etc.) This pretty much finishes buildout of lower level and the interior of the cabin. We just hangout and enjoy. Building a garage is next (keep vehicle protected for those cold Southpark winters)
|
|
Eddy G
Member
|
# Posted: 30 Mar 2017 11:40
Reply
As I've been thinking about this the thought of condensation came to mined.
It gets cold in NH....This year seemed colder then years past but that's more me getting older....
We use a wood stove to heat our cabin.
So when we arrive on a really cold wet day and fire up the wood stove it creates some condensation on the metal stove.
I hope I'm wrong BUT I'm guessing I would see it raining off that corrugated metal and making a mess of the floors and walls.
In a warmer climate it wouldn't matter and once the cabins up to temp it would go away but I believe this would happen enough to stain the heck out of the wood walls, beams, and floor..
Now maybe, in an area that would heat up a little slower (like our kitchen) this would be less noticeable. But with the wood stove right underneath the metal ceiling I can't see how you could stop it.
I used close cell foam to seal in between the rafters (6") so the moisture would have no where to go but on and down the metal.
Bummer.
|
|
gauman2
Member
|
# Posted: 31 Mar 2017 08:04
Reply
mick98 - what fasteners did you use and what was the best method to cut the material? Thanks.
|
|
Borrego
Member
|
# Posted: 31 Mar 2017 09:52
Reply
Here is a product I used for fencing : http://www.cortenroofing.com/
It arrives looking shiny but gets a nice look after few months..
|
|
KinAlberta
Member
|
# Posted: 14 Apr 2017 21:45 - Edited by: KinAlberta
Reply
This could be a DIY twig ceiling:

http://1.bp.blogspot.com/-FOM4GFD_G_k/Uy_vARc7VjI/AAAAAAAAS-4/jk5mxcf_5yQ/s1600/DSC_0 093.JPG
http://www.destinationsperfected.com/2014/03/megeve-france-le-lodge-park.html?m=1


Interesting photos for ideas here
http://www.thestylejunkies.com/portfolio/le-lodge-park-hotel-megeve/
|
|
mick968
Member
|
# Posted: 19 Apr 2017 22:34
Reply
fasteners-actually just screws holding metal to ceiling beams.
|
|
paulz
Member
|
# Posted: 26 Dec 2017 09:04
Reply
Quick question:
I have some 16' cedar boards I am going to use for the ceiling of my 12x24. It has a 12' walls with a 10x12 loft at the rear (sorry no better interior photo, hope you get the idea).
My options are to run all the boards full length from the front of the cabin, which puts the ends 2' over the loft (but clearly visible from below), then 8' boards over the loft. I suppose I would put a trim strip over the seam. OR, stagger the boards, one 16' from the front, next board 8', and so on.
Which way to go?
1219171753.jpg
| 
0917141805.jpg
| | |
|
|
Just
Member
|
# Posted: 26 Dec 2017 09:44
Reply
IMO only I would stager them . It will add strength to the roof and all look the same.
|
|
Steve_S
Member
|
# Posted: 26 Dec 2017 11:51
Reply
If the boards have bevelled edges then I would bevel the board ends where they meet and stager the ends as Just suggests.
By bevelled I mean as shown below in Pic-1
Lapped as in pic-2 (sorry but I trimmed that out of a bigger photo in my place.)
I used the compound mitre saw to cut 45deg cuts for the edges and did it so it laps, that way expansion / contraction don't show - it is wood so...
The cuts were like so: [==board-a==>/==board-b==]
so board-a has a > edge while board-b only has one angle / that slips under board-a. Hope that's clear enough... I could attempt to draw it out... "maybe" I have some scraps left over to take pics of - not likely though....
Bevelled T&G Cedar
| 
Bevelled Joints
| | |
|
|
KinAlberta
Member
|
# Posted: 26 Dec 2017 12:49 - Edited by: KinAlberta
Reply
You could alternate a pattern by putting two or three on the flat and then add a square edged 1x3†or 1x4†on edge the full length. This would create a more textured interesting look.
Just make sure to put something dark above so that any drying and shrinkage that creates spaces, cracks, knotholes, etc that might develop don’t allow people to see some white backing showing through.
I still love encountering older 1960s and 70s buildings that used cedar on the ceilings. Sometimes I see T&G and other times more crestinv ornamental patterns like boards spaced out, staggered, overlapped, on edge, etc. They always look great and create a nice warm feeling.
What I tend to HATE is exactly what we have. Those 1sqft pressed paper fibre t&g tiles stapled to 1x4†strips. The worst of it is that they are always painted white. Ours is white. So we’ve got beautiful amber coloured knotty pine walls with Douglas fir trim, then this harsh contrasting, white painted, shitty, artificial, unnatural, 1950s ‘cardboard-like’ ceiling product. I can’t wait to rip it. It was painted ‘bright white’ to improve on the rooms darkness. That worked but going from original soft white/beige to an even more starkly white just ruins the comfortable cabin feeling.
However, I might experiment by upping the lumens with LEDs and then paint the ceiling tiles grey or something.
I’d love metal, wood or almost anything but these tiles - or drywall/gypsum board.
Spaced board example

http://cassilhaus.typepad.com/.a/6a00e54feadc81883300e554609a028834-500wi

https://www.customaudiodirect.co.uk/image/data/acoustic-panels/timber/slats-image4.jp g

https://i.pinimg.com/originals/75/2d/74/752d74c1c9cb4e454942d8a2ead18264.jpg
|
|
Steve_S
Member
|
# Posted: 26 Dec 2017 13:15
Reply
@Kin, I was visiting another Cabineer and he just finished doing rough cut poplar on his ceiling with a very light stain. It was quite light coloured being poplar and the light stain was just enough to get the grain & saw cuts to show a bit (sanded but not perfect as he wanted it "honest"). It's gorgeous, nice light but natural and seeing that little bit of grain added a certain je ne ces't quoi to it. He also went with poplar because it was cheaper than most anything else and it's a light weight wood... should'a took photo's dang it... gotta remember I have a damned camera in my phone ! I never ever seem to until it's too late... can't figure out why.
|
|
KinAlberta
Member
|
# Posted: 26 Dec 2017 13:17
Reply
Woven ceiling example:
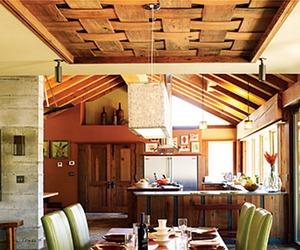
http://mat2.materialicious.com/images/reclaimed-redwood-basket-weave-ceiling-m.jpg
|
|
paulz
Member
|
# Posted: 26 Dec 2017 13:50
Reply
Thanks for the thoughts! Steve, the boards are beveled and tongue and groove. Really nice kiln dried boards, leftovers I bought from a local high end remodel. I get what you're saying about beveling the ends (I think!), the idea is not to show gaps from shrinkage.
Kin, those are some nice ceilings! I think I'm pretty much stuck to mating the boards, being T&G.
|
|
Steve_S
Member
|
# Posted: 26 Dec 2017 15:28 - Edited by: Steve_S
Reply
Correct Paul, even kiln dried cedar will shrink & grow a bit and that's just wrong to show if it can be avoided. Butted up flat edges will always standout & the transition of the grain between boards jumps out so by cutting the lapped 1/2 V Notch to bring the edges together shows the edges it makes them honest. I dunno if I'm using correct "technical terms" but you get it. I will try to take some better photo's tomorrow and post them later.
I installed all my wood ceilings (pretty much the whole cabin) with 2" brads nailed through the tongue edge where the V-notch, is to hide the little holes, I also did a couple on centres into the rafters and puttied them as I shellaced with Zinsser Clear (not amber) before installing so it made touchup simple as simple gets.
Ooohs & Ahs on that "woven ceiling" ! I bet that was a treat to install... makes me wonder how they did it and what that wood is.
|
|
KinAlberta
Member
|
# Posted: 26 Dec 2017 21:12
Reply
Looks neat. But will it yellow?
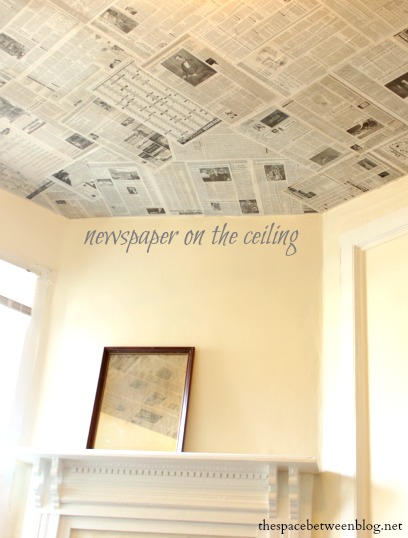
https://thespacebetweenblog.net/wp-content/uploads/newspaper-as-a-creative-wall-cover ing.jpg
http://thespacebetweenblog.net/newspaper-as-a-creative-wall-covering/
|
|
paulz
Member
|
# Posted: 29 Dec 2017 19:32 - Edited by: paulz
Reply
Here is a photo of the ends of my boards, common T and G I suppose. I understand the part about nailing through the inside row of the groove so as not to show the nails. What size nails (or brads?) would be best? I don't want to crack the wood. Don't I also need nails on the exposed surface on the tongue side, or do I nail through the tongue at an angle so the next board will still slide over?
Steve, in regards to the ends, I cut a 45 on one, but I don't get what you are saying about other, is it not just another 45?
Sorry for the confusion, I'm a mechanic, not a finish carpenter. 
|
|
KinAlberta
Member
|
# Posted: 29 Dec 2017 23:54 - Edited by: KinAlberta
Reply
Don’t they normally nail on the tongue side? Hardwood flooring and all. I’d guess there more wood to lessen risk of splitting the wood.
I’m back. Here’s s link:
See step #4 blind nailing. Also note thd comment about orefinidhkmv below:
How to Install a Tongue and Groove Ceiling
“Tongue-and-groove boards are notorious for shrinking and expanding with changes in temperature and humidity. Unfinished boards installed in humid summer conditions can be an ugly mess during the dryness of winter. As the wood dries and shrinks, unfinished stripes will appear where the tongues withdraw from the grooves. But if you apply finish before installation, the tongues will be completely finished—no unfinished stripes to appear later ...â€
https://www.familyhandyman.com/ceiling/how-to-install-a-tongue-and-groove-ceiling/vie w-all/
|
|
paulz
Member
|
# Posted: 30 Dec 2017 09:00
Reply
Thanks KA! OK I get the nailing part now, It says 15-18 gauge nails, I'm thinking thinner is better?
The part about chamfering the ends I don't get, they recommend the stagger joints have a visible chamfer?
I hadn't even considered a finish on the boards, they are unfinished now. What would you recommend? Is it worth finishing both sides?
|
|
kamusito
Member
|
# Posted: 6 Aug 2018 02:33
Reply
I would recommend wood woll acoustic panels , they are really usefull , having alot of advantages like the noise reduction with a good performance and even with the heat, they have a quite good high resistance
You can check them out in here https://www.panelsforwalls.com/wood-wool-acoustic-panel/
You can look your self everything that they have to offer, i used it and tested with a home teather and the acoustic its amazing besides giving a slight touch of decoration
|
|
KinAlberta
Member
|
# Posted: 30 Nov 2018 21:31 - Edited by: KinAlberta
Reply
Would those Ondura roofing panels work inside?
https://ondura.com/corrugated-metal-roof.shtml
If I get around to removing or altering my flat ceiling to expose the roof I may try to find commercial metal ceiling panels to cover the rafters. (Last year I missed my chance to get a while bunch of perforated panels (something like 24â€x96â€) and keep regretting that I didn’t act. Wouldn’t have been enough to do the whole ceiling but I could have done 3/4 of the ceiling in them and then trimmed with something else.
Metal ceiling panels up to 96†long:
https://www.armstrongceilings.com/content/dam/armstrongceilings/commercial/north-amer ica/brochures/metalworks-ceilings-perforations-brochure.pdf
|
|
| . 1 . 2 . >> |
