|
| Author |
Message |
bobbotron
Member
|
# Posted: 5 Oct 2012 14:57
Reply
Hi all,
I'm looking for some input with respect to a wood stove I'd like to put in the cabin. I want to install the stove in the corner of the cabin, as it makes the most sense in terms of cabin layout. I'm planning on getting a small jotul stove, and putting a heat shield on the two close walls. There are two tight rafters just above where this would put the chimney, so the plan is to put two bends in the stove pipe to jig it over a little (two feet or three feet) to get the pipe going through a more favorable part of the roof. On the floor, I plan to make a 2" thick stone/concrete pad for it to sit on, perhaps with a wooden boarder, and reinforced with another piece of plywood underneath it.
I was wondering what you all thought of this, and if you had any suggestions on any of these steps. I've attached a very rough sketch of the cabin, with the stove placement. The grey box is the stove, the white box around is the pad, the black line is the chimney pipe. I figure the pipe would come up about 4 or 5 feet , and then have the bend to get it to the right position. This would also make it closer to the ridge, would mean our double insulated pipe costs would be less, and there would be less pipe to brace outside. (I'm definitely interested in both of these aspects!)
|
|
bobbotron
Member
|
# Posted: 5 Oct 2012 15:13
Reply
Also curious if anyone has any suggestions about whether it's better to use found rocks or buy flatter rocks or tile for the floor under a stove. I'm a little concerned about the flatness of the surface, but I figure there must be some way around it. I'm also somewhat concerned about the flammability of the boarder of the pad. I suppose I could fab a border out of steel angle iron, I do have a friend with an O/A torch... (Or I could make a form and remove it afterwards..)
|
|
GomerPile
Member
|
# Posted: 5 Oct 2012 16:01
Reply
For the pad 2 layers of cement board with tile or stone is typically ok. Skip the plywood.
Find a manual which will give you clearances all around the stove.
Don't forget that the stove pipe also need to have clearance to combustables. Double wall pipe cuts the clearance down by 50%
You probably already know that the top of the chimney pipe needs to be at least 2ft taller than anything within 10 ft of it....and must be 3 ft from the roof.
|
|
trollbridge
Member
|
# Posted: 5 Oct 2012 16:07
Reply
bobbotron,
If you have "found" rocks nearby and they are somewhat flat then save the money and use them. If you have a river nearby that is a good source or even picking through a pile at a landscape nursery wouldn't take too long.
Follow the set back requirements closely-many require a 1" airspace behind whatever fireproof material you choose to use. I remember that you want the stove pipe as straight as possible...we ended up with one bend in ours to make it work but generally the more bends the slower the air flows thru allowing it to cool and create more creosote-somebody will correct me on that if I'm wrong but I think that is the thought.
If your wooden border is outside the minimum space requirement you shouldn't have to worry. I think there are also "hearth rugs" that sit in front that must be fire retardant to help protect the floor from sparks or ashes. I personally like the hearth or platform to be raised from the ground at least 6" or so- my thoughts are that it is just a little safer-especially if children are around- less easy to accidently back into.
Good luck to you! Post lots of pictures...you will be very happy when this job is over with!!!
|
|
TomChum
Member
|
# Posted: 5 Oct 2012 16:45 - Edited by: TomChum
Reply
Hey Bobbo, here's my thoughts on my stove....
My stove is 30 " from the wall. From the drawing it seems like it would be 'in the way' but ----- during the winter, more people can crowd around it 360 degrees, and there is space to hang wet clothes on the wall behind to dry. Depends how you use your cabin. I need it to work well in the wintertime.
My stove is also in front of the door, but it's in a space that is not used, if that makes sense. It's just beyond the point where you turn around to shut the door, so it doesn't 'seem' like its in the way. Don't let the the swing of the door confuse you. In the wintertime, the door is closed 99.9% of the time, it's more like the photo than 'the drawing'. I think this is a good example of where showing the door swing in the layout diagram can confuse 'real life usage'. When you bring firewood in from the outside, there are no obstacles between you and the stove. And whenever someone DOES open the door, the cold air puffing in gets a warmup going past the stove.
This also allowed a straight run for the stovepipe. Brushing the chimney gets very easy when the pipe is straight. Rather than worrying about burning the wrong kind of wood, you can just brush it whenever you feel like it. I can brush my chimney in about the same time as sweeping the floor. But getting up on the roof is no problem at this point in my life.
Good luck with your project. I understand the apprehension because you are planning to cut a hole in your roof and it damn well better be in the right place. I bet you predicted that I would vote for "found rocks". Say no to barcode. My current plan to protect the floor is to nail a bare steel sheet to the floor, but I keep forgetting. Tools you need to fab angle-iron border is a hacksaw & drill, welding probably not necessary. You can miter the corners and screw it down to the floor.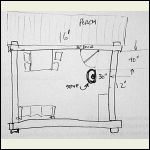
Cabin woodstove location diagram
| 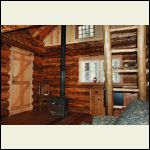
Woodstove near door
|  |  |
|
|
larry
Member
|
# Posted: 5 Oct 2012 20:07
Reply
i placed my stove close to the centre of the building for a more even heating. my stove sits upon a hearth pad i made which consists of three layers. the layer against the floor is half inch plywood with half inch cement board screwed to it. on top of that is the cut river stone 12x12 tile. it has a wood border and even when the stove at its hottest the wood never gets any warmer then the floor. i never feel like it will catch fire.
|
|
toyota_mdt_tech
Member
|
# Posted: 5 Oct 2012 21:10 - Edited by: toyota_mdt_tech
Reply
What is the setback of the stove? If the stove doesnt have shielding on it, you will find it might be quite a bit. Keep in mind, it may be required to be 24" from each wall, plus is needs to have 18" of hearth in front of the door when its open. In a corner, this moves it way out. You can add a shield, but it must be permanently attached to the stove to get it closer. If you shield the wall, it must have air space behind the shield, or the set back remains unchanged. The pipe, if its uninsulated, needs to be 24" away from the wall. Where it goes through the ceiling, must have a firebox or chimney support box (12" wide). From that point up, it must be the insulated pipe, cost around $200 for each 4 foot section. Now depending on how steep your roof is, the cap must either extend above the highest point of the roof by 2 feet or be 10 feet away at the top. So if the pipe is at the lower end and you have a steep pitched roof, you might end up with a tall flue of the spendy pipe. Also, down low on the roof, will you have sliding snow? This can shear off your pipe as snow melts. Closer to the top is better. IF you go tall pipe, support it well, HD pipes made from large EMT conduit. You can add a snow slicer as a gusset at the base of the chimney, so if snow slides, it will cut it and it can divert around the pipe.
I just purchased my hearthpad. It is fireproof, has air space under it and meets/exceeds code.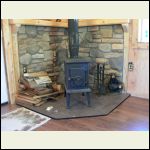
flooring_010.jpg
| 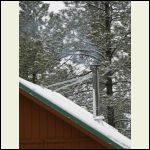
stovepipeburning.jpg
|  |  |
|
|
Storogoth
Member
|
# Posted: 6 Oct 2012 19:07 - Edited by: Storogoth
Reply
TMT.........
In your photo how far is the corner of the stove from the wall and mantle? How far is the pipe? I am looking at a similar configuration when I put the stove in next year and I will probably use 1/2" backer board with slate on the floor and wall surround. Similar to Tom's install the door will be next to the corner but the stove will be at an angle like yours. I'd like to think that I can do about 18-20" clearance. Your floor tiles make it look like I'd be OK.
|
|
|
Martian
Member
|
# Posted: 7 Oct 2012 08:32 - Edited by: Martian
Reply
If you haven't bought the stove, check out the Morso line of convection woodstoves. They can be placed within 8" of a sidewall and as close as 3" from the backwall. The controlling factor is whether you use doublewall or singlewall stovepipe to the ceiling.
This is the one I chose. It is in the middle of the structure and exits close to the ridge. The pipe is straight, and having it close to the ridge makes it easier to get access to for running the brush down on occasion and makes sealing the flashing easier.

The base is a slate chalkboard from an old school set on 1/2" concrete backer board.
Tom
|
|
trollbridge
Member
|
# Posted: 7 Oct 2012 13:35
Reply
Quoting: Martian The base is a slate chalkboard from an old school set on 1/2" concrete backer board
Ahhhh, I like that! A good use for those old heavy chalkboards. Cool idea!
|
|
toyota_mdt_tech
Member
|
# Posted: 7 Oct 2012 16:48 - Edited by: toyota_mdt_tech
Reply
Quoting: Storogoth TMT......... In your photo how far is the corner of the stove from the wall and mantle? How far is the pipe? I am looking at a similar configuration when I put the stove in next year and I will probably use 1/2" backer board with slate on the floor and wall surround. Similar to Tom's install the door will be next to the corner but the stove will be at an angle like yours. I'd like to think that I can do about 18-20" clearance. Your floor tiles make it look like I'd be OK.
Storo, its right at specs. I cant remember the distance, but the specs is on the stove, or should be by law. A metal tag riveted. I think mine was 24" from the stove corners to the combustible wall surface, not the stone work and hardiboard. Pipe was like 12", but only at the top, it dog legs back to the corner. 12" was min distance, unles you go insulated pipe. This is the distance to combustible materials, so measure the wooden wall. My stone with sets on top of 1/2" hardi board. The mantle is far enough away. The pipe just before the ceiling is at min space away from wall. My hearth was just purchased as a pre made. Its a special tile, it is grounted and has an air space under it. This is the easiest way to go. I think mine is like 54" wide. But the amount of hearth in front of the door isnt enough. I needed 18". I have about 12".
The hearths for corners cost close to $350-$500! I called looking for one, they said they had a corner one, with a crack in the grout line from shipping. Still OK, bought it for $150 total. The crack goes away as soon as its set flat on the floor. I did drill through the grout line to add a door stopper. I used a 36" door and it would of hit the stove.
Keep in mind, you can move the stove closer, you just have to have a sheild around the stove and it must be anchored, in other words, it cant be moved or fall off. Or buy a pricey stove with it all in place. I wanted a trash burner style and small. I got mine from Craiglist for $100. In the summer, craigslist is full of them. And cheap too
http://www.woodlanddirect.com/Wood-Stove-and-Accessories/Hearth-Pads
Just use a search engine, type in wood stove pads
|
|
Montanan
Member
|
# Posted: 8 Oct 2012 12:22
Reply
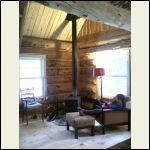
Our wood stove is also in the corner and we were able to set it such that we didn't need any heat shield behind it (though we have thought about adding it just for the extra warmth it would radiate.) We built the pad with rocks from our property- set on cement board. It works great. As for the stove pipe, if you can possibly make it work, I'd try to avoid having multiple bends. The draw is better with a straight pipe and, as TomChum mentioned, it's easier to clean.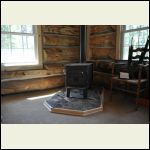
Stove and pad
| 
Stove and pipe
|  |  |
|
|
bobbotron
Member
|
# Posted: 9 Oct 2012 09:12
Reply
Wow, thanks everyone for all the great replies! I think we're going to rethink our cabin layout somewhat, so the stove will be closer to the ridge, for less double wall pipe, and a easier time cleaning it. Out of curiosity, can you clean the stove from the bottom, or does it have to be done from the top? If only from the top, then we pretty much have to put it near the ridge, there'd be no way to get a chimney brush down the top of a pipe protruding 6' or 7' from the roof!
We got our last door and roof panel installed this weekend, except for some caulking, the place is weather tight!
|
|
GomerPile
Member
|
# Posted: 9 Oct 2012 10:03
Reply
Not to derail this thread...but I am thinking about buying that exact stove for my cabin because of its small clearances. How large is your cabin? Does it heat well? How do you like it? How are the burn times?
Thanks
Quoting: Martian If you haven't bought the stove, check out the Morso line of convection woodstoves. They can be placed within 8" of a sidewall and as close as 3" from the backwall. The controlling factor is whether you use doublewall or singlewall stovepipe to the ceiling.
|
|
optimistic
Member
|
# Posted: 9 Oct 2012 21:36
Reply
Look incredible Montanan.
|
|
Martian
Member
|
# Posted: 9 Oct 2012 23:21
Reply
Quoting: GomerPile Not to derail this thread...but I am thinking about buying that exact stove for my cabin because of its small clearances. How large is your cabin? Does it heat well? How do you like it? How are the burn times
My place is 20X24 plus an 8X8 mudroom; no loft. The stove works like a champ. Burn times depend on how much heat I need. An average would be around 4 hours, I guess, but there is still a lot of heat remaining when I come home after work. I'm really impressed with how well sealed it is. The shaker grate is nice, too. I'm very happy with it.
Tom
|
|
Montanan
Member
|
# Posted: 10 Oct 2012 01:06
Reply
Thanks optimistic!
|
|
Storogoth
Member
|
# Posted: 10 Oct 2012 02:31
Reply
TMT......
Thanks for all of the info. I should be good with double walled pipe. I like the shield idea with a nice piece of plate steel with some decorative welding to dress it up. That might just get me the few inches that I need.
|
|
FishPCreek
Member
|
# Posted: 21 Oct 2012 20:30
Reply
This is an interesting thread as I have been pondering a similar installation. Hearth.com has some good information on thermal rating for various materials. Many folks seem to put their stoves on rock over cement board, but the required thermal rating for the Jotul I am looking at is about 1.1 if not UL/ULC rated. This means about 2 or 3 layers of cement board before the rock etc. I looked for the Micore stuff and it is nearly impossible to find - thin but very thermal resistant. I am leaning towards purchasing now due to time before winter, but yes the pre-made stove boards/pads are expensive and not many available on CL etc.
The insurance guy that looked at our cabin said call him back when the stove is in as that is the most important piece they will check for adhering to code - along with the electric! Might be something to look in to.
|
|
bobbotron
Member
|
# Posted: 25 Oct 2012 13:48
Reply
So we've decided to put it in the corner, and live with the gigantic outdoor stove pipe.
Got the tile done for the stove last weekend! Picking up the stove tonight, a Jotul 100.
The tile we used is quite nice, but not totally flat - considering options for what to put under the stove feet to take up minor irregularities in the slate, suggestions are welcome! So far I'm thinking possibly using some 1/8" thick steel plate I have kicking around to make little foot coasters to distribute the stove weight. Possibly putting a thin layer of high temperature silicone on the bottom of each coaster first to create a rubber bottom for each...

2012-10-22 16.58.06.jpg
|
|
toyota_mdt_tech
Member
|
# Posted: 25 Oct 2012 17:30
Reply
Bob, tye installer who did mine just used some thin shim stock under a few feet.
|
|
BigDuke6
Member
|
# Posted: 14 Dec 2012 13:47
Reply
Any updates to share?
|
|
bobbotron
Member
|
# Posted: 14 Dec 2012 14:07
Reply
We finished the stove, got it installed. Ended up not having to shim, it sits pretty flat as is. One day I may shim the 4th leg with the very thinnest of shim. We ended up putting it in the corner, it turns out it works alright. Cutting a hole through the roof was terribly difficult to do! We need to buy another 2' length of chimney pipe to go over the roof peak, and there's a little more roof work to do, we have a little leak on heavy rain, got too cold and dark to fix the last time we were up there.
If you have more q's, I'd be happy to share. 
|
|
MtnDon
Member
|
# Posted: 14 Dec 2012 14:19
Reply
Quoting: bobbotron we have a little leak on heavy rain,
Leaks can be a bear to find. Hope you are lucky. Years ago I had one that I finally determined to be coming from the joint between two exterior insulated pipe sections. A little silicone stopped it.
|
|
bobbotron
Member
|
# Posted: 14 Dec 2012 14:23
Reply
Quoting: MtnDon Leaks can be a bear to find. Hope you are lucky. Years ago I had one that I finally determined to be coming from the joint between two exterior insulated pipe sections. A little silicone stopped it.
Yeah - this one should be easy to find, I'm pretty sure I know exactly where it is.. we just ran out of time at that point.
|
|
BigDuke6
Member
|
# Posted: 14 Dec 2012 14:30
Reply
Any pics of the installation? And, how are you coming with the rest of your project?
|
|
bobbotron
Member
|
# Posted: 14 Dec 2012 15:50
Reply
Unfortunately no real install photos, we were too busy getting the darn thing installed. What I can say is, the connection from the DSP to the stainless chimney pipe needs better much instructions, that really slowed us down. Actually, all of the instructions were just ok, but works great once you figure out what's going on. 
The roof is up, windows and doors are in, we're starting to insulate the main floor, had some wiring put in. Loads more to do, but it's getting there. It'll be great when we get rid of the piles of interior panelling that's in the middle of the room.
It would have been nice if I'd been able to document it all, I've done this for past projects, never got around to it for this one....
|
|
|

