|
| Author |
Message |
jesse977
Member
|
# Posted: 3 Nov 2014 04:02
Reply
Im going to install some split rail fence. The posts are 64 inches long. How deep should I bury them in the dirt? Should I use cement? I hear the cement makes wood rot faster and that lain old dirt is best. I also heard that adding gravel does NOT make water drain away faster. I just want the opinion of the knowledgeable folks in these forums. Thanks
|
|
bldginsp
Member
|
# Posted: 3 Nov 2014 06:45
Reply
Posts in the dirt will rot one way or the other. I always thought concrete made them last a bit longer but not much. Best you can do is use the most rot resistance species you can find.
I plan to build a split rail type fence with cedar poles. But I'm not going to use posts. At the intersections of the poles I was going to put them up on bricks to keep it up off the dirt. Wood on or in dirt = rot.
Any fence is doomed from the day you build it. All you can do is extend its life. Where I am they call split rail fences 'rot rail fences'. So don't work too hard at it, is my thought.
|
|
Don_P
Member
|
# Posted: 3 Nov 2014 07:02
Reply
Concrete will shorten the life of a post encased in it. If the soil drains well then gravel enhances drainage, if the soil is impermeable then gravel just invites water to sit in the pot your hole has created. For a fencepost it is typical to backfill around the post with the excavated soil and tamp tightly in 3-6" lifts. If the soil is not at optimum moisture or is not compacting well some rocks or gravel well tamped into the fill helps. We typically dig a fencepost hole 3' deep, tamp very well at the bottom, tamp well through the middle and tamp very well at the top forming a large well compacted collar. In the spring on dry days it helps to go around and repack the surface. Posts do not rot underground, insufficient oxygen.They do rot from ground level to about 6" underground in the biologically active zone.
 everything we build is doomed from the day we build it. One log home builder, after answering the settlement question one too many times, said "it has finished settling when the ridge is on the ground" One neat rail fence I pass occassionally is concrete posts with steel railroad rails. Glad I didn't have to build that! everything we build is doomed from the day we build it. One log home builder, after answering the settlement question one too many times, said "it has finished settling when the ridge is on the ground" One neat rail fence I pass occassionally is concrete posts with steel railroad rails. Glad I didn't have to build that!
|
|
bldginsp
Member
|
# Posted: 3 Nov 2014 08:24
Reply
yeah, Don, glad I didn't have to build that either, or pay for the railroad rails, which even at scrap prices are going to cost a lot.
But I wonder how hard it would really be to make a bunch of concrete posts, once you were all set up with a small mixer, several forms, and a teenager to lift the bags.
|
|
hattie
Member
|
# Posted: 3 Nov 2014 11:15
Reply
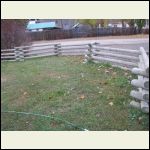
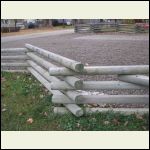
We don't have a split rail fence, but we do have a snake rail fence. It is made out of pressure treated landscape ties. They are round poles with two flat sides. Bob drilled a hole through them vertically and put a piece of rebar in them. For the top and bottom rails the holes are drilled only half through which results in the top rail hiding the holes. Each corner is sitting on a 12 X 12 concrete slab that is 2 inches thick to keep them off the wet ground. There are no posts in the ground to rot.
The two of us put the fences together really quickly. There are no post holes to dig, no nails or screws. It is just posts and rebar.
Our fence is over 10 years old now and is just as good as when it was new.
One HUGE advantage of this fence is that it hinges. If you need to move it to get something large onto the property, you just hinge it out of the way and then put it back into place.
Snake_Rail_Fence.jpg
| 
Fence_Overlap.jpg
|  |  |
|
|
Malamute
Member
|
# Posted: 3 Nov 2014 16:06
Reply
Buck and rail works pretty well and doesn't require holes. Its pretty popular in the west where theres a lot of rocky ground. If not familiar with it, its an X bolted together close to the top, with rails (can even be totally natural materials) spiked or screwd across the outside face of the bucks, and every few sections a diagonal brace added to keep them straight.
Can either ignore the bottoms rotting, or simply dip treat the very ends where they sit on the ground. Once in a while I've seen steel T posts driven in at some bucks to help keep them in place in high winds, probably not needed where you are. and yes, I've heard of long stretches of back and rail blowing over, but it was over 100 mph winds.
Lumber yards in the west have various lengths of fence rails, simply round machine peeled tapering poles. Bucks can be made from poles, or heavier material.
Pics,
https://www.google.com/search?q=buck+and+rail+fence&biw=1147&bih=688&tbm=isch&tbo=u&s ource=univ&sa=X&ei=_-1XVLT-Jur9iALgzIGADw&sqi=2&ved=0CB0QsAQ
|
|
davestreck
Member
|
# Posted: 3 Nov 2014 18:17
Reply
The best wood for fence posts (IMO) is Black Locust, if you can find it. The heartwood will last many years longer in ground contact than any other wood species, including PT. Don't set them in concrete, just backfill with soil. As said before, gravel is unnecessary in well-drained soil.
Locust is also strong, holds fasteners well, steam bends as well as ash or white oak, and makes pissah firewood.
|
|
old243
Member
|
# Posted: 3 Nov 2014 20:25
Reply
All the onigonal fences in our area were cedar. Made rails by splitting cedar logs , with wedges and a sledge hammer. A lot of the fences have been replaced with woven wire, or the fencerows removed to make larger fields.I built a hundred feet of rail fence . Between us and the neighbor. Dug in cedar posts about 12 feet apart, to suit rail length. It is straight. . Rails alternated and a piece of rail wired to hold them in place . At the bottom set your first rail up on a short piece of rail . It will keep the rails out of the moisture.Old 243
|
|
|
Don_P
Member
|
# Posted: 3 Nov 2014 21:24 - Edited by: Don_P
Reply
Quoting: bldginsp But I wonder how hard it would really be to make a bunch of concrete posts, once you were all set up with a small mixer, several forms, and a teenager to lift the bags.
I've got a form at the job to make 8x8x8', planning on using it if I can successfully order a little too much concrete. The homeowner wants some raised bed ties so I was going to cast some at 96" and some at 80" and set them up log cabin style to make the beds. Should cost about $15 ea in concrete, we have some brick ladder type reinforcing wire that we'll lay in as we go.
As we were kicking this around, you could pour timberframe type bents and build a house out of tilt up concrete post and beam. but back on topic, a number of our old bridge approaches are cast posts with holes that cast rails fit into.
Black locust is the preferred fence post here as well, also a wood I really enjoy working with. i've had field grown locust fail in 7-20 years, woods grown ones seem to last a few years longer than stone. One thing with those small treated landscape timbers, they are usually peeler cores from plywood production. Generally they say something like "treated to refusal", in other words they treated it until the wood wouldn't accept any more treatment chemical. What they don't say is that heartwood won't accept treatment, so most often these timbers are just green on the outside.
|
|
jesse977
Member
|
# Posted: 3 Nov 2014 22:19 - Edited by: jesse977
Reply
Wow thanks for all the great info. Im in Los Angeles and I cant find any locust, all I can find is cedar. I guess Ill just go with cedar. Do you guys think a stain or sealant will help the fence last a little longer? The fence will be up in the mountains in Big Bear.
|
|
Don_P
Member
|
# Posted: 4 Nov 2014 06:28
Reply
Cedar is also considered to be highly decay resistant so should be fine. A water repellant preservative would probably help. With a finish you would want something that tends to repel bulk, liquid, water yet allows water vapor to pass back out through the finish. A film forming finish, like paint, would allow bulk water in through the checks, splits and cracks but would not allow water vapor back out very well, this tends to cause rot.
|
|
Steve_S
Member
|
# Posted: 19 Nov 2014 08:20
Reply
Around me the favoured wood is Eastern White Cedar which is critter & rot resistant naturally. Western Red Cedar is equally resistant. Split Rail fencing (many variations) are all around my place and in various conditions, some very very old as well.
Before burying posts in the ground, "char" the buried ends. Make a nice open fire, grab a pint or two of your favourite pop & lawn chair, maybe some slab bacon with the rind to roast over the fire and char the ends of your logs to the same as the depth you are going... wait till the wood starts to burn and rotate it so that the end burns evenly. Don't let it get too burnt obviously but a nice "crust" all around. Critters don't go for carbonized woods, the creosote remaining from the burn is protective and the end is hardened with most species of woods.
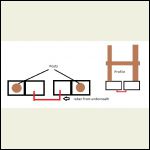
Of course good gravel drainage in your holes. If your on a Rock Surface or other which won't take post holes, you can also use Cinder Blocks on the ground to put the posts in but you'll need to concrete them in to those... You can link the blocks if need be with a U shaped rebar if your going with an H type post.
If your looking at it East-West. Block1 E, Block2 W, posts in outer hole of block (farthest E & W) concrete in all 4 holes with a rebar U between the two inner "cells". Below is a quick doodle to show how I mean. Quite a few folks do this in my area and then cover the cinder blocks over with rocks.
Just remember that if your "concreting" in the posts, that the concrete is a touch above grade and slopped away from the post so the water can run off easily.
Cinder Block base with rebar tie-in.
|  |  |  |
|
|
|

