|
| Author |
Message |
yarnammurt
Member
|
# Posted: 23 Jan 2015 20:47
Reply
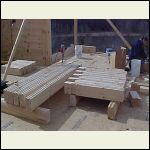
I am going to start on a 8x8 timber house. I started stacking logs last week. I will get more pics when I have them all stacked. I was going to stack and run rebar through 5 layers at a time with B&P ends. Any pointers would be greatly welcomed.
|
|
toyota_mdt_tech
Member
|
# Posted: 23 Jan 2015 21:04
Reply
Did you attend the log home builders association meeting in Vegas?
http://www.buildloghomes.org/
One of these days, I am going to sign up for that 3 day class.
|
|
Nirky
Member
|
# Posted: 24 Jan 2015 00:10
Reply
A great class!
Butt/pass with rebar every 2 ft is a solid combination.
Pier foundation?
Those are some serious looking logs. For a 64 sq ft cabin, I'd opt for smaller diameter logs, like 5 or 6". Unless you just have to overbuild by like 2000%. How did you plan on lifting the pictured logs?
|
|
yarnammurt
Member
|
# Posted: 24 Jan 2015 07:07
Reply
Its going to be a 36x80 home with 8x8 timbers. I use a 95hp New Holland 4x4 tractor to load and move them around. I have a sawmill that I will cut them on. And yea pier foundation.
|
|
Don_P
Member
|
# Posted: 24 Jan 2015 11:49
Reply
36', that's quite a span, how do the floors and roof work?
With a mill I think I'd be looking at timberframing it.
|
|
CanadianNorth
Member
|
# Posted: 24 Jan 2015 12:36
Reply
Quoting: Don_P ... I'd be looking at timberframing it.
I agree. If you desire the rustic look, timberframing will give you that but offer more in terms of easy and speed of build, cost, maintenance, and heating efficiency.
|
|
Nirky
Member
|
# Posted: 24 Jan 2015 14:35
Reply
Quoting: yarnammurt Its going to be a 36x80 home with 8x8 timbers.
I misunderstood. Are you going to have a vertical post every 8 feet then? For a 35x80 ft home, even single story, it's gonna weigh tons and you'll have to calculate the load on your soil to be sure your piers will safely support it. This will be a massive project. As MDT pointed out, check out the forum at buildloghomes.com. They specialize in teaching how to build butt/pass log homes like yours.
|
|
yarnammurt
Member
|
# Posted: 24 Jan 2015 20:42
Reply
We are having a footer poured, And a block foundation. We are stacking 8x8 timbers around the foundation, to a height of 10'. And a 6x6 weight bearing wall down the center, with a 28' span in the middle for the great room and kitchen. We are having a truss mill build the truss for the ends and timber framing the center. And we will have footers poured down the middle of the foundation at 12' spaces. The floor joist will be 2x12x12. The ground will be no problem, the timbers will be a mix of 8', 10' 14' 16' long timbers all tied together. The ends of the but and pass will have a 2" hole bored through the pass into the but to 12" and have a white oak dowel hammered in. I am a carpenter by trade and have flipped many homes. So I'm not a total rookie. I just have never built a log/timber house, But I like the rebar thing and with the White Oak dowels glued in we should be fine. And the ends of the timbers where they meet up will be tongue and grove with a 8" tongue glued and then a dowel hammered through.
|
|
|
w8n4rut
Member
|
# Posted: 25 Jan 2015 20:52
Reply
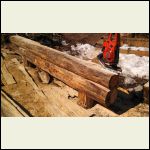
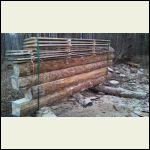
I'm about 2 years from building our cabin. Going to build something around the 16x24. I'm milling d-logs from the pines on our property as I get time with a chainsaw and mini-mill....about halfway done. I'm planning on doing butt and pass also...still researching on how I'm going to gasket/spline between courses.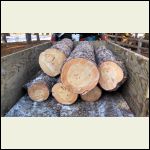
IMG_20150122_151258_.jpg
| 
IMG_20140329_145446_.jpg
| 
IMG_20140331_072654_.jpg
|  |
|
|
Don_P
Member
|
# Posted: 26 Jan 2015 08:19 - Edited by: Don_P
Reply
Rather than butt and pass, a notch and pass corner is more airtight, stronger and easy enough to cut. If both interior and exterior are left round then a V and A corner works pretty well.
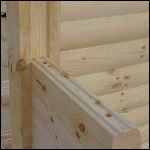
Because of the way a timber dries, (wood shrinks nearly twice as much tangentially as radially) a flat sawn surface on a large timber dries to become a convex surface. You end up bearing on the middle of the flats and the edges gap. Also the primary drying check tends to take the shortest path from heart to surface, usually one of the sawn faces in other words. You can help promote the check forming on the desired face by ripping a groove on what will be the bottom sawn face. You'd rather have the check facing down,draining, rather than on the upper surface where it will encourage water getting into the check. To get the bearing on the outer edges I run a power planer along the center of the bottom of the timber to create a relief, the bearing is then on two outer edges. Much like the relief cut on the backside of flooring, see the pic below. Self stick foam strip on a roll can then be rolled down the edge of the relief area (it needs a small gap to live in rather than being smashed flat or it has no recovery) Caulk the bearing area on the outer flat, this will need maintenance. Make sure there are no water catching ledges sticking out on the row below, make drip edges rather than water catching ledges, scribe and drawknife offending wood out of the way. Think like a raindrop 
Edit, found a couple of not too good pics showing how a notch is cut in the recieving member. The round is cut away from the inserted member leaving a stub of tennon to be inserted into the notch, making an air dam and helping to restrain the corner if things want to twist. I'm a fan of lags rather than rebar or spikes, we pull the logs down "dollar bill tight", the closer to dry they are the better things stay in place. Do allow for some settlement.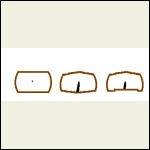
flatonflat.gif
| 
drpDlogprep.jpg
| 
drpcornerpost2.jpg
|  |
|
|
w8n4rut
Member
|
# Posted: 26 Jan 2015 19:48
Reply
Don-P
You highlighted things already on my list of things to do.
1. chainsaw cut for check on bottom of log.
2. drawknife off "ledges" of bottom logs. I was planning on fitting top log and pencil marking the top of the bottom log and scribing to mark.
3. notch butt log into pass log. (or use a vertical notched corner)...haven't decided which way I will go yet.
4. gasket strip between courses.
5. power lags for logs.
The only thing I am still deciding on how to do is the relief cut on the bottom of log so outside edges sit tight. I was thinking router....but I like the planer idea.
Thanks for your input.
|
|
|

