| << . 1 . 2 . 3 . 4 . 5 . 6 . 7 . >> |
| Author |
Message |
CaliGrlInWV
Member
|
# Posted: 6 Apr 2012 10:50
Reply
@CabinBuilder Thanks so much for your feedback. I wasn't quite sure about what kind of fumes/vapors the pipe would emit.
@TomChum yes, I would have to agree with you about it being better for outdoor use. I appreciate your feedback.
- Marisol
|
|
dfosson
Member
|
# Posted: 25 Apr 2012 21:47
Reply
I found my little wood cook stove on Craigs list for $200. I purchased all my double wall stove pipe from Menard's using stainless steel through the wall and along the outside wall. I highly recommend shopping around for a used stove but not cutting corners on the piping.
stove
| 
chimney
| 
stove hooked up
|  |
|
|
esther
|
# Posted: 3 Feb 2013 11:37
Reply
fairy-mother
Hi there,
We just bought a Hobbit stove for our tiny house build in New Mexico (USA). The house will be about 150 square feet. We're having a tough time finding 100mm stove pipe here, and are curious where you got yours. We'll also be putting a couple small bends in our pipe, and would like to know if you've noticed any problems with the draft since you installed it. Any words of wisdom about the installation would be greatly appreciated!
Thanks!
Esther
esther.fredrickson - at - gmail dot c0m
|
|
Just
Member
|
# Posted: 3 Feb 2013 20:12
Reply
3 in . muffler pipe works ,any place that does truck mufflers comes in 10 ft lengths they can bend it for you.I have a very small stove for a hunting tent it has a two in. flue..
|
|
jaransont3
Member
|
# Posted: 3 Feb 2013 21:46
Reply
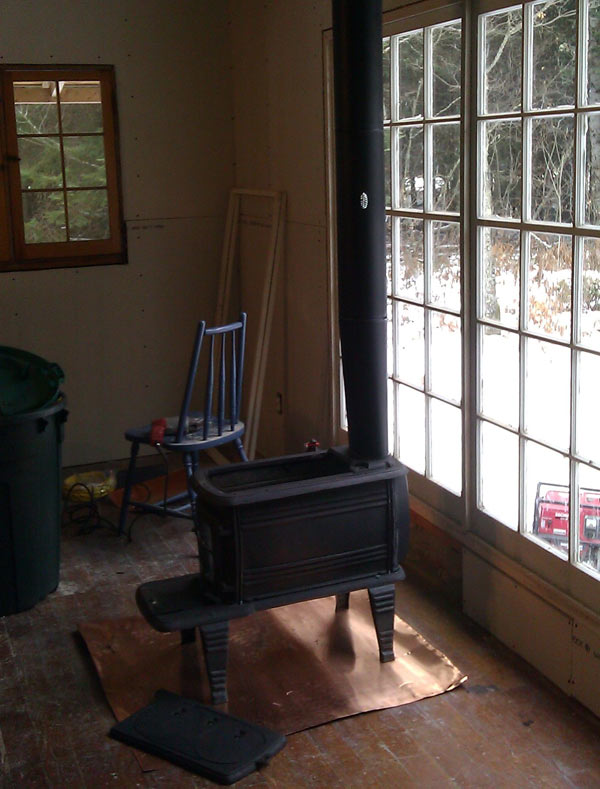
Thought I would share our set-up for our cabin in Northern MN. It is only 420 sq ft, so this little boxwood stove heats it right up and keeps it warm. The stove is probably 40+ years old. I pulled it out of my aunt and uncles old storage shed where it had sat for at least 25 years. It is nice thick cast iron. I disassembled it, sand blasted everything clean and then reapplied the stove black, sealed and reassembled it.
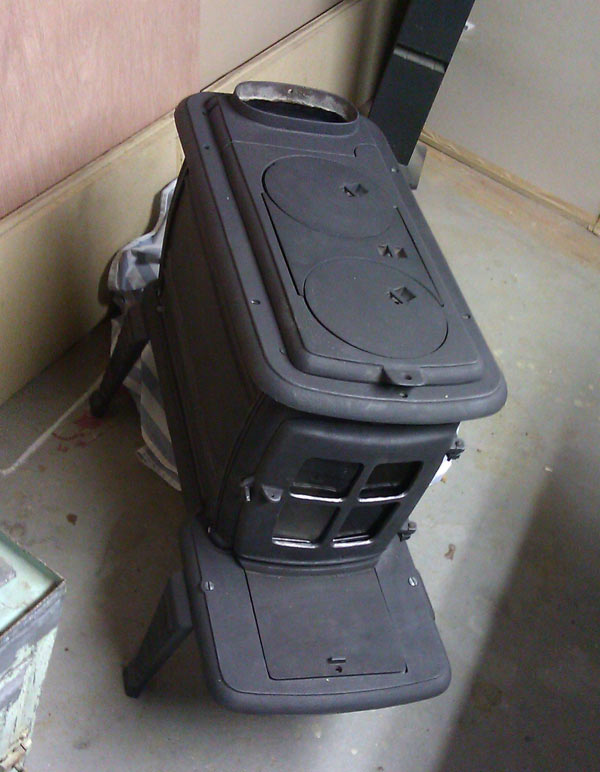
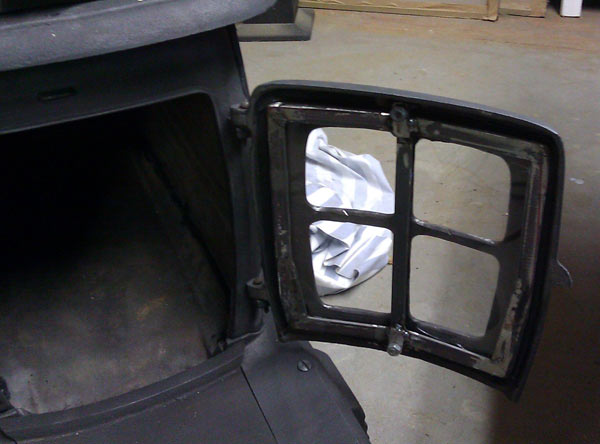
I also cut four windows in the door with my die-grinder and cut-off wheel, built a frame to hold a couple of pieces of pyrex fire glass.
I put a piece of copper roofing on the floor to protect against stray embers. The stove pipe is a straight shot up and through the ridge of the roof. Most of the pipe is just single wall black 6" stove pipe. The part that passes through the roof is double wall insulated stainless steel pipe.
I built the heavy gage plate that is screwed to the rafter box framing and supports the weight of the insulated pipe section.
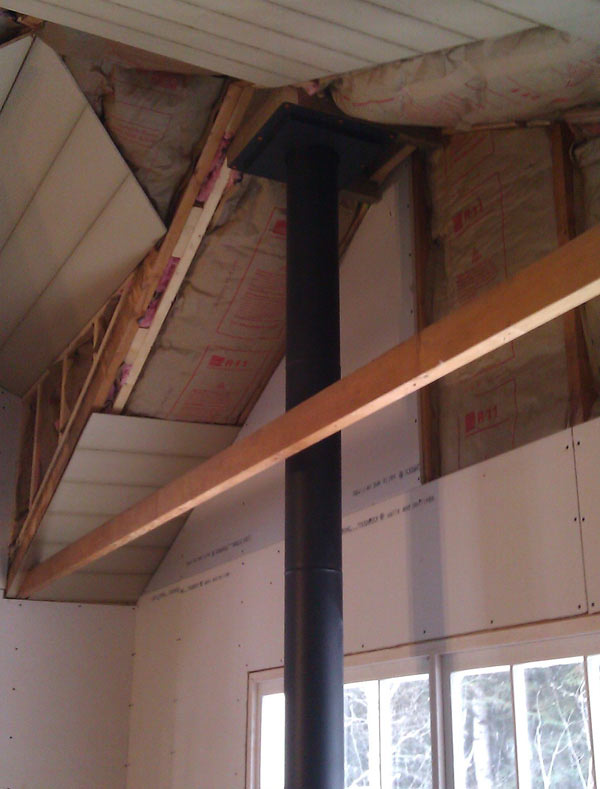
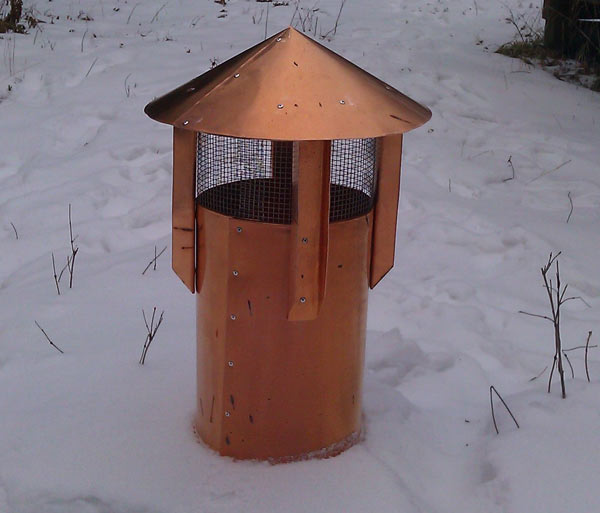
I also built a copper chimney cap with flashing and screen for the outside . It just slips over the stainless steel insulated pipe.
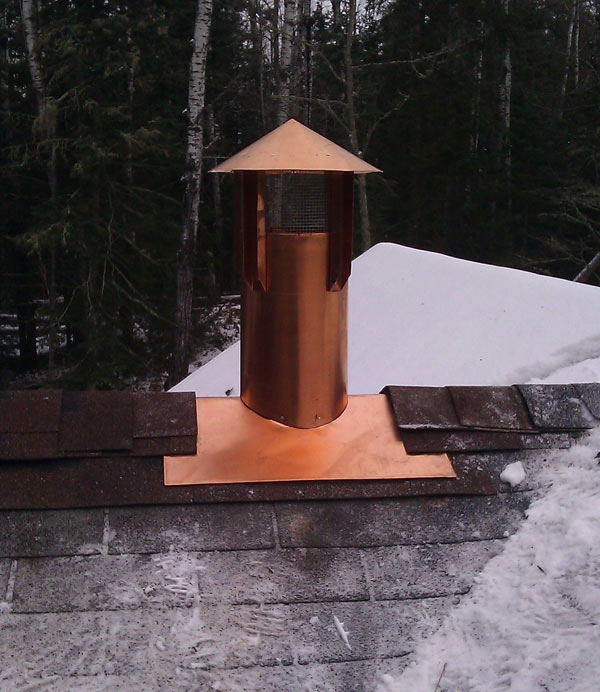
Here is a little better shot showing the details and construction of the chimney cap.
And finally a shot of it burning. The glass windows really make it nice since we can see the fire. You can also the custom copper heat shield that I made to reflect some of the heat and protect the window and trim from getting to hot.
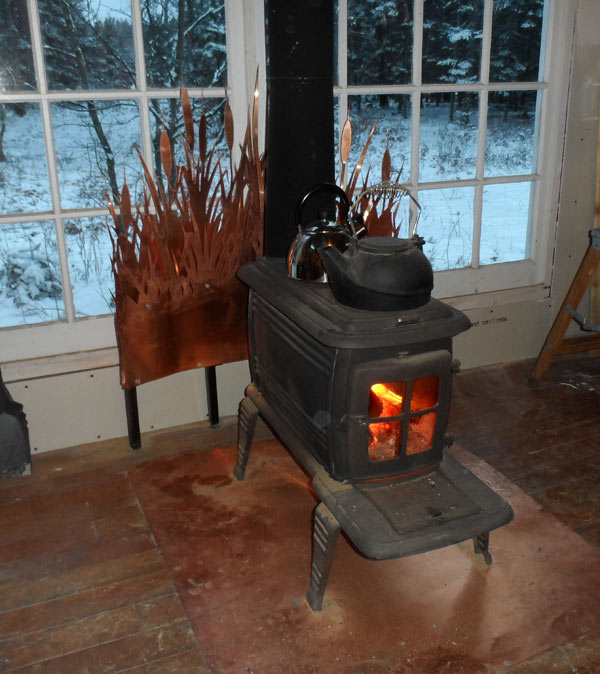
It is not the most efficient stove in the world, but it keeps us plenty warm and we have plenty of firewood on our property. It will do an even better job once we have the cabin fully sealed up and some storm windows made.
|
|
martym
Member
|
# Posted: 4 Feb 2013 16:34
Reply
Quoting: esther fairy-mother Hi there,
esther
If you look back a few postings in this thread you will find a link to where I found 4 inch / 100 mil black pipe. Harper hardware. They had every thing I needed.
I've had my Hobbit for about a year now, very pleased with it, well worth the money.
|
|
martym
Member
|
# Posted: 4 Feb 2013 16:36
Reply
Nice copper work! Really looks great.
|
|
chillisauce
Member
|
# Posted: 16 Oct 2013 10:21
Reply
I know this is an old tread but it's still topical and very useful as the winter arrives and my shed is getting colder.
Did anyone else use oversized stove pipe as a heat shield, and insulate the gap between big and little pipes? I read fire rope works but would filling the gap with sand also work?
How woud you go about connecting the bigger pipe to the little pipe? Just fire cement? Big jubilee clips? More fire rope?
Any thoughs appreciated. I hope to get it through the roof at the weekend.
Thanks, Dave
|
|
|
Truecabin
Member
|
# Posted: 16 Oct 2013 12:09 - Edited by: Truecabin
Reply
Quoting: chillisauce Did anyone else use oversized stove pipe as a heat shield, and insulate the gap between big and little pipes?
dont put insulation in the gap
you want the air to flow in this gap between the pipe and its heat shield this air comes from inside the room and is heated and stays in the room
the heat shield blocks the radiation from hitting the wall it heats the room air instead of over heating the wall
|
|
Dillio187
Member
|
# Posted: 16 Oct 2013 12:30
Reply
to run the pipe through the roof, buy the shiny class A pipe designed for this, do not try to make your own.
|
|
neb
Member
|
# Posted: 1 Dec 2013 23:32
Reply
Cabinbuilder
Just a question for you. How far away is your stove from the wall? I see you have two fire walls out of sheet metal and block around the stove itself. Does that help some also for a fire wall?
|
|
CabinBuilder
Admin
|
# Posted: 2 Dec 2013 13:45
Reply
I have about a foot of clearance on each side, so I had to use the heat shield.
Two sheets of shield seem to be an overkill since the wall behind them is always quite cold, but I am considering extending the shield up to the ceiling - the wall ebove the shield gets quite warm at times.
|
|
neb
Member
|
# Posted: 2 Dec 2013 17:31
Reply
CabinBuilder/ Do you think the block cement fire wall you have constructed has been a help to keep heat isolated and do you think it helps your walls from access heat?
|
|
CabinBuilder
Admin
|
# Posted: 3 Dec 2013 10:36
Reply
I think so. Also, the cement blocks allow to retain heat for longer.
|
|
neb
Member
|
# Posted: 3 Dec 2013 12:06
Reply
Thanks Boss!
|
|
scamper
Member
|
# Posted: 15 Dec 2013 02:13 - Edited by: scamper
Reply
I've been researching wood stove installation in small spaces and came across this thread. The folks here seem to be knowledgeable so I thought I'd seek some insight.
I'm looking to install a small wood stove in the 19ft travel camper where I live in Nova Scotia. A friend has given me this stove...
http://halifax.kijiji.ca/c-buy-and-sell-other-Lil-Cooker-Wood-Stove-W0QQAdIdZ50770979 1
and I thought I'd see what the community thought about it before I went a head and installed it and what sort of tips for installation might be shared.
Thanks!
|
|
johnism
Member
|
# Posted: 16 Feb 2014 13:09
Reply
Quoting: PDK73 I just built my own small stove. Mainly out of 1/4 inch plate, with a four inch stack
PDK73 any chance you can post some pecs and what you may change about your stove?
This look like what I am looking to build except with and air tight door and a second combustion at the top below the top plate .
Thanks, John
|
|
KinAlberta
Member
|
# Posted: 5 Jun 2014 20:58 - Edited by: KinAlberta
Reply
Space shuttle tiles!!!
I wish I could just buy space shuttle tiles and stick them right on the wall and put the stove right against them with zero clearance! 
Some random comments/thoughts on attaining as near zero clearance as possible to a wood interior wall (clad both sides with very dry, very old knotty pine boards):
I'm looking into all this because our cabin has old unrated stoves in it. I believe the code says 48" from wall and half or 2/3rd less if a heat shield is used. Even that seems excessive for our old wood cooker/oven so I'm thinking I could somehow make a double or triple or more layer heat shield with wall protection to safely bring the distance down to about 6" - 8" from the stud wall (once the knotty pine boards on the stove side are removed).
One thing I've read is that the backer board, cement board will heat up and simply transfer the heat through to the wall so it too should be spaced out from the wall. Also any spacers must be around the perimeter and not close to the heat source and not go though any more than two attached layers together or they defeat the purpose of multiple layers - they need to be staggered. This makes sense. You don't want the heat to simply go along a connecting bolt and into a wood stud.
So moving from the wall towards the stove:
Maybe aluminum wrap inside the cavity and covering the studs or galvanized tin cladding spaced out 1/4" lining the stud cavity and protecting the studs. (Maybe heat proof paint on the studs and inside the cavity.)
Maybe rock wool in front any cavity lining. But, but, but... that could trap heat so maybe the 4" deep wall cavities are best left empty for improved air circulation. Need openings of a couple inches top and bottom for convection air to enter and leave.
Maybe two layers of cement board with only an 1" spacing between them but then several more tight 1" spacing layers of metal shielding going outwards towards the stove.
Maybe a layer or two of extruded steel mesh to allow further dissipation of heat then add the solid metal layers just before the stove.
Layers closest to the stove: I've learned that copper and aluminum convect heat away the best so a layer closest to the stove could be made of one of those, then maybe a steel layer further from the firebox.
So in the end from stove towards wall:
Laer of Aluminum sheet
1" space
Layers of extruded steel tight together (2 sheets)
1" space
Layer of steel sheet
1" space
Layer of steel sheet
1" space
Cement backer board
1" space
Layer of cement baker board again
1/4" space
Layer of tin on studs
4" space in cavity
Since moving air is all important I would lift the stove a couple inches to allow air to be drawn in under the front and then flow up the sides and back. Maybe use square aluminum tubing (aluminum fence pickets or something) as a spacer under the stove's platform layer. Could also drill a couple holes in the base of the opposing bedroom wall as an air source from the very back of the stove.
Any thoughts?
Also, this is a good and interesting how to video:
Obadiah's: Installing A Cookstove Safely In Tight Quarters
https://www.youtube.com/watch?v=2DBUdaPmN4Q
|
|
KinAlberta
Member
|
# Posted: 14 Jul 2014 10:18 - Edited by: KinAlberta
Reply
Take a look at this picture and the wood on the wall behind the stove...

...for ominous looking damage to the wall surface.
|
|
Smawgunner
Member
|
# Posted: 14 Jul 2014 14:37
Reply
Wow! The kicker is the bent pipe.
|
|
toyota_mdt_tech
Member
|
# Posted: 14 Jul 2014 21:25
Reply
OK, looks like I haven't posted my wood-stove set up in this thread.
|
|
KinAlberta
Member
|
# Posted: 18 Jul 2014 20:51
Reply
Very nice
|
|
Woodeye
Member
|
# Posted: 19 Jul 2014 17:37
Reply
To clean the inside of the window in your stove spray lightly with winter windshield washer solution. Then wet folded paper towel with the same, lightly dip in the fine white ash in your stove, lightly smear in a circular motion and wipe off with clean paper towel. You are going to be impressed with how easy and well this works.
|
|
Turbogeno
Member
|
# Posted: 22 Jul 2014 08:20
Reply
Here's my take on a wood stove install. Well, one where there's no official inspection or permits required. The stove is a military surplus tent heater, the cement board is spaced 5/8" off the wall and covered with roof slate.The thimble and 4" double wall pipe are from Duravent. I insulated the thimble with 2, 1.5" layers of ceramic wool. My 1st attempt used single wall pipe throughout with an insulated through wall connection. The outdoor section cooled off so fast I had poor draft while I was getting everything hot and there was lots of condensation in the outdoor section. Unacceptable and potentially dangerous. I haven't tried the new setup in the winter yet but I'm confident it will perform better.
Thanks, Geno
pipe1.jpg
| 
pipe2.jpg
| 
stove1.jpg
| 
thimble.jpg
|
|
|
moregon
Member
|
# Posted: 18 Oct 2014 16:32
Reply
I too am thinking about the Hobbit Stove. I have to check the EPA status first as cabin is in Oregon. It mentions DEFRA approved, is that the same as our EPA? Anyone know??
~Monique
|
|
beachman
Member
|
# Posted: 18 Oct 2014 17:43
Reply
Check out the specs on the Pacific Energy Vista stoves. We have one and one of the main reasons was close placement to a combustible wall without worry. It has worked great for us for a couple of years. Pricy but highly recommended. No catalytic converter but a second burn chamber - very efficient.
|
|
NhLiving
Member
|
# Posted: 10 Nov 2014 00:12
Reply
Just purchased an older Sun 50 Wood/Coal stove for 120 bucks in great condition. I am more than excited to upgrade from the old propane heater i have been using for the past few winters. I just read all 6 pages of this thread and couldn't help but sign up to this forum.. I got some great ideas as well.
I'm sure this little stove will heat my 12x16 cabin with ease... the sad things is the cost of the through wall kit and chimney pipe needed.
I hope to repaint the stove with some fresh paint, can anyone recommend a certain brand of high heat paint that wont off gas and fry my brain cells over time.
|
|
Just
Member
|
# Posted: 10 Nov 2014 08:41
Reply
It's called " stove black " do not use any kind of paint . Any hardware store $5 .
|
|
NhLiving
Member
|
# Posted: 10 Nov 2014 19:58
Reply
Great, thanks!
|
|
bill mitchell
Member
|
# Posted: 20 Nov 2014 02:48 - Edited by: bill mitchell
Reply
I am sorry that I did not get the name of the stove, but I recently saw a smallish stove that you could stand or hang directly on the wall. It was in a stove shop near the line between Wiscasset and Woolwich, Maine. You can probably google wood stove shops in the area. I did not choose it as it is quite a modern design. I will try to find the name and post it for you. I since looked this up. It was at Maine Coast Stove and Chimney company in Wiscasset Maine.
|
|
| << . 1 . 2 . 3 . 4 . 5 . 6 . 7 . >> |
