|
| Author |
Message |
rmckenzie
Member
|
# Posted: 5 Apr 2023 21:10 - Edited by: rmckenzie
Reply
Hi all,
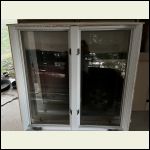
I got a good deal on four big, recycled casement windows for my 12x16. Three that are 5x5 and one that is 2.5x5. I'm excited about them, but there's just one issue: I'm not sure how to put them in.
I've never done it before, but I think get the general idea of framing out and installing a window. Frame the opening a little bit wide, install the window centered in the gap with shims around each side, screw through the sides of the window frame into the trimmers, and then install trim to cover up the gap both on the inside and the outside of the window. First question: is this at least roughly the right idea? Any good resources on this would be much appreciated.
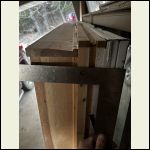
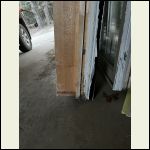
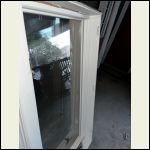
The second question is for these particular windows in particular. I'm not sure which pieces should actually go where? I'll attach pictures below, but the setup of the window is that there is a two inch section in which the window actually rests - maybe this would be the sash? From the weather stripping and the remnants of what I assume was a nailing flange, this seems to me like the part that previously would've been outside. Next, there is another 2" section the same size as the first section that is a wooden box. This has grooves running up the sides, and the crank for the window is located on the edge of this section, facing out. Finally, there is another box, 4" in width, that is slightly smaller than the overall window. I'm not sure what is going on with this part. It seems like it could just be pulled off, and it's slightly more damaged than the rest of the window, so it seems like the way to go? Especially because I am planning on using 2x4 walls, so the whole thing is way too wide for what I'm currently planning.
Apologies in advance, I know these are basic question, but I feel like most of the resources I can find are about new window installation, and it's hard to find something that explains what to do in this particular case. Any help is, as always, very very appreciated!
Window side view top
| 
Window side view bottom
| 
Window front (inside) view
| 
Window inner view to layers on side
|
|
|
gcrank1
Member
|
# Posted: 5 Apr 2023 22:38
Reply
Having done casements, one a couple of times over the past 35yrs......
They are Heavy! That means double plating the bottom support/rough sill, properly supporting that with the cripple studs beneath and doubling the side studs/trimmer studs.
Look online for examples of 'studding for window install' and/or get a basic construction book at any building center.
Casement downsides.
They are Heavy.
And when the windows are cranked out there is a LOT of load on the window framing and hinges. One early sign of failure is when the seal breaks on the themopane windows and fogging developes inside between the glass.
Open each one and check the seal around the perimeter, look for wood rot/looseness, etc. ANYthing that isnt good or better means it may be folly to install.
Btdt, my so called 'good' used one lasted only 10yrs and the 'end' came far too soon at great expense.
Fwiw, we really like the good 'exposure' of that size window and the uninterrupted visuals. No more casements, we went to 'sliders'. Same things to like and the windows are fully supported beneath with no 'hang-out weight'.
|
|
DmAK12
Member
|
# Posted: 6 Apr 2023 08:25
Reply
Flash the framed opening before install with a waterproof membrane. Also I used the spray foam cans for the window gaps, holds the windows in much better than the flanges and provides less air leakage.
|
|
Brettny
Member
|
# Posted: 6 Apr 2023 10:48
Reply
To awnser your thickness question.. it looks like those windows still have a jam extension on them. That's the white/interior part. The actual window looks to be about only 4in thick. How you flash really depends on the siding not the trim. Try to remember that things like cawlk are not ment to be a primary water sealer.
Also make sure every one of the crank parts of the window operate properly before you put them in. I have seen alot of broken casement windows mechanical pieces.
|
|
rmckenzie
Member
|
# Posted: 6 Apr 2023 18:58
Reply
Hi everyone!! Thanks for all of the feedback - this will be very helpful once I starting putting everything together.
Quoting: Brettny To awnser your thickness question.. it looks like those windows still have a jam extension on them. That's the white/interior part. The actual window looks to be about only 4in thick.
This is kind of what I was thinking. So it would be alright to tear those off, and then I would be able to set the windows in my 2x4 walls? With a little hanging on the outside, where I would install flashing and trim? I’m planning on using 3/8†T1-11 over 7/16†OSB sheathing - any flashing advice for this setup?
|
|
Brettny
Member
|
# Posted: 7 Apr 2023 09:58
Reply
Quoting: rmckenzie I’m planning on using 3/8†T1-11 over 7/16†OSB sheathing - any flashing advice for this setup
No sorry I dont have any good way to flash that window design with T1-11. The groves in the siding make it hard to properly seal the top. I'm useing windows with a nailing flange to help overcome this.
|
|
Aklogcabin
Member
|
# Posted: 7 Apr 2023 10:50
Reply
Butyl tape makes a good window sealer. Even pieces for the corners pre made. You should not have any problems. I also do not think that any extra framing materials need to be used beyond the standard installation. Those are not that large of a window. Tilt the sill a bit to outside. Flash tape, I install a silicone or butyl caulk around the edges before installing. On T1 just fill the viod no problem.
Hey good score. I'd expect a lot more life from them while you enjoy your views. Good luck n have fun
|
|
offgrididaho
Member
|
# Posted: 7 Apr 2023 13:22
Reply
If you're anywhere remotely wet take the extra step to put metal flashing over the top of each window (inside the trim and inside the vapor barrier) like this:
-- Bass
|
|
|
gcrank1
Member
|
# Posted: 7 Apr 2023 14:45
Reply
The idea is to provide multiple layers of overlapping 'shingled' water shedding surfaces so if the top one leaks the one under sheds it. This has to not only be done on top but down the sides and well over to the side. Water has a funny habit of running to any gap you leave! And a tiny hole/gap will channel that water exactly where you dont want it.....btdt 
|
|
Brettny
Member
|
# Posted: 7 Apr 2023 15:50
Reply
Multiple layers overlapping the top works great how ever with T1-11 siding you still have a big grove every 4-8in. Cawlk will eventually dry and crack and wood moves.
Maybe you could saw cut a grove and slip the metal flashing into it lessening the gap. I have acess to a siding brake and really cant come up with a rock solid way.
Big overhangs help.
|
|
gcrank1
Member
|
# Posted: 7 Apr 2023 17:10
Reply
Think Id use a 'cap piece' like in that link by OGI above or an oversize? Z flashing topside of the window, on the sheathing, weathershield overlap, and finish with the T-111. No need to caulk the gaps, water would run off.
|
|
Fanman
Member
|
# Posted: 7 Apr 2023 19:12
Reply
If you can identify the manufacturer, go to their website and download the install instructions. I just installed an Andersen awning window and will soon be installing a slider and a casement; their instructions are very complete and detailed.
|
|
Brettny
Member
|
# Posted: 9 Apr 2023 20:24
Reply
A window deisgn even if it's not a casement should be the same of almost any manufacturer. Care to share what yours said? Or even a link on how to find it.
|
|
|

