|
| Author |
Message |
saskboy
Member
|
# Posted: 11 Feb 2015 21:40
Reply
Im about to put up tongue and groove pine in my little cabin. My question is how did everyone deal with the butt joints? Im using 12 foot lengths and my interior width is 19 feet so ill have a few butt joints on the wall to say the least. Did you just cut the ends on a 45 degree angle and overlap them? Im pre finishing all boards before install but should I finish the 45 degree cuts too? Will be painfully slow to finish the joint cut as I put them up. What did everyone else do?
|
|
Don_P
Member
|
# Posted: 11 Feb 2015 22:38
Reply
I route a 45 degree chamfer on the cut end the same size as the V groove ~1/4". We keep a container with lid and small brush near the cut bench and hit the ends of each cut. And yes finish all sides and get the tongue, it can become visible if things shrink. If you can get it stacked with stickers in the cabin and crank the heat for awhile before installing it'll stay tighter.
|
|
toofewweekends
Member
|
# Posted: 12 Feb 2015 01:04
Reply
Butt joints, offset from each other so the wall doesn't have a line of joints. Mine still looks cabin-grade good after 3-4 years.
|
|
OwenChristensen
Member
|
# Posted: 12 Feb 2015 10:11 - Edited by: OwenChristensen
Reply
Don has the best way, but it takes a lot of extra time. Most of my builds are spans 16' or less, so no joints are an option. Sometimes, on longer spans, I will have a cover strip to allow all the joints to be together, say at the edge of a loft. I think I might have a picture of simple staggered butt joints. I'll post it if I can find.
Note; if the wood going up is dry enough, your joints should stay tight. Tight staggered joints are hard to see.
|
|
Wilbour
Member
|
# Posted: 12 Feb 2015 10:33
Reply
I went for the cabin look and just used a butt joint. I did recut them as the factory cuts were unreliable. I staggered them where nessary or placed them behind a couch or bookcase. It wasn't much of an issue on the upper half since the windows broke up the wall.
|
|
Malamute
Member
|
# Posted: 12 Feb 2015 12:42 - Edited by: Malamute
Reply
I've also done plain butt joints. I stagger them two studs or rafters apart and make a pattern of the order. One you get the pattern set, you can cut them as you go off the chart you make.
Factory cuts should be cleaned up. Cut slowly, if you havent done much of this. I've watched people use a miter saw that looked like they were trying to hack through it as fast as possible and end up making rough cuts. Doesnt have to be real slow, just not hacking through as fast as possible.
Keeping some finish and brush at hand sounds like a good plan. I usually leave mine natural, I like the way it ages over time, and there isnt all the chemical residue airborn in the place. I know it eventualy stops emitting, I dont like working or living in it if I have a choice though.
I think I use a 15 deg angle (off 90 deg) if I dont make them square (90 deg) cuts. Been a couple years since I've done any.
|
|
Don_P
Member
|
# Posted: 12 Feb 2015 16:47
Reply
Actually once I have the router plugged in at the bench it adds a few seconds to route the end. The best I suppose would be to have T&G bits set up with a router jig and end match the wood like flooring.
Although I prefer the look of some of the cross eyed finishes we've put on quite a bit of water based poly that destinks pretty quick. A finish makes the wood cleanable, when raw wood gets grungy it can really only be sanded clean at that point.
|
|
saskboy
Member
|
# Posted: 12 Feb 2015 19:26
Reply
Is it best to use a router or just flip it and use the miter saw? I dont have router....
|
|
|
saskboy
Member
|
# Posted: 12 Feb 2015 19:27
Reply
I talked to another guy and he did like you did also Don, learned alot from talking to him.
|
|
Don_P
Member
|
# Posted: 12 Feb 2015 21:39
Reply
You could make the same profile by cutting square then laying the saw over to 45 and nipping ~1/4" off the edge... doing that reliably and the number of saw changes and board turn arounds, I'd go with one of the other methods.
Although I use the same bit or a roundover to ease the edges of trim and with square bits I often make dados and grooves for things like cabinets and built ins, with a pattern bit I've used it to build stairs and cut recesses for timbers, a useful tool.
|
|
saskboy
Member
|
# Posted: 13 Feb 2015 07:49
Reply
Ya dad used to have a router and sold it at a garage sale years ago, funny I need one like 20 years later only. I think Ill buy one this weekend. What size nails did you use in your nailer?
|
|
Dillio187
Member
|
# Posted: 13 Feb 2015 10:37
Reply
Don, do you have any pictures of your method? I'm having a hard time picturing it in my head.
|
|
Don_P
Member
|
# Posted: 13 Feb 2015 10:40
Reply
I usually use 1-3/4" 16ga trim nails, often shooting twice per bearing at slightly different angles. If you can back up onto the tongue a little bit with the nail, then if the wood shrinks and exposes a little of the tongue it won't also be exposing shiners.
|
|
Don_P
Member
|
# Posted: 13 Feb 2015 12:26 - Edited by: Don_P
Reply
Quoting: Dillio187 Don, do you have any pictures of your method? I'm having a hard time picturing it in my head.
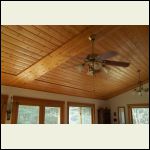
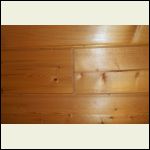
These are my ceilings. The first is a 36' long room, I didn't want butt joints and wanted to break up the long runs somehow so did a "picture frame". The second shot is upstairs, this was installed at ~12% where the greatroom was at about 8%, so the joints are more open in the second shot, there is the approximate difference in taking the time to really acclimate the wood to the driest in service conditions. The nails shot right into the edge of the tongues became readily visible and pull your eye to them. The way I route the end joint is what I'm really trying to show. These are both SPF T&G with Waterlox satin, a high VOC wiping finish.
The reason you see an erratic nail pattern, the T&G is applied to a layer of osb that is screwed through 2 layers of foam to the underside of the rafters, there is fiberglass in the rafter bays. One of the weaknesses of T&G is a whole lot of air moves through it. This not only sealed it well it gives good nailing anywhere. The T&G can be applied in any number of patterns or you could get really fancy and do intarsia  . .
ceiling_006.jpg
| 
ceiling_009.jpg
| 
ceiling_013.jpg
| 
ceiling_015.jpg
|
|
|
Don_P
Member
|
# Posted: 13 Feb 2015 13:17
Reply
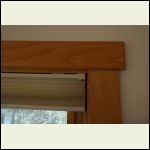
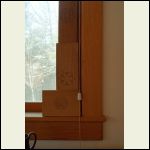
The last 2 shots above are of window trim done with the same router bit, a 45 degree chamfer with a bearing on the bottom. The oaks came from the property. There are some chip carved rosettes in the corner of the last pic. If you look at old house trim it often had rosette corner blocks. If you have evenings to fill they could be carved. The pic with this post is the ceiling fixture on our bedroom ceiling, eastern white pine with Watco danish oil, a flatter finish, still fairly high VOC. The mounting block for the light has a little chip carving on it.
|
|
OwenChristensen
Member
|
# Posted: 13 Feb 2015 21:41
Reply
One big plus for the way Don is suggesting, is that suppliers normally want to sell you random lengths. I'm having more and more trouble getting , say all 16' or all 12'.
Owen
|
|
soundandfurycabin
Member
|
# Posted: 15 Feb 2015 04:03
Reply
If you do all the end cuts at 45 degrees it makes those shrinkage gaps nearly invisible, and then no saw changes are needed to cut the chamfers although you do have to eyeball them very carefully. The board thats going to be at the back of the joint just gets a 45 cut. The one at the front gets a 45 plus a chamfer.
|
|
OwenChristensen
Member
|
# Posted: 15 Feb 2015 09:12
Reply
Don will have to respond to know for sure, but I think he means to just continue the V of the side of the board to the end. Not 45 deg. of the whole board thickness.
|
|
soundandfurycabin
Member
|
# Posted: 15 Feb 2015 17:05
Reply
Yeah, I think so too, but then if a gap opens up it's much more visible. I attached a drawing to show what I mean about the cuts.
|
|
MtnDon
Member
|
# Posted: 15 Feb 2015 17:21
Reply
Boards shrink much less in the longitudinal direction, even from green state to dry. If you are staring out with wood that is even close to dry you should not notice any end gap shrinkage. Across the grain shrinkage is much more pronounced.
Linky of interest
|
|
soundandfurycabin
Member
|
# Posted: 15 Feb 2015 17:48
Reply
No doubt boards shrink by a much smaller percentage in the long direction, but gaps can also result from slight inaccuracies in the cut (saw fence out of square, etc.) or settling of the house as the framing lumber dries and shrinks or the foundation settles. You can see that there is a tiny gap in Don P's second photo above. It might not be noticeable up in the ceiling, but I wouldn't want to see it in the wall at eye-level.
|
|
MtnDon
Member
|
# Posted: 15 Feb 2015 18:16
Reply
I guess my standards are lower. If I had that example on my wall I would not notice or if I did it would not bother me. But that is just me.
|
|
soundandfurycabin
Member
|
# Posted: 15 Feb 2015 19:12
Reply
Remember that Don has osb behind his ceiling. You might less pleased with a line of pink insulation showing in a prominent location. The older house I'm in now has several significant drywall cracks and gaps in the baseboard caused by settling. Fortunately the worst one, at 1/4" wide, is in the laundry room.
|
|
Don_P
Member
|
# Posted: 16 Feb 2015 00:42
Reply
I like the chamfered scarf idea and it would be possible with a chop saw. My neighbor would just cut a 45 scarf without the chamfer on T&G.
Actually in pine, more and more I'm getting juvenile reaction wood that does shrink lengthwise. Hopefully the foresters are wising up and we'll be the only generation to have to deal with that. But meanwhile the same thing works for it, get the wood inside and acclimated to dry conditions if possible.
|
|
neckless
Member
|
# Posted: 25 Mar 2015 22:25
Reply
have done a few of these jobs and made all the mistakes...lol if u run a file over the square cut once or twice the joint seemingly disapers... and thats the truth....
|
|
|

