| . 1 . 2 . >> |
| Author |
Message |
rpe
Member
|
# Posted: 11 Sep 2020 17:07
Reply
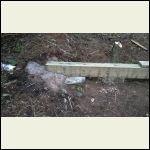
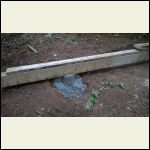
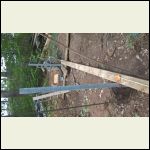
I'm building a workshop/storage shed combo at our property in northern Ontario. I thought I'd post up a few pictures. This set of four show the layout of the 8 support piers, two rows of four, 13' apart.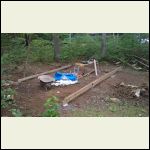
Layout
| 
Bedrock
| 
Sonotube
| 
ScrewPile
|
|
|
rpe
Member
|
# Posted: 11 Sep 2020 17:11 - Edited by: rpe
Reply
In the layout image, the back row of piers are: 1.) surface bedrock, 2.) 30" depth to bedrock, 3.) 60" depth to bedrock, 4.) Boulders at 60" depth, no bedrock found.
The front row of piers are: 5.) 30" depth to bedrock, 6.) 72" no bedrock found, 7.) 72" no bedrock found, 8.) 60" boulders.
The sonotube piers were pinned via several pieces of rebar drilled and pounded into the rock at least 3" each. All excavation was backfilled with gravel rather than native soil which is hard grey clay for most of the depth.
|
|
rpe
Member
|
# Posted: 11 Sep 2020 17:15 - Edited by: rpe
Reply
This is a picture of the screw piles that I used for some of the piers. The are just over 5 ft in length, and I used extensions to get above ground level. The pipes are 2-3/8" OD, 2" ID, hot dip galvanized, and the helix is 8" diameter. The ground was not suitable for actually screwing them in, but I set the bottoms in concrete below the frost line, and back-filled with gravel.
Picture 4 in the first post shows the extension pipes sticking up out of the holes as I was laying out the post locations.
|
|
rpe
Member
|
# Posted: 11 Sep 2020 17:17 - Edited by: rpe
Reply
Here's where it sits now, with the floor framing complete, sitting on quadruple 2x8 pressure treated beams. On recommendation of some locals, I stuck a couple pieces of asphalt shingle between the pressure treated beam and each support. Rumour has it that extends beam life considerably.
Floor joists are rough-cut 2x8, so actual 2"x8". I had ordered a few extras, so I sistered the outer joists, and every third one throughout. Two rows of blocking were nailed in place as well. Joists were installed on 16" centers, but given all the sistering I did, I suppose 12" centers would have made more sense? Decking to go on is rough-cut 1x10.
|
|
Brettny
Member
|
# Posted: 12 Sep 2020 07:54
Reply
What was your plan for screwing the screw piles in?
|
|
rpe
Member
|
# Posted: 12 Sep 2020 09:36
Reply
The supplier of the screw piles loaned me a high-ratio gearbox powered by a mud mixing drill. Four foot handles supported by two willing helpers are supposed to steady unit, and resist the driving torque. I did give it a try briefly, but the gearbox was damaged from the previous job, so we ended up back to basics - shovel, breaker bar, and big shop vacuum. Based on the size of the hydraulic drive motors I saw mounted to their excavator equipment, I did have my doubts if this hand-held rig would work anyways, particularly in my soil.
I'm happy with how it all turned out, but will hold final endorsement until after a winter or two. Comparing my concrete/screw pile pier with the BigFoot and sonotube, or equivalent, there is far less concrete, and no rebar used. Also far less excavation required. Cost-wise, the screw piles were $80 each, and $20 for saddle to suit 6x6 beam. That, combined with say two bags of concrete mix ends up being $110 per pier. A BigFoot, and sonotube for that same 6-ft pier would be similar in material cost, with much more digging and mixing required.
One other benefit of these screw piles was the ease of trimming with a sawzall and metal cutting blade. I used a laser level to shoot a beam around the work-site, marked the posts, and cut them all to matching height.
|
|
Brettny
Member
|
# Posted: 12 Sep 2020 09:50
Reply
Humm now you got me thinking. I have a hydraulic gear box attachment for my mini ex. Do local lumber yards have these things?
|
|
Brettny
Member
|
# Posted: 12 Sep 2020 09:59
Reply
I did some quick numbers. 12inx48in sono tube with post base will cost me $45.
|
|
|
rpe
Member
|
# Posted: 12 Sep 2020 10:53
Reply
4' x 10" sonotube: $8
Bigfoot: $29
Concrete: 8 bags @ $5.50
Rebar: 10ft $12
Totals $81 here in Ontario before taxes. Everything around here seems to be going up in price daily since Covid.
If I had a mini-ex accessible property, I'd probably just go with the Bigfoot (or preferably the 'Foottube'). However, given the week it took me to dig my smaller diameter pier holes by hand, I wouldn't want to have to repeat that with hole sizes to suit the BigFoot.
If you're in Ontario, here's the link to the guys I bought from. Even though their business is primarily installing the screw piles, they were quite willing to help out a 'diy-er' with advice, even to the point of loaning out tools no charge.
|
|
rpe
Member
|
# Posted: 12 Sep 2020 11:01
Reply
Based on the pier work I did on my cottage a couple years back, I think multiple full-height rebar is important even with the BigFoot. The BigFoot itself should hold the pier down to prevent heaving upwards, but differential freezing could put huge side-loads on the sonotube portion of the pier. When I re-did the piers on my cottage several of the existing sonotube piers were cracked right through just below ground level. The rebar was holding the pieces in alignment so it would still carry the load come spring time. These could have easily collapsed completely without the rebar in place. Also, without rebar, the frost loading could easily snap that bigfoot section right off the rest of the pier, and then you're back to frost jacking again...
Here's a video of another BigFoot style product with integral rebar.
|
|
rpe
Member
|
# Posted: 23 Sep 2020 07:50
Reply
Framing nearly complete. Steel for roof doesn't arrive until later next week, so I'll be setting up tarps to try to keep it dry in the meantime.
Right side is storage for ATV, snowmobiles and other randoms. Shelving will be on the inside of the front wall all the way to the ceiling.
Left side will be a 10x14 workshop, insulated walls and ceiling.
|
|
rpe
Member
|
# Posted: 7 Oct 2020 10:00
Reply
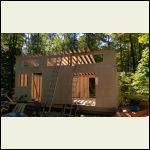
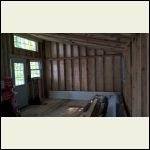
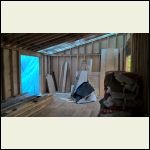
Here's a couple other pics of the structure. The back wall was built in two pieces, and the front in three pieces, with overlapping top plates to lock it all together. I didn't have the manpower to lift either wall in one section.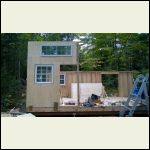
WP_20200919_18_58_55.jpg
| 
WP_20200922_12_58_20.jpg
| 
WP_20200927_14_27_28.jpg
| 
WP_20200927_14_27_45.jpg
|
|
|
rpe
Member
|
# Posted: 7 Oct 2020 10:04 - Edited by: rpe
Reply
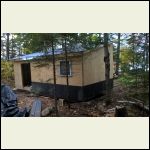
Roofing steel is on now. A layer of Tyvek was put underneath to reduce condensation on underside of steel. Vented soffits top and bottom are planned as well. LP SmartSide panels were used to create a more water/splash-resistant lower wall surface, and hang past the bottom of the floor joists an inch. Batten strips will cover the nail holes and seams of the plywood above, and all will be stained in near future.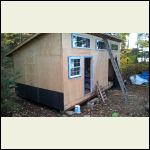
WP_20201006_18_30_58.jpg
| 
WP_20201006_18_31_31.jpg
|  |  |
|
|
rpe
Member
|
# Posted: 6 Nov 2020 10:58 - Edited by: rpe
Reply
Front porch is on, supported by posts sitting on three more piers. Digging these last three pier holes was easier as the ground was very wet, softening the clay layer. Got down to bedrock on two, and down about 5 ft on the third. We set the lighter duty Pylex screw piles in concrete, and backfilled with peastone for drainage. The posts will be replaced with cedar fence posts to match the look of the woodshed we built in spring.
|
|
rpe
Member
|
# Posted: 6 Nov 2020 11:02
Reply
Porch Roof
|
|
Aklogcabin
Member
|
# Posted: 7 Nov 2020 10:28
Reply
Nice cabin n nice stories
|
|
WILL1E
Moderator
|
# Posted: 3 Feb 2021 08:46
Reply
rpe Thanks for linking me to your build! Looks awesome so far!! What are you wall heights...8' and 10'? Did you insulate your floor?
|
|
Alaskajohn
Member
|
# Posted: 3 Feb 2021 10:14
Reply
I loved going through these pictures and your narratives. I have not heard about putting asphalt shingles down between the wood and the supports. Interesting!
|
|
rpe
Member
|
# Posted: 3 Feb 2021 10:42
Reply
Quoting: WILL1E rpe Thanks for linking me to your build! Looks awesome so far!! What are you wall heights...8' and 10'? Did you insulate your floor?
Willie: No floor insulation. That's well beyond the scope of this build. We weren't even sure about insulation at all until my kids got talking about having a 'guys hang-out', particularly in winter-time. They lobbied for insulation and wood stove, so they can leave all their wet riding gear in there to dry, and also hang out shooting darts, playing cards, or whatever. Some cots or hammocks would allow overflow sleeping as well, although perhaps not up to the standards of the fairer sex. Wall heights are about 7' and 10'. Drive-through sliding doors on the right side allow ATV or snow machines to be stored/serviced inside. We used rough 1x10 lumber for the floor sheeting, as any water that might drip off the machines needs to find its way out. We didn't want it puddling on plywood flooring.
|
|
rpe
Member
|
# Posted: 5 Feb 2021 20:23
Reply
Piers and beam supplies - $900
Framing lumber and pine for batten strips - $2360
Barging - $265 (no road access...)
3/8 "Plywood - $675
Doors and windows (used) - $180
Steel Roofing and trim - $880 including porch
Insulation (kijiji deals) - $325
Vapour barrier, wire, electrical boxes, etc - $200
Stain - $80
Tracks and rollers for barn doors - $210
Misc hardware - $40
Under 6k so far. Using rough-cut lumber from a local mill for framing and flooring saved a huge amount, as did scrounging for surplus/used supplies when practical.
It's far from 'done' but getting much closer now. Interior wall and ceiling finishing remain, as well as the deck across the front.
|
|
rpe
Member
|
# Posted: 7 Feb 2021 13:14
Reply
Working on insulating the sloped roof/ceiling now. R22 batts are being cut down to fit, with the off-cuts used at either end. It's a slower process for sure, given the 12" centers, and roughly 2" width lumber. I've been cutting the batts to 10-1/2" width, and the pop in nicely and stay put without issue. Given the batts are 5-1/5" thick, and the rafters are a full 8", there's lots of venting space. The steel is also up on 1" purlins, to there's actually 3-1/2" gap from steel to insulation. Hopefully we can finish insulation and vapour barrier next weekend.
|
|
rpe
Member
|
# Posted: 7 Feb 2021 13:54
Reply
One interesting thing I noticed is that the frost has pushed the ground upwards significantly, to the point of contacting the beam in a couple spots. Across the front it doesn't appear to have lifted the beam, but at the back the one pier (labelled as 'Sonotube' in that first series of pics) has a gap of about an inch between the bottom of the beam and the pier. The ground has swelled to take up the 3-4" gap, and also enough to lift that portion of the building an inch.
What to do... Jack building up higher, and put spacers under each pier (maybe sections of pressure treated 6x6?). Or dig down a foot or so under the beam, and backfill with gravel. Those are the two ideas thus far. I'm open to votes and other suggestions!
|
|
Nobadays
Member
|
# Posted: 26 Feb 2021 09:32 - Edited by: Nobadays
Reply
I just realized the shop/woodshed I built last summer is nearly identical to your new building. I added the lean-to off the side for our Tracker. The main building is 10x20 with the left side 12x10 for a shop and the right side 8x10 as a woodshed... I gotta have dry wood! Added the 4' knee wall to the front for roof slope and to give us a huge storage area upstairs. The lean-to is 10x10 but the roof is 10x12 extending toward the opening for a little extra coverage.
Not sure how to address your frost heave issues other than just re-leveling and seeing what it does over time. Mine sets on 8x8 solid railroad tie piers. They were set 3' in the ground down to, and into the caliche layer. (For those not out west, calichie is cemented clay/stone... in the city you would call in concrete!) I'm told as we are on a well drained hillside... above the calichie... that there is no significant frost heave. I'm hoping they are right!
|
|
rpe
Member
|
# Posted: 26 Feb 2021 10:50
Reply
Nice building. I can see ending up with a lean-to on one side of ours as well. I thought 14x24 would be plenty big, but now my wife wants my old 8x12 shop as a bunkie, so all that stuff needs to find a home in the new building.
We ended up insulating the whole building, and skipping the internal dividing wall. A woodstove is on the list of additions for next winter.
As for the piers, they seem to be fine, it's just the building itself that has been lifted up by the heaving soil under the beam. I'll likely jack up the building and put a couple pieces of 2x6 under the beam at each pier. That will give an extra 3" rise. Any areas that were problematic this winter I'll dig out a bit further, and backfill with gravel. We hauled a yard of pea-stone up this winter across the frozen lake. There's always a place to use aggregate on our property!
|
|
gcrank1
Member
|
# Posted: 26 Feb 2021 12:39 - Edited by: gcrank1
Reply
What is easier, jacking and shimming while trying to maintain the structural integrity or digging/raking the dirt out from under the beams?
It would be door number two for me 
|
|
Nobadays
Member
|
# Posted: 26 Feb 2021 13:00
Reply
Quoting: rpe Nice building.
Thanks! 200sqft is all that is allowed by the county without a permit.... of course no electrical or plumbing (I'll beg for forgiveness on the electrical part!). I contend the lean-to though attached to the building really isn't part of the building! I've insulated the shop portion walls, will foam under the floor and do the ceiling this summer. I was heating it with a 5kw diesel heater, worked great.
Quoting: rpe now my wife wants my old 8x12 shop as a bunkie,
Always another building project! Does it end?! My wife wants me to extend the covered porch around/and across the west side of the cabin this year, AND add a bathroom in the loft. I want to build a 12x16 open equipment shed... just a roof so I can pull through it. I really don't want to work all summer this year!
|
|
rpe
Member
|
# Posted: 26 Feb 2021 14:50
Reply
Have you posted about that heater before? Is it one of those Chinese truck heaters? Did you get the all-in-one unit, or the cheaper one with separate fuel tank? Wondering about differences between the 5kw and 8kW units as well. They look identical from the ebay pics at least. I've been wondering how effective they'd be with a building that size. It should be a pretty air-tight building if I can pull the sliding doors tight against their frames. If I don't find a deal on a wood stove, I might go that route, perhaps with a propane torpedo heater to break the chill first in really cold temps.
|
|
Nobadays
Member
|
# Posted: 26 Feb 2021 15:29
Reply
Haven't posted much before... just about the fact I nearly set my building on fire with it... out of stupidity!
From what I understand there is little difference between the 8kw and 5kw or for that matter the 2kw, just the label. Basically a 2kw air/fuel mixture is detuned on a 5kw to put out less heat... an 8kw is a 5kw tuned to put out more heat.
Mine was an all in one unit which I will replace. The major drawback is the controller. When turned on it ramps up to full tilt then when it reaches the set temperature it drops to idle, it never shuts down. It will ramp back up when the temperature drops... by how much I couldn't say but I have heard it do so. They really don't have a thermostat as we would think of one in there. Some have a timed start feature, set time of day to start and away it goes. Others come with a countdown timer - one use only- it will start after the input time has reached zero.
The problem is, no one knows what they will get until it arrives!
I even ordered a second controller said to have a timer... yep countdown just like the original There is an aftermarket controller that is apparently really, really good called the Afterburner but they are about $125.
My biggest issue with it this winter was when it was really cold, below zero to mid teens it wouldn't fire up unless I pre-heated it.... and that is how I set it on fire! I was using a small bottle top heater leaned up against and pointed at the rear of the diesel heater. A piece of cardboard over the top to hold heat in. I heard the bottle heater fall over - I was outside - and when I went in the cardboard was burning as was the back of the heater. Best I can tell the propane heater melted the fuel line and the caught the diesel on fire then the cardboard! My wife ran for an extinguisher and I grabbed big rag and started smothering the fire then grabbed the whole unit and got it out of the shop.... wife handed me the extinguisher and I gave it a squirt. We were just lucky the electrical wires inside it had burned right away so it didn't continue to pump fuel!
My stupidity... a good little heater. A friend told me that in the future use kerosene in the he winter or a diesel additive.
|
|
rpe
Member
|
# Posted: 26 Feb 2021 16:13
Reply
gcrank,
I hear you. I'll likely still jack it up though, just to get it up a bit higher, just for some extra insurance. The front deck portion is not yet complete, and the supporting beam for the front of the deck may end up having similar issues. Hindsight is 20:20...
By the time I'm ready to lift it up, the entire interior will also be sheeted in plywood, so it should be a fairly rigid box. Here's hoping anyways!
Nobadays, thanks for sharing the story! It looks like a neat little heater, although perhaps one that needs to not be left unattended. I may add that to the list. I will have a 40A service to the building, so I could run some form of electric heat as well, although I'm sure the solar folks would shudder just thinking about that!
|
|
gcrank1
Member
|
# Posted: 26 Feb 2021 20:44
Reply
With 40a Id be plugging in my big infrared tower heater!
Just today I was giving a hard look at what I would have to trim out of the tree line to allow the cable layer to get through and parallel my driveway up to the cabin. Got a pole c/w a transformer sitting right out there....
|
|
| . 1 . 2 . >> |

