| << . 1 . 2 . 3 . 4 . >> |
| Author |
Message |
mj1angier
Member
|
# Posted: 25 Oct 2020 17:34
Reply
I don't feel like I have actually did much work at cabin unless I go to hardware store twice in 1 day...,
|
|
Nate R
Member
|
# Posted: 1 Nov 2020 07:49 - Edited by: Nate R
Reply
10/10 and 10/11: With the ladder set overhangs, there were parts of the roof sheathing that didn't have enough support. I knew that, and had bought H-clips, but kept forgetting to put them in when I was sheathing those parts of the roof! :o So, I cut 1/4" off some 2x4 chunks so I could wedge them in, and put solid blocking under those seams of sheathing.
I decided to use the "hybrid" detail from JLC of flashing my roof/drip edge/fascia. This protects against ice dams backing up AND bulk water. The downside was that I had to have the fascia in place before the roofing went on.
https://www.jlconline.com/how-to/roofing/drip-edge-and-ice-barrier-membrane_o

For fascia, I had considered my options. PVC and engineered wood were about $28/ea for a 1x8 in my area. PVC was out as I couldn't paint it a dark color. The store we purchased from offers wood boards in "standard," "quality," and "select" grades. The select was also like $26/ea for a 12 ft 1x8. The quality was $12, and the "standard" board was $8. So, I chose to go with the $12 option. I purchased a couple extras, so we had options. This worked out OK in the end, we ended up with enough straight enough boards for less than an engineered option.
So, all the fascia had to be painted and hung. We got that done on Saturday. I used Pittsburgh Paints' "Paramount" exterior paint, and had a great experience with it! VERY thick, good coverage and flowed well off a brush. MUCH better than the "high" end Behr paint I'd used on my house trim earlier this year. We'll see how it holds up.
Sunday, we adding the flashing tape to the fascia/roof sheathing joint, and then installed drip edging. Ran into my first time needing something offsite. ....I had nothing to cut the drip edging with. I was able to borrow a snips from a neighbor, thankfully. Saved me a trip into town. Got the drip edging installed, and then started on the ice/water shield. I'd watched a couple videos on how to install it, and thought it'd be a snap. That was NOT the case. I realized later the videos were on a 3:12 or 4:12 roof, and my 6:12 meant I couldn't roll it out without it sliding off, even with a nail or 2 tacked in. So I ended up cutting 16-18 foot chunks instead of the whole roll, and did my best to keep it straight and unwrinkled. It was cold enough on Sunday that it wasn't adhering well, either. We WERE above the manufacturer's minimum install temp (w/o primer), but still wasn't sticking great. Eventually we got it on well enough, and I moved onto the roof underlayment higher up. Finished that up as it was getting dark on Sunday and headed home.
Oh, and forgot to add we met with an electrician on Sunday. Once the power company told me it would be FREE to have power run from the pole on the road to a meter pedestal, we decided it was worth it. I should've looked into it years ago! My local inspector required I have a licensed electrician then rough in my wiring in the cabin once she heard I'd be grid-tied. So I hired one to drop the meter pedestal with an exterior panel, and then trench to the cabin, put a panel in there, and do the rough wiring. We'll pay him about the same as we would've spent on a small setup of off-grid solar panels, wiring, inverter, battery, etc.... So I'd much rather pay the monthly cost, but be able to microwave my lunch, or heat with electric as a backup, etc  So I guess we won't be off grid, but now merely a "dry cabin." Fine with me for that price...I'd always assumed it'd be thousands for the power co to bring in power. I get the impression our local company USED to charge a LOT more for new installs....neighbor nearby went from solar panels for 15+ years to paying to have power run over 1/4 mile a couple years ago. So I guess we won't be off grid, but now merely a "dry cabin." Fine with me for that price...I'd always assumed it'd be thousands for the power co to bring in power. I get the impression our local company USED to charge a LOT more for new installs....neighbor nearby went from solar panels for 15+ years to paying to have power run over 1/4 mile a couple years ago.


|
|
WILL1E
Moderator
|
# Posted: 2 Nov 2020 08:30
Reply
Lookin' good Nate! I like that dark color with your pine surroundings.
So do you do the drip edge only on the 2 side where say gutters would be installed, or do you do it on the gable ends as well?
I thought you were supposed to install the membrane stuff along the gable ends as well so that when snow drifts hang or creep over the edges that it doesn't suck back under the roofing and get your sheathing wet.
|
|
Nate R
Member
|
# Posted: 2 Nov 2020 10:56
Reply
Quoting: WILL1E Lookin' good Nate! I like that dark color with your pine surroundings. So do you do the drip edge only on the 2 side where say gutters would be installed, or do you do it on the gable ends as well? I thought you were supposed to install the membrane stuff along the gable ends as well so that when snow drifts hang or creep over the edges that it doesn't suck back under the roofing and get your sheathing wet.
Thanks, my wife is great with color design! Cabin itself will likely be a dark color as well.
I did the drip edge all around. It's UNDER the membrane on the eave/gutter sides, and OVER the underlayment on the gable/rake ends...this is how shingle manufacturers suggest.
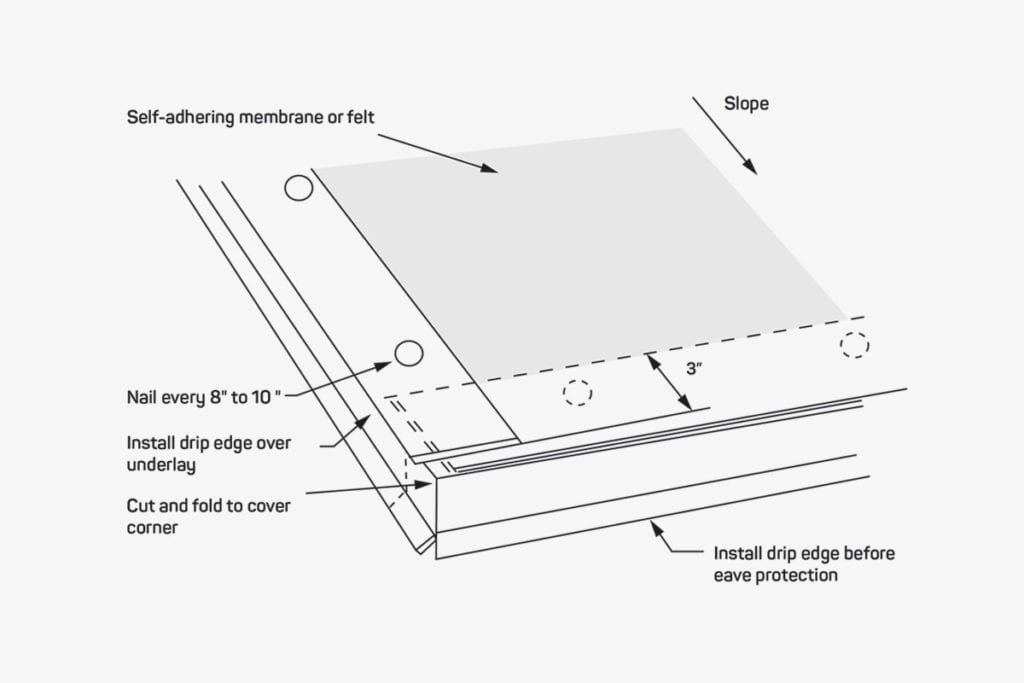
As far as ice/water shield on the rake edges, that's news to me, hadn't seen that anywhere. I can see where snow would curl around liek you say... hopefully IF that happened AND it wetted the sheathing that it would dry out fine towards the vented attic, and only be a 1-2x/year occasion.
|
|
WILL1E
Moderator
|
# Posted: 2 Nov 2020 11:32
Reply
I wonder if it would hurt (besides the wallet) to put a membrane over the drip edge on the gable/rake ends?
|
|
willywilly2020
Member
|
# Posted: 3 Nov 2020 12:41
Reply
Looks awesome! Great work getting things ready before winter!
|
|
Nate R
Member
|
# Posted: 15 Nov 2020 08:59
Reply
10/16-10/18
A big storm come through on Monday, the day after the roof underlayment went on! Fortunately, a relative was in the area Tuesday, and was able to check for me that I hadn't lost the underlayment over the ridge or anything, so things were OK. Some wind damage in other areas, so I was glad to come out OK.
I took Friday off work, looked to be better than Monday as far as weather goes. Came up early Friday morning, was about 31 degrees, and a light dusting of snow had fallen overnight. I spent Friday (alone) putting shingles on one side of the roof. Started on the side where the snow had melted off early due to sunlight. I had to be very careful with the cold, stiff shingles. Made sure not to bend/crack them, etc. The weather was NOT as forecast, and ended up getting a bit of rain in the afternoon, that turned to snow, and then a bit more rain.  Despite that, I was able to complete one side of the roof on Friday. (about 410 SF of roof). Despite that, I was able to complete one side of the roof on Friday. (about 410 SF of roof).

My wife came up Friday after she got done with work. Cold that night, about 31 degrees where we slept.
Saturday, rain was in the forecast. It was raining when I got up, and about 32 degrees. We worked Saturday morning on a couple remaining pieces of sheathing, and put in an entry door. This door is temporary, and eventually will just be an interior door between our entryway and the rest of the cabin.
By Saturday late afternoon, the rain (and a bit of snow!) had stopped, and things dried a bit. Got a start on shingling the other side. We tried to stay warm, keeping a fire going in the firepit, but was pretty miserable being 30s and wet/damp.

Sunday, I was able to finish the shingles, and put the ridge vent on. Got a rolled ridge vent, what a pain that was to align alone, and get nailed in straight! I wish I had used the ridge vent that comes in 4 foot straight sections, but too late. We hit our 2nd missing material/tool snag....I had no roofing cement! Hadn't even thought about it, but needed it for the ridge vent install. My wife was able to run to town and get some, fortunately. So we got the ridge shingles installed after the vent was on, right as the sun was starting to set.
Phew! Happy to have the roof done! It was a good experience to do it once, but not sure I'll sign up to do it again... But that's why I'm doing this, right? I wanted to build something myself in my life, but not necessarily make a career out of it! 


|
|
Nobadays
Member
|
# Posted: 15 Nov 2020 10:16
Reply
Way to go! I'm sure it's a good feeling to be dried in before real winter snow hits!
|
|
|
WILL1E
Moderator
|
# Posted: 16 Nov 2020 08:49
Reply
Lookin' good Nate!
What's your plans for siding? Are you going to try and get that up yet this year or just house wrap till spring?
|
|
Nate R
Member
|
# Posted: 17 Nov 2020 08:04 - Edited by: Nate R
Reply
Thanks!
Siding will likely be a very dark colored vinyl, but that will wait until sometime next year, probably late summer. So for now, I've put on the cheapest housewrap Menards had as a temporary cover.
Once spring hits, I've committed to finish the rest of the siding replacement on my full time home. I did one side late this summer, and I need to do the other 3 sides next year before getting back to the cabin. (I promised my boss that the house exterior will be done by the end of next year....part of our agreement with starting the cabin this year  ) )
|
|
WILL1E
Moderator
|
# Posted: 17 Nov 2020 08:07
Reply
Quoting: Nate R (I promised my boss that the house exterior will be done by the end of next year....part of our agreement with starting the cabin this year )
Sounds like a similar deal i had except for remodeling our kitchen before i could buy land again!
|
|
Nate R
Member
|
# Posted: 3 Dec 2020 11:44
Reply
10/24: With the freezing temps and no heat, my wife and I didn’t’ want to stay overnight again. We came up early Saturday morning. Collected cut shingles, plywood, plastic, and whatever we could fit into her car, and made a run to the landfill/dump, only open in the mornings on certain Saturdays. Got rid of 360 lbs of stuff that way. I've been surprised we haven't had more waste from this process so far.
Then we cleaned some things up inside and out, got things away from the walls so the electrician could work inside. Also patched in the last small pieces of sheathing. We put up a temporary housewrap for the winter. (Just as an extra layer of protection, and overlapped the foundation insulation so it will stay dry this winter). Cold, we headed home Saturday evening.

|
|
neb
Member
|
# Posted: 8 Dec 2020 17:53
Reply
I love your build and keep us updated.
|
|
Nate R
Member
|
# Posted: 27 Jan 2021 13:14
Reply
The following week, the electrician installed a meter base and outdoor panel, and trenched…ran conduit to the cabin and put a 100A panel inside. Inspector OK’d it and power co has been notified. Nice! We already planned to plant a bush between the cabin and the meter to obstruct that view…. So hopefully we won’t see it soon enough.
11/7: Came up again just for the day. Hit the 60s during the week with sun, and the shingles have heated up and most have relaxed at least! Came up to mostly get ready for deer hunting. Checked on the electrician’s work, and then went to the family’s land to check on tree stands and such. Power co still has to run the line from the pole to the meter, likely within the next 2-3 weeks. Electrician has run boxes and such inside, but no wires yet.
Windows and front door are ordered, and should be delivered up there around Thanksgiving. Still need a patio door.


|
|
gcrank1
Member
|
# Posted: 27 Jan 2021 13:47
Reply
I dont get the pedestal with a CB box and another one inside?
|
|
WILL1E
Moderator
|
# Posted: 27 Jan 2021 13:47
Reply
Quoting: Nate R ower co still has to run the line from the pole to the meter
Fingers crossed they don't do something stupid like drop a transformer box and 2 phone boxes in the middle of your driveway 
|
|
Nate R
Member
|
# Posted: 27 Jan 2021 14:15 - Edited by: Nate R
Reply
Quoting: gcrank1 I dont get the pedestal with a CB box and another one inside?
Power co would only go so many feet for free with their lines underground. In order to make that distance from the pole, we'd have to put the meter on the side of the cabin, in a spot my wife didn't' want it, or where it wasn't convenient to have the panel. I also want to run some underground power later to my shed, and a small chance of adding an RV/Camper electric hookup in the future.
Due to those factors, me, the Power Co designer, as well as the electrician all agreed doing an outdoor panel that I could add to later, and then a separate panel for the cabin was best/easiest. So we put the pedestal in a spot where we can obscure it from the cabin view, but I can somewhat easily/conveniently add circuits in a different direction.
|
|
Nate R
Member
|
# Posted: 28 Jan 2021 13:20 - Edited by: Nate R
Reply
11/20 Up for deer hunting, staying in a nearby rented cabin. Spent a few hours at our cabin place though. In the week prior, the Power Co was out, replaced a pole and transformer, ran underground lines to our meter base, and installed our meter. We had power! Got to check out the rest of the electrician’s work, he did a nice job on it. Local inspector came by when he was done and approved the cabin work so far, as well as the rough electrical. I was worried about the inspection, as I did a few things that aren’t 100% run of the mill conventional, but all was OK!
Got some red pine logs that were sitting for a year + bucked and split, and confirmed that red pine MUST be under a roof in my woods if it’s going to dry, seems it doesn’t dry out. Splits were 40+% moisture content inside, starting to think about rotting. Wood shed, or at least temporary wood covering for now, is on the list for next year. My wife and I walked through some things for the interior walls and such, decided that the patio door in the bedroom will be sliding and not swinging for clearance issues. No deer for us this year.

|
|
Nate R
Member
|
# Posted: 29 Jan 2021 13:22
Reply
12/11 I was supposed to have the windows and front door delivered before Thanksgiving. Windows were in, but door manufacturer got delayed….12/23 was the new estimated arrival, a month later than originally quoted. It all worked out, as I then quoted a sliding patio door through that vendor, and they were cheaper than our other option for a black exterior patio door at our local Menards. So I added that to the order. Should have ALL of our windows and doors on site by the end of the year. So, the vacation day I reserved for delivery was available.
Was a good day to take off work, and open for antlerless hunting. Also wanted to get more oak firewood on hand. During hunting a couple weeks prior, I had selected a tree on the family’s 40 acre plot (just down the road) that broke in a 2019 windstorm. A slim red oak. Cut it down, bucked it into carryable logs, and moved some of them to the cabin land. I’m experimenting a bit with how fast I can dry this oak in a few places. Hoping the attic in my full time house will be a mini kiln….by my guesses, I need more dry wood set aside for next year. We’ll see if I can get some of this under 20% by a year from now.
Did some hunting after that, no dice. Headed home.


|
|
gcrank1
Member
|
# Posted: 29 Jan 2021 14:01
Reply
Winter air is dry, split and stacked under cover with the air moving thru it should cure it decent.
|
|
Nate R
Member
|
# Posted: 4 Mar 2021 12:15
Reply
1/8/21
The patio door and entry door were at the vendor just before Christmas, and the windows already there too, but they could not deliver it all until after the new year. So took a day off work and met the delivery guy at the cabin. Paid an extra $275 to have them deliver them 170 miles away from their shop. This was WELL worth it, as it was all their responsibility until I had them inside.
We ordered Marvin’s Essential (all fiberglass) windows, black inside and outside, as well as the jamb extensions in black. Also a black sliding patio door from Marvin, and a ThermaTru entry door, painted black. Not cheap, but windows and doors are an important design element to us.
Was able to split some more wood and take delivery of the windows and remaining doors. They look great, and all appeared to be there and correct! My main windows are a bank of 3 in a 9 foot wide opening by 6 feet tall, so getting those inside was a relief.
The way things are going, I don’t forsee a lot of further work here until I finish re-siding my main house this year. So there might not be much to add/see until July-ish? But that was part of the agreement between my wife and I to start this project. I wanted a box up in 2020, and I got that. My goal for 2021 is to get the cabin to the point that it’s comfortable (temperature wise) to stay in for next winter. Lots to do in order to get to that point:
Frame interior walls
Air sealing details around the shell
Install skylights (2 going in )
Install chimney and wood stove
Add soffit vent chutes
Run a bit more wiring
Insulate
Install windows (and final house wrap)
Install patio door, swap outside door with the final one
If I get that much done, I’ll start installing the final exterior parts, like window/door trim, siding, soffit, etc.
Window Example

9x6 window bank and wood stove

Eventual front door

Patio Door

Saw this little shrew, even got to pet it!

Got to see how much snow made it onto the porch.....not bad!

Also got to see how well the 2 foot overhangs kept snow off the building.

Hoping to see a chimney and windows from this view later this year....

|
|
WILL1E
Moderator
|
# Posted: 4 Mar 2021 12:29
Reply
Those windows look sharp!
|
|
Peewee86
Member
|
# Posted: 5 Mar 2021 00:05
Reply
Good windows are not cheap but they make such a difference in good architectural design. A simple Google search of “big window cabins†will show how dramatic a small space can be with the right glazing.
It’s looking really good Nate! Can’t wait to see it with all of the windows installed.
|
|
ketchgould
Member
|
# Posted: 11 Mar 2021 10:43
Reply
Looks great! I bought 3 acres last year, 4 miles from Hayward and will build a similar cabin over the next two years. Are you guys in Sawyer County?
I haven't decided on a crawl space foundation or a heated slab yet. Did you consider both options?
Also, what were the pros and cons of building your own rafters instead of premade truss?
What were pros and cons of metal roof instead of asphalt shingles?
I was considering adding electricity too, part of the decision is that Jump River co-op charges $47 each month just to be connected.
Your outhouse looks great too. Did you poor that slab yourself?
Thanks for all of the great information!
Christian
|
|
Nate R
Member
|
# Posted: 11 Mar 2021 13:10 - Edited by: Nate R
Reply
Quoting: ketchgould Looks great! I bought 3 acres last year, 4 miles from Hayward and will build a similar cabin over the next two years. Are you guys in Sawyer County?
Not Sawyer, we're a ways east, closer to Crivitz.
Quoting: ketchgould I haven't decided on a crawl space foundation or a heated slab yet. Did you consider both options?
Not heating a slab for me...takes too long to bring it up to temp from cold for a part-time use place. Thought about crawl space for a while, but I like not worrying about rodents and such underneath the building, and didnt' need any floor joists, subflooring, etc.
The other benefit is a slab building stays a bit closer to ground temperature in winter. I'm hoping mine won't get much colder than 30 when unheated. An elevated building (off the ground) tends to get much closer to ambient temps in winter.
Quoting: ketchgould Also, what were the pros and cons of building your own rafters instead of premade truss?
I did premade trusses. Rafters would've needed a lot more cutting/fitting, room for insulation and venting is a concern, and then proper bracing would mean a ridge beam or rafter ties... Was easier to handle a lot of that with the trusses.
Quoting: ketchgould What were pros and cons of metal roof instead of asphalt shingles?
I did shingles?.......I thought about metal, but thought installing shingles myself would be easier, and I could always put metal over it in 20 years if I decided.....And I'm not sold the seals around metal roofing screws last any longer than shingles. A metal roof would shed snow better.
Quoting: ketchgould I was considering adding electricity too, part of the decision is that Jump River co-op charges $47 each month just to be connected.
Yeah, I only pay $20/mo for connection. $47 would make me evaluate the costs harder between on or off grid.
Quoting: ketchgould Your outhouse looks great too. Did you poor that slab yourself?
The slab was just a ltitle "porch" slab we found on the property, discarded by someone else.
Hope that helps! Keep us posted with what you do!
|
|
Nate R
Member
|
# Posted: 6 Apr 2021 13:39
Reply
4/2/21
After nearly 3 months away, I was able to stop by for a few hours. Mostly checking on things, bringing up a few items, and getting some of my things organized for my turkey hunting trip at the end of the month. Everything looked fine, which was a bit of a relief. The weather has let up a bit, so I'm starting back on the siding project on my main/primary house now, so as soon as that's completed, I'll be back at the cabin work. (Hopefully by the end of July? )
I'll probably start a separate thread tracking my costs for this project soon.
Hope everyone has a great Spring!

|
|
Nate R
Member
|
# Posted: 21 Sep 2021 13:17
Reply
More to come later, but got back at it!

|
|
WILL1E
Moderator
|
# Posted: 21 Sep 2021 13:46
Reply
Dude!!!! That looks awesome!! I love those dark framed windows!
|
|
Nate R
Member
|
# Posted: 28 Sep 2021 11:15
Reply
After working on my main houses' exterior most of this year... And then a short break... We are back at the cabin project!
Brought the skylights up on a day trip in August.
Came up another day in August and installed 1 window after pulling off the housewrap, making sure sheathing nailing was good, routing out the window opening, and then installing new, permanent housewrap. Was good practice for the other windows.


|
|
Nate R
Member
|
# Posted: 28 Sep 2021 11:22 - Edited by: Nate R
Reply
Labor day weekend, my wife and I got to work. First up was the patio door. The slab has a.. “notch†cut in it along the wall lines between the covered porch and the interior. It’s about 1 ½-2†deep in the concrete, down to the rebar level, basically. This was supposed to be a full thermal break, but the concrete guy had a miscommunication, and I wasn’t on site for the pour. So by the time we realized he hadn’t put anything in to thermally break the porch, it was too late.
This was the after the fact fix: He cut out a v shaped notch with a saw along the wall lengths. Got the blessing that this was the best solution from the local inspector and a Structural Engineer that worked for the state. I cleaned and filled these with spray foam RIGHT as I put down the sill plates.
Cutting out the sill plate for the patio door, I was able to see how it did. Looked great! Filled the cavity! Cut it flush with the slab (as it had expanded beyond it a bit…), and moved on. So a…. “thermal break lite†to help a little with heat loss to the outside through the slab. Could be better, could be worse. If this was a full time place I’d probably have pushed harder to redo the concrete entirely in that section.


Anyway, we got the patio door put in. Marvin Fiberglass (Essential line). About $1600 for the 6 ft door. We moved on, and were able to get 4 more windows put in after cutting sheathing, housewrap install, etc. Not a bad 3 day weekend, but I only took a few pictures. Oops.


|
|
| << . 1 . 2 . 3 . 4 . >> |
