| . 1 . 2 . >> |
| Author |
Message |
Diver
Member
|
# Posted: 25 Jul 2013 09:51pm - Edited by: Diver
Reply
Our 600 sq ft Cabin is finally underway. Its a long time dream becoming a reality. The cabin is beeing built on the Canaan River in New-Brunswick, Canada. I have been reading this forum for a while and found some great information that helped while designing our cabin. I tought I would share the plans to our future cabin. Here is a picture taken from the river bank. I will post pictures of the site prepwork and construction to date in a folow up post

-
|
|
Diver
Member
|
# Posted: 25 Jul 2013 10:11pm - Edited by: Diver
Reply
Here are some pictures of the site preperation. We started clearing the lot and preping the roadway as soon as the snow melted enough in april to get to the site on ATV. The cabin is 1km from the main road.


Location of the cabin staked. Cabin will be located 65' from the river. We have an environmental permit that would allow construction up to 50' from the river but due to the contour of the terain, 65' from the river edge allowed for the best view and placement of the cabin.

Here is a picture of the roadwork beeing done. Unfortunately it started raining and were not able to complete the roadway as the trucks were getting stuck. We will have to wait until august to finsh it. Fortunately, they we able to get enough done that we can drive down with the truck & trailer

Here are some pictures of the technopost foundation beeing installed. I chose 5" Technopost to support the cabin. Each post has a capacity of around 25,000 Lbs. The original designe called for 8 posts but we opted for 11 based on the recommendation of the installer. We wanted to make sure the building didn't sway in time of very high winds.


Here are some pictures of the floor frame. Floor consists of 14" LVL beams around the perimiter of the building an 14" I Joists 16" O/C for the floor. Floor is 18'-8" wide. We chose I joist due to the longer spans and the I shape makes it easier to insulate using rigid insulation.


|
|
Gregjman
Member
|
# Posted: 25 Jul 2013 10:36pm
Reply
Nice setup. Do they just spin the posts in the ground and then adjust for height?
|
|
Diver
Member
|
# Posted: 26 Jul 2013 08:55pm - Edited by: Diver
Reply
The posts are basically screwed in with the machine. They can determine the bearing capacity of the pier with the torque required to install it. Depending on the soil bearing capacity, sometimes they have to weld on extensions to get the required capacity and cut to lenght afterwards. I my case the soil was good and they exceeded the required bearing capacity at the depth I needed the peirs set. The just continue to screw them down until the desired depth is reached. They were all set using a laser level.
We checked them during construction and they were all withing 1/16" elevation. The installer squared everything up again before welding the column caps and it was withing 1/8". This is as good or better than any concrete foundation I have seen. I was quite pleased with the outcome.
|
|
Kharkov43
Member
|
# Posted: 27 Jul 2013 07:00pm
Reply
Looks really nice, congratulations.
|
|
bldginsp
Member
|
# Posted: 28 Jul 2013 09:48am
Reply
Looks like a very fast way to get a solid, long lasting foundation. Congratulations!
Tell us about why you chose technopost, and how much it cost versus concrete. Are you located where you can call concrete trucks?
|
|
Diver
Member
|
# Posted: 28 Jul 2013 08:57pm - Edited by: Diver
Reply
Quoting: bldginsp Looks like a very fast way to get a solid, long lasting foundation. Congratulations!Tell us about why you chose technopost, and how much it cost versus concrete. Are you located where you can call concrete trucks?
I did not price out the concrete as getting a concrete truck to the site would have meant clearing much more of the site and roadway than I wanted to. I wanted the cabin to be in the wilderness and not be like a cottage in the middle of a field. The second reason I chose the Technoposts is that the environmental permit would have taken much longer to get if I could get it at all. Due to the minimal disruption to the site with the posts, I was able to get a permit within 3 weeks to build 50' of the river.
Cost was around $4,000 for the posts and installation took 1 day. I could have cut the cost to around $2,500-$3,000 if I had used a smaller diameter post or used the 8 posts that the original building desing called for. The bearing capacity would have been similar with the smaller posts but the lateral stability of the building would have been less. The wider post anchor the building much better in high winds. The 5.5" posts and 3 additional posts is what the installer recomended. I felt that if there was ever a problem and I did not follow his recomendations, I would have been on my own to fix the problem. I tend to overdesign anything I do and felt that the extra $ were worth it to me for peace of mind.
|
|
Diver
Member
|
# Posted: 28 Jul 2013 09:41pm - Edited by: Diver
Reply
Worked on the insulation and subfloor this weekend. The floor insulation will be R30 and consists of a lower layer of 2" exterior door cut-outs and 4" of reclaimed Rigid insulation. I used the door cutouts as they were free from a local door manufacturer and should be rodent proof due the the metal on each side. The 4" rigid was reclaimed from a flat roof beeing redone.
It is much more work to install rigid compared to batt insulation but I beleive it was worth it as Rigid insulation will not absorb water like fiberglass batt will and it was much easier to install from above compared to crawling under the cabin to install batt once the building is sealed.
Here is a picture of the cutouts before they were installed

Here is a picture of the cutouts installed and some of the reclaimed 4" Rigid insulation

Here is a picture of the finished insulation with the gaps sealed using spray insulation and part of the 3/4" plywood sublfoor installed. First time using spray insulation and didn't realised how much it expands as you can see in the picture.

|
|
|
jrbarnard
Member
|
# Posted: 29 Jul 2013 06:24am
Reply
Good lord.. that thing will be built like a brick .. well, you know.. lol..
Please, more pics ;)
Russ
|
|
WY_mark
Member
|
# Posted: 29 Jul 2013 12:56pm
Reply
that looks awesome! looks super close to the river, no flooding danger?
|
|
Diver
Member
|
# Posted: 29 Jul 2013 07:33pm - Edited by: Diver
Reply
Quoting: WY_mark that looks awesome! looks super close to the river, no flooding danger?
I chose one of the heighest spots on my 43 Acre lot for the cabin with the intention of minimizing flooding potential. The pictures are a bit deceiving, The cabin is approximately 16' heigher than the main river bank. It is built 2' heigher than a 14' secondary bank. The river was actually the highest I have ever seen this weekend with over 4" of rain falling in 24 hours. The river was approximately 2' over the lower bank. The cabin was still 14' above this water level.
There is little risk of erosion in front of my cabin as approximately 1' under the soil at the rivers edge and most of the embankment is solid granite. There is more of a low area down stream on my lot and a a few miles beyond which would have to flood before water could actually start to rise more than it did in front of my cabin. It would have been easier to access the river and slightly better view if I had built there but the risk of flooding was not worth it in my opinion.
One should never underestimate mother nature but I feel I took as many precautions possible including the technopost foundation with the exception of not building along the river to minimize my flooding risks.
|
|
Diver
Member
|
# Posted: 18 Aug 2013 08:58pm - Edited by: Diver
Reply
I have been working many hours on the cabin with my father an brother in law. We finally have a roof over our heads. Here are a few pictures of the progress.
Exterior walls are framed and ready for the roof trusses.

Here are a few pictures of the trusses being installed. Trusses are 3 ply spaced 4'-0" O/C. I wanted the look of a timber frame without the cost. They were stained to make a contrast with the pine boards.

Trusses are going to be covered with 2x6 T&G pine boards, Ice & water shield, 2" Rigid Insulation R10, 2x4 Strapping 24" O/C and a metal roof.


Here are a few pictures from the inside of the cabin looking at the pine boards and trusses. I may paint the truss gussets black in the future to accent the connectors


Here is a picture with most of the metal roof installed.

I am quite pleased with the progress thus far. Alot more work than I expected but it is very rewarding knowing that I have been involved in every step of the build thus far.
|
|
old old buddy
Member
|
# Posted: 18 Aug 2013 09:42pm
Reply
Wow.....what a project! Your cabin is already beautiful. I love the pic on the inside showing the trusses. I agree that your metal will really show quite a contrast painted black.
Judging by your insulation, I'm guessing it gets real cold up there
What are your plans for the exterior? Sorry if you mentioned it before and I missed it. I like the color of your roof also. It really looks good with all the green around you.
Old Old Buddy
|
|
Diver
Member
|
# Posted: 19 Aug 2013 08:38pm
Reply
Quoting: old old buddy Wow.....what a project! Your cabin is already beautiful. I love the pic on the inside showing the trusses. I agree that your metal will really show quite a contrast painted black. Judging by your insulation, I'm guessing it gets real cold up there What are your plans for the exterior? Sorry if you mentioned it before and I missed it. I like the color of your roof also. It really looks good with all the green around you. Old Old Buddy
Thanks for the compliment. I am very pleased with the outcome and look of the cabin thus far.
The roof color is called burnished slate. As far as the exterior finish, the only thing that is sure is the color. The material will be burnt orange in color. I am still on the fence between vinyl and wood siding. I am trying to get the cabin as maintenance free as possible and that is why I am leaning toward vinyl but many people are trying to sway me to a wood siding such as Maibec. I have this week to decide as the windows and doors are beeing installed this weekend and the wood siding will require furing out the windows and doors.
As far as temperature, it rarely goes below -20C or 0F. I could have insulated the roof more but most of the cabin usage will be from March to December and I will just have to add a few more logs in the wood stove when it gets cold. The floor is a bit overkill with R30 but I had the material and figured I might as well use it.
|
|
Scotty Dosent Know
Member
|
# Posted: 19 Aug 2013 09:18pm
Reply
I really like how your place is turning out. Are you doing a loft in the rear and one in the front out over the porch?
What are the dimensions of your project out of curiosity? 20'X24' platform with 20'X20' interior?
12/12 pitch roof?
Looks really nice with the 3 ply trusses.
|
|
Diver
Member
|
# Posted: 19 Aug 2013 09:49pm - Edited by: Diver
Reply
Quoting: Scotty Dosent Know I really like how your place is turning out. Are you doing a loft in the rear and one in the front out over the porch? What are the dimensions of your project out of curiosity? 20'X24' platform with 20'X20' interior? 12/12 pitch roof?
Yes there is a loft in the front and the rear of the cabin. Lofts are 9'-6" wide x 8' deep. Front one is accesible by ladder, the rear one is accesible by ships ladder. The roof pitch is 12/12. The cabin is 18'-8"x32' including the 8' covered deck, this leaves 18'-8"x24' on the main floor.
The link to the PDF plans are on the first post I made under the picture of the river edge.
|
|
OwenChristensen
Member
|
# Posted: 19 Aug 2013 10:04pm
Reply
Beautiful. Nice work and a great project.
Owen
|
|
rockies
Member
|
# Posted: 13 Sep 2013 06:18pm
Reply
Hi. I found out about "Technopost" from an ad in a cottage magazine. I like their product due to the fact that a lot of sites can't get a concrete truck in and most people don't want to mix bags and bags of cement by hand and then dig holes and fill tubes. I looked at the Technopost US site and they had a link to an article that quoted a price ranging from 150 to 250 dollars per post to install. Was this about what you paid? Also, they have the possible addition of a "frost sleeve" for their post that adjusts itself due to freeze/thaw cycles in the ground. Did you use that as well? My cabin is going to be 14x20 feet with perimeter beams set on the posts and a SIP floor that is 10 1/4 inches thick on top of the beams. Did the company weld on the brackets to hold your beams or was that done by someone else? Did the company design the size and layout/number of posts needed or was that done by an engineer/architect you hired? Is there anything you would change now that you are getting close to finishing? Thanks a lot! Beautiful design.
|
|
Diver
Member
|
# Posted: 16 Sep 2013 07:49pm
Reply
Quoting: rockies Hi. I found out about "Technopost" from an ad in a cottage magazine. I like their product due to the fact that a lot of sites can't get a concrete truck in and most people don't want to mix bags and bags of cement by hand and then dig holes and fill tubes. I looked at the Technopost US site and they had a link to an article that quoted a price ranging from 150 to 250 dollars per post to install. Was this about what you paid? Also, they have the possible addition of a "frost sleeve" for their post that adjusts itself due to freeze/thaw cycles in the ground. Did you use that as well? My cabin is going to be 14x20 feet with perimeter beams set on the posts and a SIP floor that is 10 1/4 inches thick on top of the beams. Did the company weld on the brackets to hold your beams or was that done by someone else? Did the company design the size and layout/number of posts needed or was that done by an engineer/architect you hired? Is there anything you would change now that you are getting close to finishing? Thanks a lot! Beautiful design.
Hi,
Thanks for the compliments, I will try to answer your questions as best I can.
The posts I got installed have the green frost sleeve on them. They help protect against frost and also minimising the damage to the galvanizing when installing the posts due to friction from the soil and rocks. The main building is supported by 5.5"diameter posts (P5) and the deck is supported by 3.5" posts (P3).
I sized the beams and joists for my 18'-8"x32' cabin myself but the installer was quite capable of doing so also. I used the beam reactions and a chart from Technopost to determine the quantity of posts required for vertical loads. My design called for 8 posts, I ended up using 11 based on the recommendation of the technopost installer. The 3 extra posts were for lateral stability and were not required for the load bearing capacity. I could have used smaller posts but ended up choosing 5.5" post for lateral stability also. I am a firm believer that you should start with a good foundation which is why everything is oversized as mentioned in one of my posts.
Brackets were all welded on site after re-squaring the building by the technopost installer, there are a few pictures of them welding on the brackets. Some Technopost installers have a screw type tops for adjustements. These are typically used for a deck; I would not recommend them for supporting a building.
No regrets or changes so far other than beeing a bit over budget. I will get over that as I am getting my dream waterfront cabin as I have alway's envisionned it.
I will try to post more pictures next week once I have the exterior finish installed and the stairs.
|
|
Diver
Member
|
# Posted: 13 Oct 2013 10:46pm - Edited by: Diver
Reply
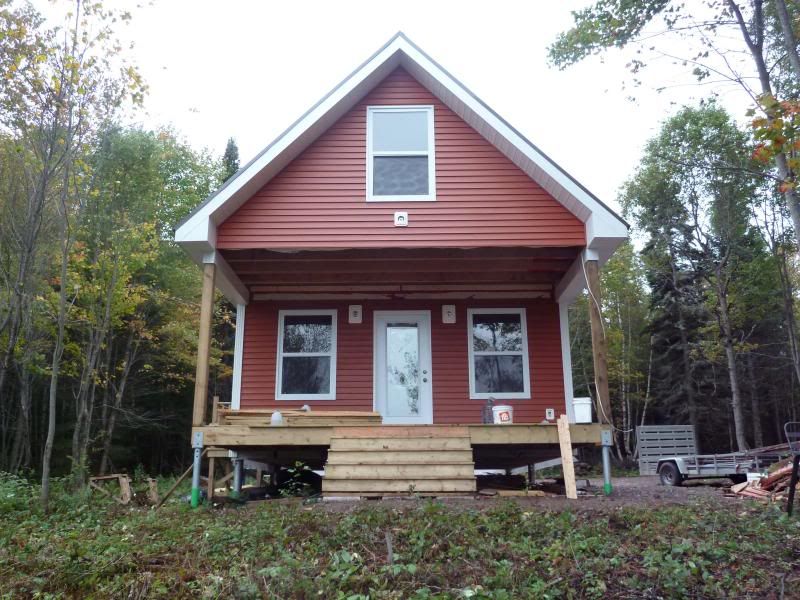
We have been working on the cabin quite a bit since my last post. Most of the exterior is finished with the exception of the skirting and soffit under the covered front deck. This will be completed once the electrical is finished.
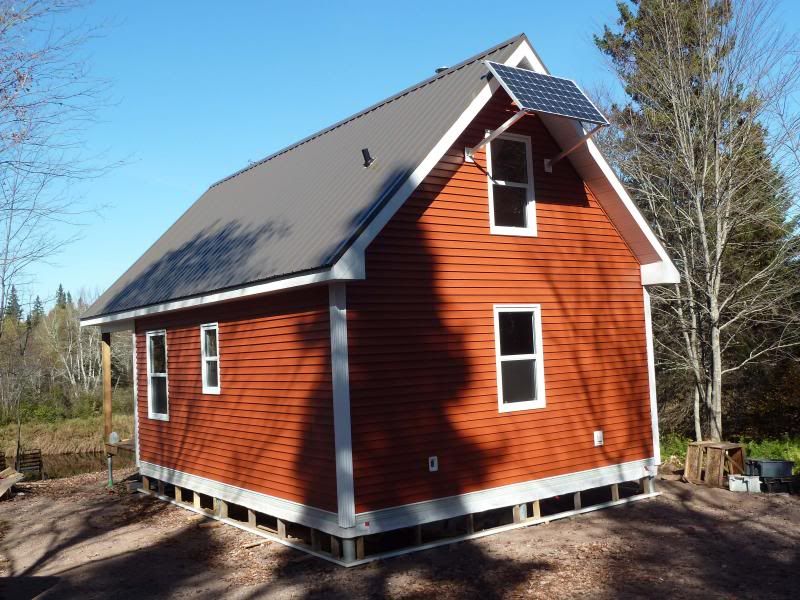
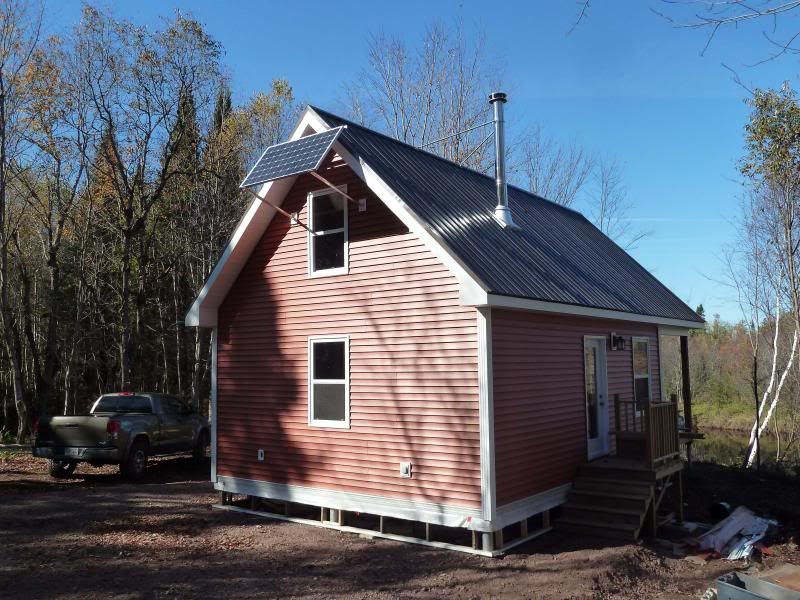
the 240W, 24V solar panel is installed. It was a bit more time consuming than I expected mostly due to the height of the panel and the mounting brackets. We needed 3 lifts of scafolding to install the panel. The panel is supported by 2" aluminium angles and hinges. I would have prefered not to install it on the gable as it would have been less visible, but the gable is pointing south which will give me the most efficiency with the panel. I also get an awning for my windows. The panel was installed at a 50 degree angle +/- to get more efficiency in the spring and fall when the cabin will be used the most.
I installed a 30A plug in for a generator on the rear of the cabin. My invertor has a built transfer switch and battery charger. If I need to top of the batteries or run heavy loads on the electrical, I can plug in my Honda EU3000 to the cabin. I dont think I will use this often as I will mostly run LED lights and a ceiling fan but things could change in the future.
The wood stove and chimney are also installed. This will come in handy when we are working inside the cabin this fall.
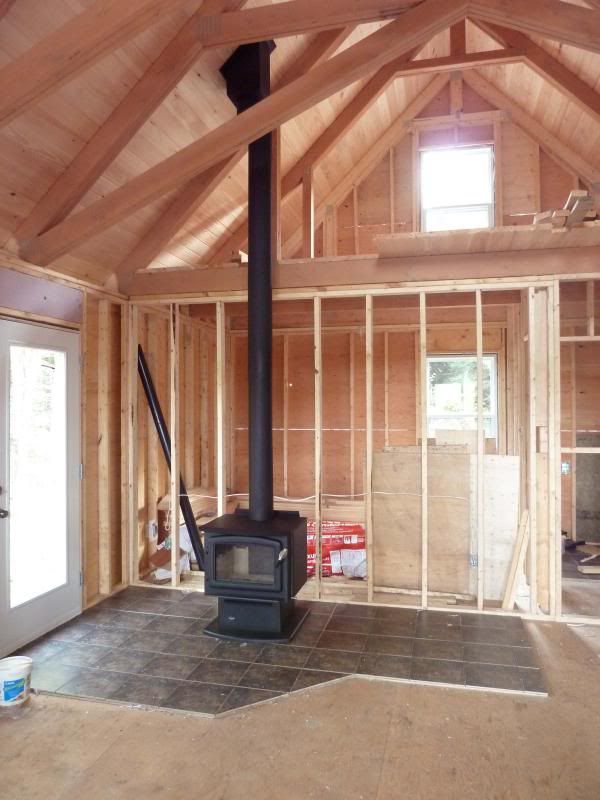
Things are coming along quite well. I am eager to install the electrical and insulation so the pine boards can be installed on the inside walls.
|
|
DackRetreat
Member
|
# Posted: 24 Nov 2013 12:01am
Reply
Very nice progress. With the single solar panel, how much are you able to power with it and how many batteries do you have for it? Also can you tell me why people choose to use the pine boards for the interior instead of regular Sheetrock? Thanks
|
|
Diver
Member
|
# Posted: 24 Nov 2013 01:58am
Reply
Quoting: DackRetreat Very nice progress. With the single solar panel, how much are you able to power with it and how many batteries do you have for it? Also can you tell me why people choose to use the pine boards for the interior instead of regular Sheetrock? Thanks
My panel is 240W. I will be connected to a MPPT charge controler and two 12V AGM 134 AH batteries wired in series for a 24V system. This will be connected to a 24V/110v inverter. The intent is to have the inverter power the LED lights, a ceiling fan and the receptacles for small loads such as a phone charger & radio.
I can't speak for everyone but I used pine boards for the finish because I feel the pine gives it more of a rustic finish. The pine makes me think of a cabin/cottage and not a home which is typically finished in sheetrock.
|
|
DackRetreat
Member
|
# Posted: 24 Nov 2013 06:30am
Reply
Thanks for your response. Look forward to seeing your continued progress.
|
|
neb
Member
|
# Posted: 24 Nov 2013 08:04am
Reply
Very very nice! A lot of hard work you have put into your cabin and will something you will be able to enjoy for life.
|
|
hattie
Member
|
# Posted: 24 Nov 2013 12:06pm
Reply
Beautiful!! Keep those pictures coming please!! 
|
|
Scotty Dosent Know
Member
|
# Posted: 24 Nov 2013 01:36pm
Reply
I love the floor plan and style of this cabin, especially the roof truss design. One of the only builds I have subscribed to! Looking forward to updates
|
|
beachman
Member
|
# Posted: 24 Nov 2013 05:07pm
Reply
Diver - a really awesome cabin. We too are in NB and cross the Canaan on the highway from Moncton. Your place looks as though it is farther up the river from the highway. Do you have water access to the Washedemoak? What a beautiful spot. We have always loved that river. I built a walkway several years ago and now wish I has used the Technopost posts. We had a flood on the lake a couple of years ago and a few sections took little trips. Great pics!
|
|
Diver
Member
|
# Posted: 25 Nov 2013 06:11am - Edited by: Diver
Reply
Quoting: beachman Diver - a really awesome cabin. We too are in NB and cross the Canaan on the highway from Moncton. Your place looks as though it is farther up the river from the highway. Do you have water access to the Washademoak?
Thanks the compliments. We am in the New-Canaan area and approximately 50 Km from Washademoak lake. Access to the lake would be by canoe only during times of high water and a multi day trip. My understanding is that you have to be a few km past the old Blacks store before you have access by motor boat to Washademoak lake.
|
|
Diver
Member
|
# Posted: 29 Dec 2013 04:05pm - Edited by: Diver
Reply
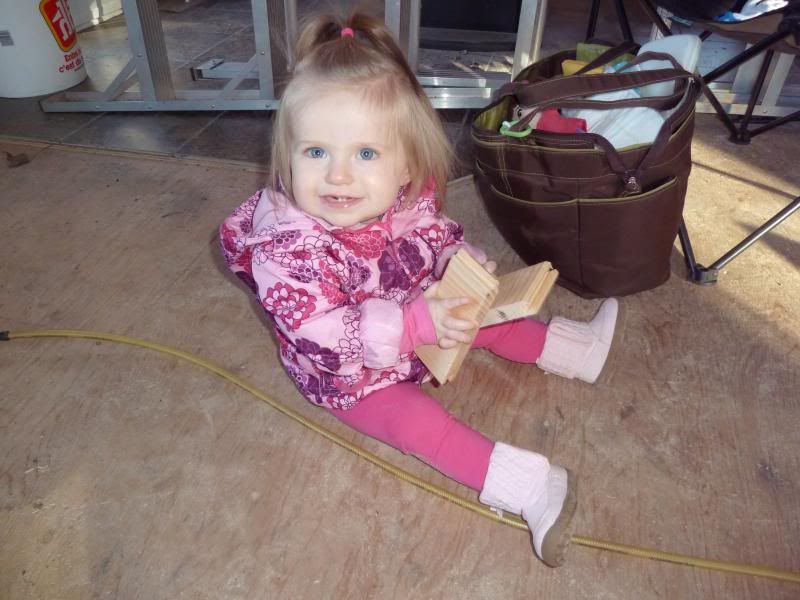
We have been buzy installing the T&G pine on the walls. It is much more time consuming than I tought. The pine boards are 5 1/16" (+/- 1/16") wide which means a lot of sorting if the V joints are to match at the corners and the boards are to be even over window and door openings.

I had to bring my daughter to help sort the wood an speed up the process. She is quite the little worker. Things are just moving along now. She is one of the main reasons my wife and I wanted a cabin. We wanted a place of our were we can spend family time in the outdoors.
We now have 3/4 of the pine boards installed, 2-3 more days and it should be done. Once this is done we will start installing the kitchen cabinets and stairs/ladders.

Snow came a bit earlier than I expected this year and has put off construction a bit as we had 2 storms come in on the days I had intended to be working on the cabin. I have had to hire someone locally to open the 1Km driveway on 2 occasions thus far.
We had a recent ice storm which was very rough on the grey birch along the roadway. We spent a few hours clearing them in order to maintain access to the cabin. We are expecting another 10" overnight. If things continue, I may have to halt construction until spring as clearing the roadway is getting costly. After tonights storm, we will be over 3 ft of snow in December wich is more than I have seen over the entire winter the last few years


|
|
gersus
Member
|
# Posted: 20 Jan 2014 11:36am
Reply
Awesome cabin, snow, daughter and river! Really like everything you've done. That is a solid well built cabin for sure!
|
|
| . 1 . 2 . >> |
