Building Other Structures
Outdoor Open House Concept
So you have built a small wilderness cabin where you have a bed, a small table, some shelving, and perhaps a stove.For some folks, this small space is want ideal: - no maintenance and worries, no costs - just the simple enjoyment of quiet reading time, fishing, a nightly campfire, and other getaway experiences. Others (like me) would like to add more living space, the better to enjoy our getaway time. More space comes in really handy if you like to bring your family and friends along with you to your cabin. At the same time that I was thinking about adding more space, I was also committed to my original decision of having no building permit requirements and low property taxes. So what, exactly, is a person to do?
 The solution is to build other small functional structures around your cabin.
- Outhouse / outdoor toilet
- Outdoor summer kitchen
- Storage shed
- Veranda / Gazebo / resting area
- Dining 'room' (area for a table under mosquito netting)
- Shower
- Firewood storage shed
- Cellar / cold storage
Outdoor Summer Kitchen / Veranda / Gazebo
 This is still my work in progress.
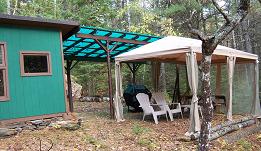
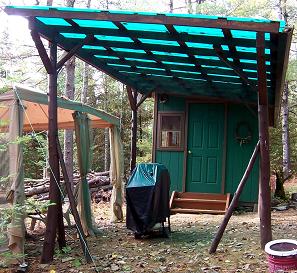
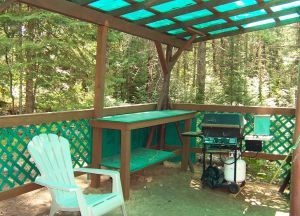
For my outdoor summer kitchen, I have chosen a simple structure - corrugated plastic/fiberglass roofing on cedar posts, surrounded by half-walls, with the tabletop space and a place for the BBQ (as seen on a picture further down this page).
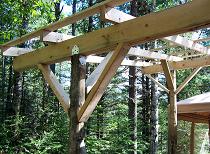
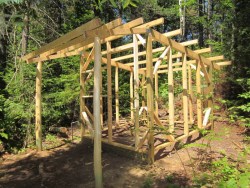
Posts
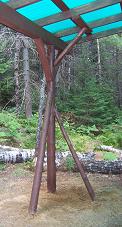
I had fairly good soil on one side of the structure, so I was able to dig post holes ~5 ft deep.On the other side, I had some sort of large rock shield, - so I could only dig about 1-2 ft. Where support posts could not be dug deep enough I've used a "tripod"-type post, to ensure that they stay in place. The procedure is as follows:
- Dig holes as deep as they can go – holes for the main post and at least 2 smaller mini-posts.
- Attach mini-posts to the main post to create a triangle.
- Pour concrete mixture into the holes to create a footing for the main post and mini-posts.
- Let concrete set, then cover with soil.
Tip:
Nail a few nails half-way into the bottom of each post, at the level where the concrete will be poured. This will provide a stronger holding bond with the concrete footing.
Roof: Wooden Frame + Corrugated Sheets
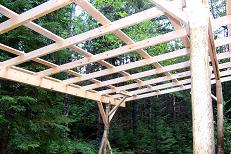
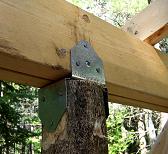
 I used two 2"x6" beams nailed together to serve as the main support beams on the front and back sides of the structure. I then used a special StrongTie mounting bracket to mount the beams to the top of each post.
A set of 2"x4" studs with 24" spacing perpendicular to the beams was mounted on top of the beams.
I used two 2"x6" beams nailed together to serve as the main support beams on the front and back sides of the structure. I then used a special StrongTie mounting bracket to mount the beams to the top of each post.
A set of 2"x4" studs with 24" spacing perpendicular to the beams was mounted on top of the beams.Another set of 1"x4" planks with 24" spacing perpendicular to the studs completed the roof frame.
 With the exception of posts, I used non-pressure-treated timber for this structure. So before fixing corrugated roof sheets to it, I painted it using oil paint for protection from decay and for a better look.
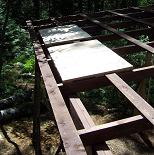
Tip:
It is difficult to work on top of a wooden roof frame (painting, attaching roofing sheets, etc.). The use of wide boards will make this task easier. (Use two of them, so you can stand on one board while repositioning the other).
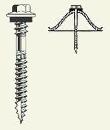 Finally, I mounted corrugated plastic (or PVC, fiberglass, metal) roofing sheets on top of the frame using roofing screws.
The roofing screws have a rubber gasket to prevent water from dripping down through. Screw them on top of the roof sheet as shown.
 Summer Kitchen Future Developments
Later, I'm planning to add some rough and simple cabinetry and a sink.
Outhouse / Outdoor Toilet
 Considering its importance, you've probably already figured out that this is should be your first (additional) structure on your property ;)
Find a place that is relatively far from the main cabin structure but still has easy access.
Tip:
If more then one suitable place is available, select the one that is further down the typical wind path in your area, to keep odors away. For example, if western winds prevail in your area (true for most of North America and Europe), place the outhouse further east from your small cabin.
Outhouse Hole
If you just dig the hole in the ground and leave it, it will eventually erode and its walls will collapse. As a result, the outhouse structure on top of it may become unstable.So you need to reinforce the walls of the outhouse hole. This can be done in many ways, for example, by building a retaining wall using brick or cinder (concrete) blocks. I've chosen a simpler and cheaper approach:

- Buy a standard household plastic garbage pail (3-4 ft tall / 32 Gallon).
- Dig a matching sized hole in the ground.
- Cut out the bottom of the pail using a heavy duty utility knife.
- Place the pail in the hole, then fill empty areas outside the pail with soil.
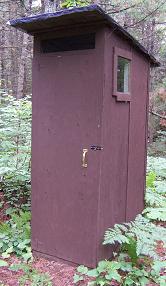
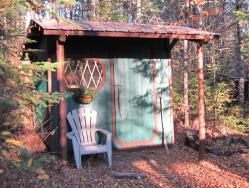
Outhouse Structure
Construct the outhouse structure in a way that it can be moved in the future to another location when the outhouse hole gets eventually filled. I.e., do not permanently mount the outhouse structure to the ground. (If required, use metal spikes that can be fairly easy removed).- Floor:
- I used a 3'x4' solid plastic skid that I found discarded - it is durable and will never rot.
- Alternatively, you can make a frame from pressure treated (PT) 2"x4" timber and PT plywood. Then cover it with some sort of plastic or linoleum sheet(s).
- Walls:
Build a wooden frame structure using 2"x4"s. Nail 3/8" plywood to the frame using galvanized 1-1˝" spiral nails. - Window:
- Find glass of a suitable size. (I found one discarded from some old glass shelving).
- Using a jigsaw, cut an opening in the plywood wall, that is slightly smaller than the glass you have.
- Use small wooden planks and screws/nails to mount the glass to the plywood wall.
- Seal with outdoor sealant.
-
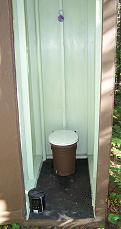 Toilet:
The simple and inexpensive solution I used:- Get a 5 gallon plastic pail. (You can probably get one for free from the local do-it-yourself wine-making place or recycling yard).
- Cut out its bottom, leaving 1" rim around for easier mounting to the floor.
- Cut hole in the outhouse floor using a jigsaw (make sure it is not too large).
- Mount pail to the floor using screws.
- Seal inside and outside using silicon sealant.
- Attach a standard toilet seat on top.
- Ventilation:
- Leave a small portion of the top part of the wall open so that fresh air can get in. Cover the open area with mosquito net.
- Make a vent so that odor from the outhouse hole is sucked outside. A 3-4" PVC/APC pipe (connecting outhouse hole with roof outside) can be used.
- Paint:
- You must paint exposed non-pressure-treated wood/plywood to protect exterior surfaces from decay. Any oil paint or stain will do the job.
- The interior is less important, but I would paint it as well
Also, check out the outdoor toilet/outhouse discussion and outhouse pictures on our Small Cabin Forum pages.
Outdoor Shower
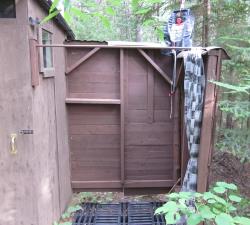 Later I've built my version of the outdoor shower.
It is a simplest post-and-beam attachment to the outhouse. Cedar and PT posts, skid tops as walls, solar water heater bag, curtain...
Can't get much simpler than that.
Storage Shed
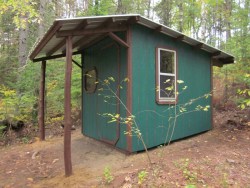
- Simple post-and-beam type of construction
- Pressure treated 4"x4" posts, cedar front posts
- SmartSide panel siding
- Metal roof
Firewood Storage Shed
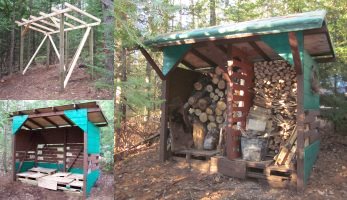
- Pressure treated 4"x4" posts with diagonal support beams
- Various leftover OSB/plywood and SmartSide siding materials
- Vented walls for free air flow
| << Small Small Cabin Cost/BOM | Small Cabin HOME | Small Cabin Off-Grid Living >> |