| . 1 . 2 . >> |
| Author |
Message |
Rick004
Member
|
# Posted: 18 Feb 2013 02:34pm
Reply
I'm so glad I have joined this site ! I plan to build this summer so I have taken this winter to decide what I will build ? I think I have changed my mind about 10 times already ! I originally planned on 16x20 with a loft and went down to 12x16 to save money then decided that was too small and so on and so on !! I think my final decision will be 16x16 with a gambrel roof with a half loft , now my question is if I will be insulating the whole cabin can I get away with 2x4s for the roof or 2x6s and where could I find diagrams or plans for gambrel trusses for a 16x16 cabin ? Thanks and for all my Ontario friends , Happy Family Day !!!
|
|
Just
Member
|
# Posted: 18 Feb 2013 09:27pm
Reply
I think if you price pre made trusses in the size and shape you want you will find they are very little more to buy pre made, than to make them yourself. the truss CO. will know the snow load in your area and tell you what you need, no more no less .they will build what ever style you wish and garentee the truss .we have lots of snow in CAN.
|
|
razmichael
Member
|
# Posted: 18 Feb 2013 09:56pm
Reply
Hi Rick004
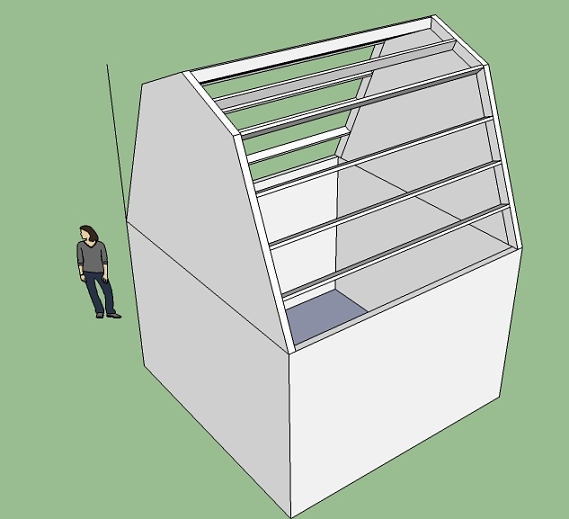
Not sure if there is some confusion on terms (not that I am a rafter expert). You will not likely find trusses for gambrel (barn) roof although I agree with Just - if doing a gambel roof then consider trusses rather than home built. If you really want to do a gambrel roof then you will likely have a much harder time finding a company to do them for you as these are rafters not trusses and need to be individually approved if meeting any building inspection criteria (in many places). Doing a barn roof sure provides a lot of extra loft space but have other impacts that may need to be considered (no ceiling joist or rafter tie to hold the walls together for example). We built our own for our 16x24 and it was a lot of work and time. Most of the designs you will find come from agricultural buildings and if you do a search you will find both BC and Ontario publish some plans. I also used a structural ridge beam to compensate for the lack of rafter ties. This is the best picture I could find to show the general design including the double pieces of 3/4" plywood gussets.
I used easy rafters to do the basic design and then modified as needed. Good program for all rafter designs.
|
|
Rick004
Member
|
# Posted: 21 Feb 2013 12:36pm
Reply
Hey Razmicheal !! I guess I didn't explain myself properly , you're right it's rafters I'm looking to build not trusses ! The pic you posted is exactly how I would like to do my roof ! I like the idea of having the beam down the length of the cabin ! How do you figure out the angles ? My cabin will be 16x16 . Did you use shingles or steel roofing ?
|
|
razmichael
Member
|
# Posted: 21 Feb 2013 01:25pm
Reply
Hi Rick,
I'm no expert so I spent a great deal of time researching options and went with something that I figured was overkill on structural strength. The problem with Gambrel roofs is the lack of pre-approved designs for a human occupancy building. Keeping in mind that huge barns have been standing for 100s of years, how hard can it be to do a small cabin - right!
There are lots of formulas and techniques for the angles as you can adjust them to better suit your design. I just went with a standard one and used Easy Rafters to do the printouts. However I did find the way they measure difficult to use when cutting the bird cuts etc. Here is one link I was able to dig up Gambrel
My walls are close to 10' with dropped lofts on both ends so there is a concern about a lack of support to stop the walls from bowing out (the support you get with standard rafters or trusses). This is why I used a structural beam made up of 3 LVL boards. I likely could have use 2 wider boards but using 3 9.5" boards allowed for more headroom. The width of these needed to be incorporated into the final plan from the Easy Rafters software - did this manually in Visio. Note that a structural beam then has follow on impact in that you need to support the ends down to the foundation in a single path (does not need to be one piece of lumber). This impacts the overall framing of both ends.
The gussets are made from 3/4" plywood so that they add up to the same width as the rafters (which are 2x8s). Glued and nailed.
I used hangers on the beam and at the bird mouths all secured with Simpson structural screws rather than nails.
Sheathing and metal roof to finish.
They say that you do one rafter and then check it and use it as a template. Tried that - didn't really work all that well (my lack of experience??). Ended doing some minor shimming in spots to ensure the midline was straight and lined up.
Unlike buying trusses or using approved rafter plans, you are somewhat guessing when doing a barn roof and you should make sure that any permit you need allows for this without an engineering assessment. Overall, this roof was a lot of work, extra cost and makes sheathing and roofing more complex. However, when you see the amount of headroom you get in a loft it ended up being worth it. You may get a better idea of some of the things I mentioned in the build photos. Photos .
As per normal - this is just the way I did mine - lots of other ways and I'm sure some others have some good ideas based on far more experience.
|
|
Just
Member
|
# Posted: 21 Feb 2013 02:07pm - Edited by: Just
Reply
Rick004
like ,, Ras,, i did mine trile and error . mine is 3 , 4x4 cross members [8 ft . long]with the rafters [4x4 s 32 in centers] hung on hangers.my cabin was only 8x13 , 10 sq. m.I then sheeted that with 1 x 12 pine no insulation. I gess thats why i though you should get a pro to do a truss..the loft had standing room to change and 2 full sise beds with a wall down the center.summer use only.
|
|
Rick004
Member
|
# Posted: 21 Feb 2013 02:50pm
Reply
Thanks for the help guys !! You definately got me headed in the right direction !!! Can't wait for all this frickin snow to melt !!
|
|
razmichael
Member
|
# Posted: 21 Feb 2013 04:22pm
Reply
Rick
I added jpegs of my design, including the rafters, to the photo site I included above. Big disclaimer on them - the design and the build do not always match!
|
|
|
stickbowcrafter
Member
|
# Posted: 18 Mar 2014 04:47pm
Reply
Any updates on this? Both my cabin & shed will have a gambrel roof. I have been researching like crazy. Interesting design raz, most of the gambrel roof framing I have found uses no ridge beams. But like you, I am a fan of over-building things.
-Brian
|
|
OwenChristensen
Member
|
# Posted: 18 Mar 2014 06:45pm - Edited by: OwenChristensen
Reply
I've build many many gambrel roofs. I have always considered them the strongest. Yes, a 2x4 rafter set is strong enough for load, even in heavy snow areas. If you want to insulate, you should use 2x6's. For a 12' building, I like four foot top rafters on a 5/12 pitch or 22 1/2 deg. Just make a jig on the floor, but your joints together then glue and nail plywood scabs over the joints. I use metal plates, but plywood works too. The hard part is putting the sheathing on without distorting the rafter sets. Once it's all sheeted with staggered joints, it is super strong.
|
|
razmichael
Member
|
# Posted: 18 Mar 2014 06:54pm
Reply
Hi stickbowcrafter - greater photo on your other post by the way. I went with the structural beam since I did not want to take up headroom with collar ties and, with the cathedral ceiling (dropped lofts on each end", there are no rafter ties or ceiling joists to hold the walls in. The beam overcomes both of these limitations. I was actually surprised at the reasonable cost for the LVL beam (3-ply) and they delivered it with a boom truck so it was easy to get in place.
|
|
stickbowcrafter
Member
|
# Posted: 18 Mar 2014 10:33pm
Reply
Thanks Owen, I'm getting close to the gambrel roof stage of my 12x12 shed barn. Will be good practice for my 16x24 cabin barn project after the shed barn is done.
That makes a lot of sense raz. Collar ties won't be a big deal in my shed barn but for the living space in my cabin barn I may look into a ridge beam.
-Brian
|
|
Don_P
Member
|
# Posted: 18 Mar 2014 11:34pm
Reply
For my 24x24 barn I ran a rafter tie/ceiling joist across at the pitchbreak to truss the upper 5/12 roof, then considered the lower 12/5 roof to be an angled wall. The thrust is still there but is relatively low at that steep pitch... but it's a barn. One other way barns were built was with 2 beams, one supporting each pitchbreak and resisting the vertical load and horizontal thrust of the upper roof and hanging the lower pitch. They were large and square in section providing beam action in both vertical and horizontal directions. The H frames supporting the beams extended down thru the building dividing it into a center aisle with stalls and rooms on each side. The extension ag barn plans attempt to open that up by forming a rigid frame with gussets making the joint rigid, that works as long as the joints cannot rotate. The longer, thicker and better nailed the gusset the better the chances of success. With poorly gusseted or metal plate connected ones that are easily distorted until sheathed, the diaphragm formed by the sheathing is what is restraining the thrust... this gets pretty iffy as the building gets larger and the loads increase. Look at older storage sheds built this way and you'll often see that they have become swaybacked over time. The gambrel trusses made by truss companies usually have a ceiling joist and vertical web members under the pitchbreak. That's often those ugly wide topped, steep mansard sided roofs you sometimes see... trying to get the biggest box inside the webwork. I guess a gambrel is really a form of mansard. Interestingly that came about due to tax laws in France at that time. Area under the roof was not taxed so Mansard designed those steep sided roof/ walls to get a large living area under the roof.
|
|
OwenChristensen
Member
|
# Posted: 19 Mar 2014 08:10am - Edited by: OwenChristensen
Reply
I'm always surprised how many people think a ridge board is where roof strength comes from. Actually even trusses take much of their strength from the peak without a ridge board. In rafter type construction the ridge board is just for convenience nailing. There are three important things that make your roof strong. One pitch, of course, two walls tied together, at least near the middle, loft joists will work, three staggered joints in the roof sheathing.
shallow pitch for cabin
| 
for livestock
|  | |
|
|
Don_P
Member
|
# Posted: 19 Mar 2014 07:16pm - Edited by: Don_P
Reply
A ridge board is a non structural nailer, a ridge beam is a structural member that the rafters hang from, and yes those are two entirely different things that people often confuse.
When rafters cannot be properly tied by either ceiling joists or rafter ties in the lower third of their height, creating a trussed assembly, a ridgebeam capable of supporting half the roof load is used. 1/4 of the roof load is supported by each wall and there is no horizontal thrust against the walls. Cathedral ceilings are often framed this way with rafters hanging from a ridgebeam.
A little model will help explain roof thrust and the difference in those two methods of dealing with it. Take a greeting card and set it up tent fashion on a smooth table. Push down on the ridge, and the edges of the card will slide out and it'll "collapse" onto the table, an untied roof.
Now run some thread or tape across the card tent in the way you would run ceiling joists. Set it on the table and push down on the ridge again. The sides cannot spread, the roof is stable. This is the simplest form of trussing, or triangularizing, a roof.
Then remove the ceiling joist threads or tape, untying the roof again. Place a support at each end of the ridge, a few books at each end works. Slide a pencil under the ridge, supported at each end on the books. Push down on the ridge again. The ridgebeam is now supporting the roof with the roof hanging from the beam with no ties necessary.
In quite a few more modern churches and some other public buildings there are glulam beams that form the walls and the roof timbers. The glulams are bent into a graceful tudor arch on the inside face and form a vertical wall and sloped roof on the exterior face. This is called a 3 hinged arch. There is a hinge point at each glulam's bottom and a hinge point at the peak. The typical joint between rafter and wall top has been made rigid by the construction of the beam. That is similar to the purpose of a rigid gusset across the pitchbreak joint in a gambrel of that gusseted style.
|
|
stickbowcrafter
Member
|
# Posted: 22 Mar 2014 04:50pm
Reply
Ok so I'll be pre-building gambrel rafter/trusses at home and trailering them to my property to save time. These will be for my 12x12 shed barn. The pre-fab jobs I have looked at have 2x6 rafters on 16 inch centers. I'd like a metal roof, probably over plywood for strength. We get a good bit of snow in northeast Ohio. Are the materials and spacing ok for this application?
-Brian
|
|
OwenChristensen
Member
|
# Posted: 22 Mar 2014 08:28pm - Edited by: OwenChristensen
Reply
Yes, that's strong. All mine were 2x4's on 2' centers and some of them are thirty years old and one even older. Here's my first shed I built in 1964 with my dad's direction. Oh yeah it's still standing.
I'd build them on the floor on site. They are hard to handle. Build them and put them right up.
|
|
stickbowcrafter
Member
|
# Posted: 22 Mar 2014 08:38pm
Reply
Looks like you get a little snow there, LOL. If I can get away with 2x4s on 2 foot centers, that will save me a ton of time and money. 1/2 inch plywood sheathing with metal on top? What kind of span did you have O.C.?
-Brian
|
|
OwenChristensen
Member
|
# Posted: 22 Mar 2014 09:06pm
Reply
I'm sure 2' would be fine, but since they are considered rafter construction 16'' is code for habitation buildings. I have used 2' for all storage sheds. I use metal plates and shoot though them with an air nailer on the joints. As I said above the steeper the pitch the stronger, I use 5/12. On a 12' wide I like the top rafters to be four foot, actually 47 7/8 '' and sheeted with 5/8'' plywood. By undersizing by 1/8 th. you can get a tight plywood joint on the hip. The lower rafter in normally five foot, but six will work. If you take two 47 7/8 2x4's cut 22 1/2 deg. for the top angle then 22 for the lower it should get you close if you use a five foot lower rafter then if I remember right the lower angle is 20 deg. Adjust your jig for height until you like the fit. Of course the width is 12'. When you sheet the roof, climb up on the loft and sheet the top rafters first. I make a scaffold over the open area. It's hard but you can do it. None of the rafter sets are rigid until sheeted. you must push and pull rafters to straighten them to the plywood. Do not settle for a poor fit. Move the rafters sideways or even up and down to get perfect. If you sheet the whole top rafters first without putting your weight onto it, it can go real nice.
|
|
Don_P
Member
|
# Posted: 23 Mar 2014 09:54am
Reply
I'm sure 2' would be fine, but since they are considered rafter construction 16'' is code for habitation buildings.
Actually code does not specify or limit rafter spacing, the prescriptive tables go up to 2' spacing, the sheathing schedule goes to 6' spacing. Beyond 2' rafter spacing the rafters themselves should be designed by an engineer. I've run rafters at 4' spacing with 1-1/2" decking a number of times and it is a nice heavy timber look in the right situation.
For an accessory building you're on your own to build as you see fit. I suspect that with only a 12' span the method Owen is describing would work although it wouldn't be hard to frame the gable ends and run purlins from gable to gable rather than having any rafters, avoiding the flexible connection he describes.
This is a snip of the code language on roof support of a habitable building;
Where ceiling joists or rafter ties are not provided, the ridge formed by these rafters shall be supported by a wall or girder designed in accordance with accepted engineering practices. (R802.3.1)
|
|
OwenChristensen
Member
|
# Posted: 25 Mar 2014 07:28am
Reply
If you want to insulate, I'd use 2x6's or 2x8's but strength wise 2x4's are fine. I found this picture.
|
|
stickbowcrafter
Member
|
# Posted: 25 Mar 2014 04:46pm
Reply
Thanks OC & Don, exactly the info I was looking for. OC are the loft joists 2x6 in that pic?
-Brian
|
|
OwenChristensen
Member
|
# Posted: 25 Mar 2014 06:18pm
Reply
Yes on 2' and decked with 3/4'' t&g plywood.
|
|
Don_P
Member
|
# Posted: 25 Mar 2014 07:56pm
Reply
This is a doodle of what I was describing for a small utility type shed using 2x purlins that run between the rigid endwalls. The roof sheathing in something framed this way would run up and down the roof.
Going to something larger this is a sketch I did a few years ago of a post framed gambrel. The second floor froms the tie that restrains thrust from the lower pitch and there is an upper tie to prevent sagging by restraining the much greater thrust produced by the upper pitch. This design also has treated posts that run from footings to top plate, the walls provide lateral bracing to the posts. My barn is framed similar to this.

|
|
stickbowcrafter
Member
|
# Posted: 4 Apr 2014 12:19pm
Reply
Here's my first one, I glued & screwed the plywood gussets on one side. Do I need them on both sides? I cut them flush with the rafters so I would have maximum headroom. I know leaving them triangle shape adds to the strength but I figured the glue made up for the corners I cut off.

-Brian
|
|
OwenChristensen
Member
|
# Posted: 4 Apr 2014 12:46pm
Reply
Looks good. The plywood is probably a little weak, but once in place should be alright. Just be careful handling them. I'm sure it's a two man job. I think you should have them on both sides except on the last ones.
|
|
stickbowcrafter
Member
|
# Posted: 4 Apr 2014 02:15pm
Reply
Ok thanks. I weigh 205 and I was able to hang all of my weight on the one sided gusseted rafter. I did double up the gussets on the interior rafters though, more glue, screws and plywood can't hurt. Surprisingly light but I can see how setting them could be awkward for one person.
I bought enough material for four rafters just to see how it would go. I have $60 dollars and 4 hours invested so far. Need to build 3 more for 2 foot centers. Definitely saving a boat load of money building my own and, of course, had fun building them because I enjoy this type of work. I can already picture my kids climbing up into the loft and having a blast.
-Brian
|
|
MtnDon
Member
|
# Posted: 4 Apr 2014 02:25pm
Reply
I believe you lost most of the strength when you cut away the chord that made them triangles. Going back a few decades there were plan books for trusses for AG buildings available through many mid west university extension departments. They advocated plywood gussets on both sides, and the plywood was left in triangular shapes. Nailed through all the layers and then clinched over the nails make a stronger joint.
What thickness plywood? How many plies in that plywood and how many of the plies have the grain going across the narrow dimension of the 2x? Those plies add little to the strength.
The other question is what kind of screws were used? Nails are better than many screws as many of the widely used drywall and deck type screws are surface hardened to prevent the driver bits from tearing out the head drive. That makes them brittle. That makes them potentially weaker than the wood. Nails are ductile and will bend a lot rather than snap as many screws will. There are structure grade screws, stronger than the wood in many cases.
|
|
stickbowcrafter
Member
|
# Posted: 4 Apr 2014 02:41pm
Reply
Oh well, first ones I ever built from scratch. They're going on a storage shed barn so I can always add to them if they don't seem to be strong enough. I have used Titebond glue on many a wood project and it's impressive stuff, can't imagine that 1/2" plywood on both sides glued and screwed isn't offering much strength. But you have to start somewhere and have something to learn from. Thanks for the input.
-Brian
|
|
Don_P
Member
|
# Posted: 4 Apr 2014 10:41pm
Reply
It's not a good idea to cut out the gussets, glue doesn't reinforce the weakened area. Each side of the broken joint could be well attached to it's rafter. But, what I'm really wanting to comment on is something I see pretty often. Using our weight to proof load a component. To flesh that out a little I looked at the brick and made the assumption that the upper roof is about 7' wide. If the rafters are set on 2' centers then the tributary loaded area to that upper roof is about 14 square feet. Dividing 205 lbs, the proof load, by 14 square feet equals about 14.64 lbs per square foot. This is about half the minimum allowable design load for a non snow area. Not saying it will fail, just pointing out that our weight is rarely an adequate proof load.
|
|
| . 1 . 2 . >> |
