| . 1 . 2 . 3 . 4 . >> |
| Author |
Message |
nathanprincipe
Member
|
# Posted: 6 Aug 2010 04:54pm
Reply
Hey Guys, finally getting around to posting the progress of my cabing build in East Tx. My wife and I started in Oct 2009, we still arnt even half way though. We set out to build a 16X24 cabin with a loft, and somewhere along the way it became 17x24. so here it is so far
the land before we cleared it
| 
after a hards day work
| 
the post came next
| 
after we set double 2x12 beams
|
|
|
nathanprincipe
Member
|
# Posted: 6 Aug 2010 05:19pm
Reply
a few more
the concept drawing ( going to eliminate the 2 dormers above the main living area
| 
beam reinforcements
| 
homemade floor trusses assemble in my garage, man that was alot of work!
| 
another view of the trusses
|
|
|
nathanprincipe
Member
|
# Posted: 6 Aug 2010 05:23pm
Reply
more pics
sheathing the floor with 3/4 t&g
| 
my lovely wife applying sealer
| 
the finished floor
| 
view from teh ground
|
|
|
nathanprincipe
Member
|
# Posted: 6 Aug 2010 05:27pm
Reply
more pics
started framing the walls
| 
more walls
| 
back wall
| 
the porch is in
|
|
|
nathanprincipe
Member
|
# Posted: 6 Aug 2010 05:30pm
Reply
still more
texas heat!
| 
stairs are in
| 
added additional 4x6 post to reinforce the load, spacing is now 4' o.c.
| 
bathroom framed, and arch way to kitchen area
|
|
|
nathanprincipe
Member
|
# Posted: 6 Aug 2010 05:35pm
Reply
keepin em comin
view of gabled wall from kitchen area
| 
started framing loft floor above bathroom and kitchen
| 
more loft framing
| 
finished loft floor, used plain old white pine 2x6 flooring
|
|
|
nathanprincipe
Member
|
# Posted: 6 Aug 2010 05:42pm
Reply
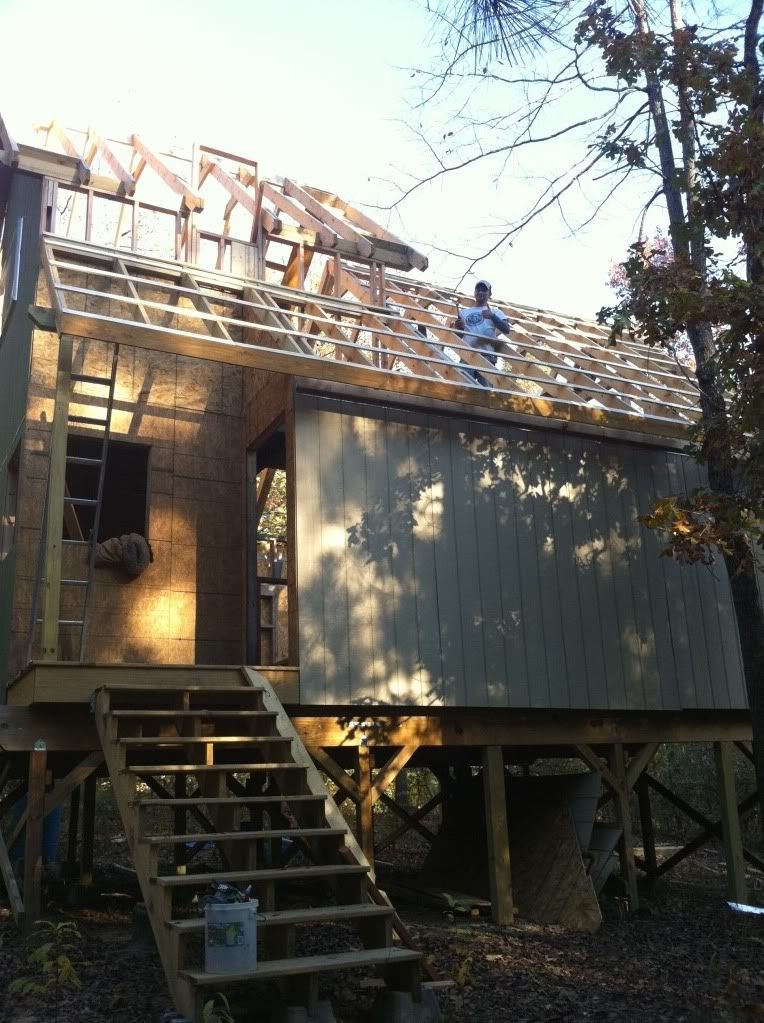
this is my progress to date, I will be constructing the loft walls this weekend and finishing the deck, next comes sheathing the rest of the structure before the roof goes up.
another view looking down from the loft into the main living area
| 
started some sheathing, im using smartsiding painted green for all the exterior except for the porch
| 
stared the deck off the main living area, dimensions are 17x8
| 
another view of the deck
|
|
|
MikeOnBike
Member
|
# Posted: 6 Aug 2010 05:44pm
Reply
You have been very busy.
Thanks for sharing!
|
|
|
nathanprincipe
Member
|
# Posted: 9 Aug 2010 11:16am
Reply
Went out this weekend and put up the loft walls, forgot to take pics tho :( had a few helpers this time, but with the heat at 105 one by one we all dropped like flies and had to call it a day. I will be back in a week or so and will post more then
|
|
nathanprincipe
Member
|
# Posted: 18 Aug 2010 11:24pm
Reply
Went out to the cabin and finished the loft wall framing for the most part, and finished laying all the deck boards that wont interfere with future construction steps. next on the list is to finish the sheathing before the roof framing starts, enjoy the pics
|
|
nathanprincipe
Member
|
# Posted: 18 Aug 2010 11:27pm
Reply
heres the pics
view of loft
| 
another view
| 
another view
| 
view of deck
|
|
|
nathanprincipe
Member
|
# Posted: 18 Aug 2010 11:29pm
Reply
views from the outside
|
|
CabinBuilder
Admin
|
# Posted: 19 Aug 2010 08:53am
Reply
Great work, nathanprincipe!
Thanks for sharing pix of your cabin building project.
|
|
nathanprincipe
Member
|
# Posted: 8 Sep 2010 11:01pm
Reply
Got a little more work done on the cabin last Friday, put up all of the smart-siding on around the 1st floor level, yet to cut the windows and doors out. I have 1 more trip to tie up various loose ends, then up goes the roof. Im so excited to see the cabin completely dried in, cant wait!
cabin_sheathing_001..jpg
| 
cabin_sheathing_002..jpg
| 
cabin_sheathing_003..jpg
| 
cabin_sheathing_004..jpg
|
|
|
nathanprincipe
Member
|
# Posted: 25 Sep 2010 09:50pm
Reply
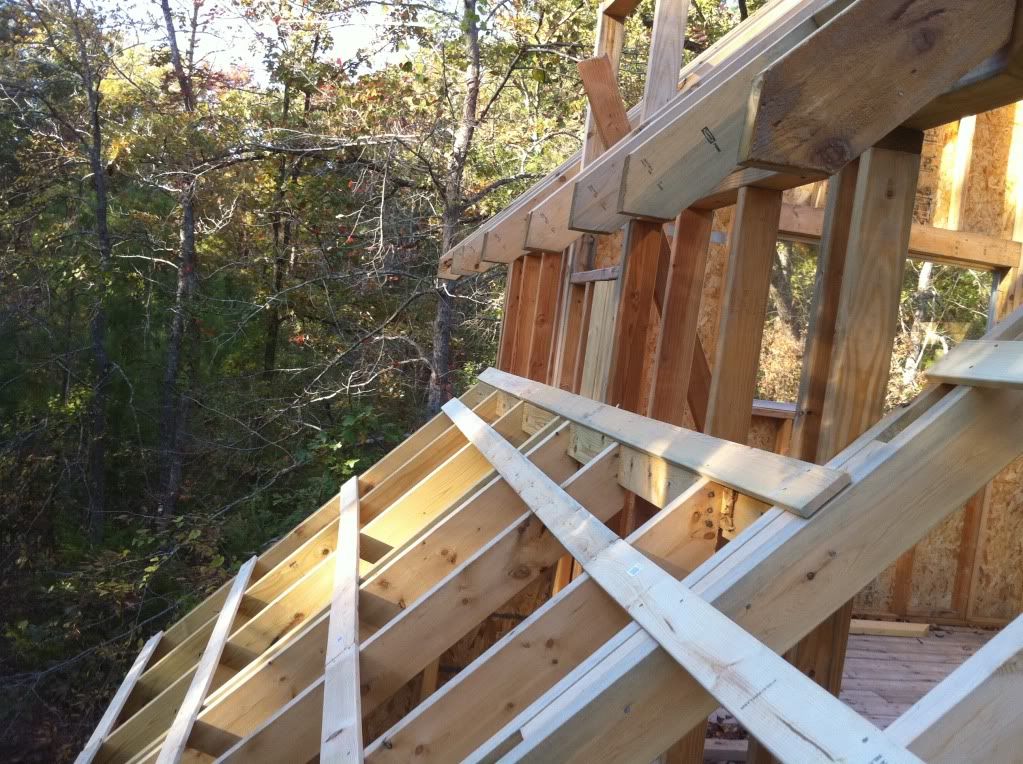
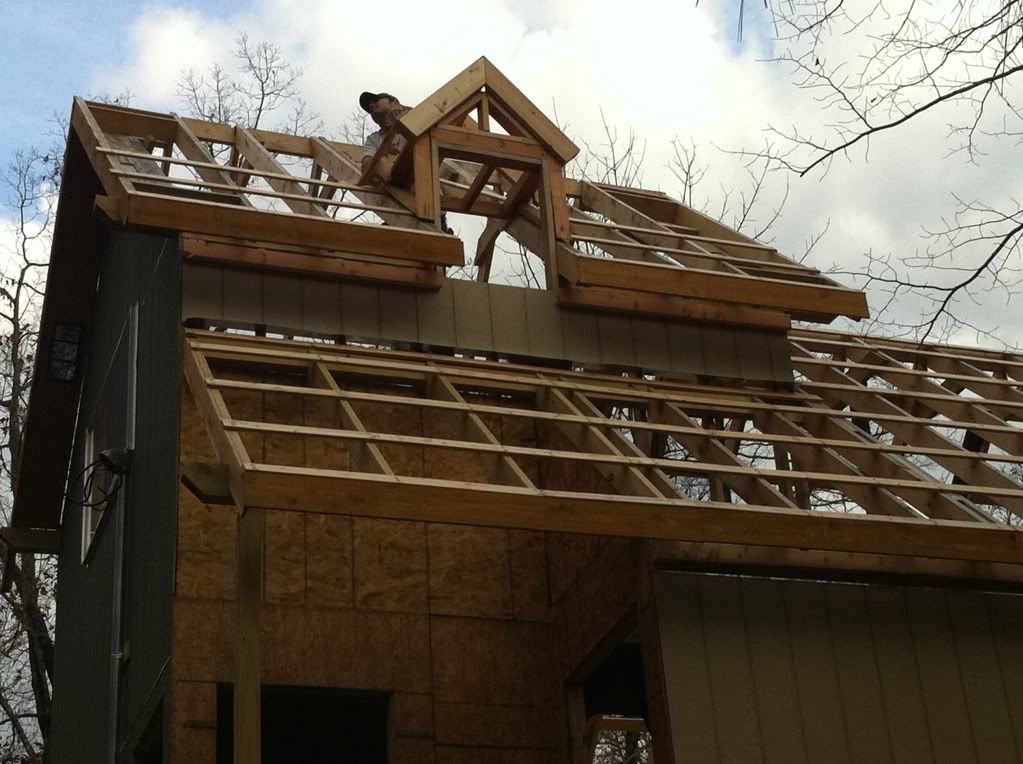
Took some helpers to the cabin today and started to frame the loft roof, this took more time then expected seeing this is my first time. I was pleasantly surprised when everything fit together as planned tho. I havent mentioned before, but, I am pre measuring and cutting everything at home and taking it out in pieces to put up bc there is no power yet. Im including some other pics we have taken o fother areas aswell, enjoy!
|
|
nathanprincipe
Member
|
# Posted: 25 Sep 2010 09:53pm
Reply
Here they are
view from main living area
| 
ground view from behind
| 
ground view looking at the deck
| 
ground view from front
|
|
|
unixfmike
Member
|
# Posted: 27 Sep 2010 09:19pm
Reply
Well that's coming along just fine. That looks like it would be great for full time living.
--MikeW
|
|
nathanprincipe
Member
|
# Posted: 17 Nov 2010 10:09pm
Reply
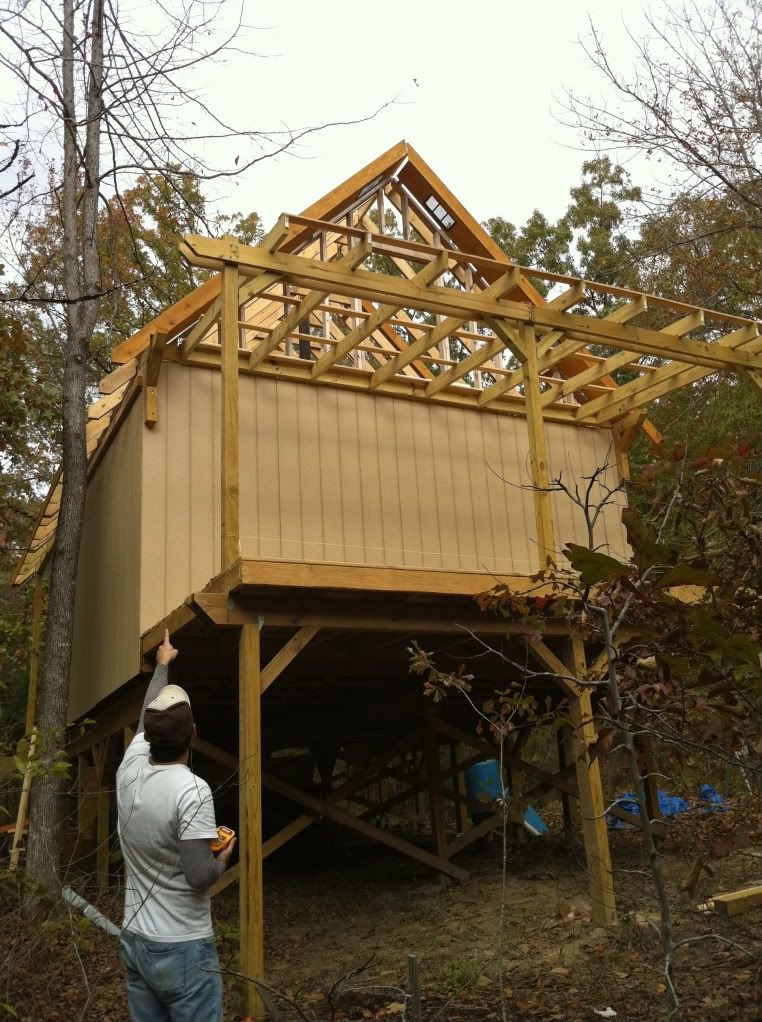
Been a while since I updated this thread. I recently finished the roof framing and started install purlins getting ready for my metal roof. To finish the exterior I still lack some framing, some sheathing, the metal roof, trim, windows and doors ( I will have power in the near future also) enjoy

|
|
MikeOnBike
Member
|
# Posted: 17 Nov 2010 10:52pm
Reply
Thanks for the update Nathan. Looks like you might have a roof before winter sets in. What is the reason for the tall foundation? Are you improving your view?
I'm going through building withdrawal. I need to get re-focused and start on some bathroom vanities for the house.
|
|
cabingal3
Member
|
# Posted: 18 Nov 2010 05:33am
Reply
somebodies gonna have a pretty grand place in the woods.hand work does pay off.thanks for sharing.
|
|
nathanprincipe
Member
|
# Posted: 18 Nov 2010 09:15am
Reply
thanks guys! Mike, you are right, when fall and winter hit we can see thru the trees from the deck to the lake, also I just think its cool :) the roof will come soon but Im not sure if we will beat winter tho, but thats ok because we are in TX and working on a metal roof in the winter sure beats summer! plus if it snows it will be like only 1" and last for maybe 1 day! haha
|
|
nathanprincipe
Member
|
# Posted: 31 Dec 2010 01:21pm
Reply
heres a few updated pics, still getting ready for the metal roof but I installed more purlins, got the electrical ready for the services drop, and finished the dormer window framing, enjoy!

|
|
islandguy
Member
|
# Posted: 31 Dec 2010 02:10pm
Reply
Thats looking really great. I also used the same siding on my 16x24 cabin. You can use it as both sheathing and siding in one, but you have already sheathed, as I had when installing the siding. I cant tell from the pics, are you letting it hang an inch or so from your framing so it allows a "drip lip?" Also, are you using any wrapping or tarpaper, or is it not commonly used in dry dusty Texas?
Great looking place, keep the pics coming.
|
|
nathanprincipe
Member
|
# Posted: 31 Dec 2010 04:45pm
Reply
thanks for the kind words Islandguy. Actually I did use the smart siding as a sheathing and siding in one, the exposed osb will get house wrap and cedar siding. Most houses do you use house wrap for the entire house but I opted not to use it under the smart siding ( hope I dont regret it!) Also, Putting up the siding that high off the ground was challenging! so what you are seeing as a "drip edge" is probably just imperfections! haha........ notice that I dont have too many "close up detail shots" because there are alot of small imperfections, but I m learning alot at least :)
|
|
Timberjack
Member
|
# Posted: 1 Jan 2011 07:52am
Reply
Awesome cabin nathan! Looking forward to more updates! Also, I noticed that you added some 6x6 posts to your foundation. How difficult was it to get those installed? I would think you had to lift the area with a jack to get the posts under the band to help carry the load. Details?
|
|
nathanprincipe
Member
|
# Posted: 1 Jan 2011 02:38pm
Reply
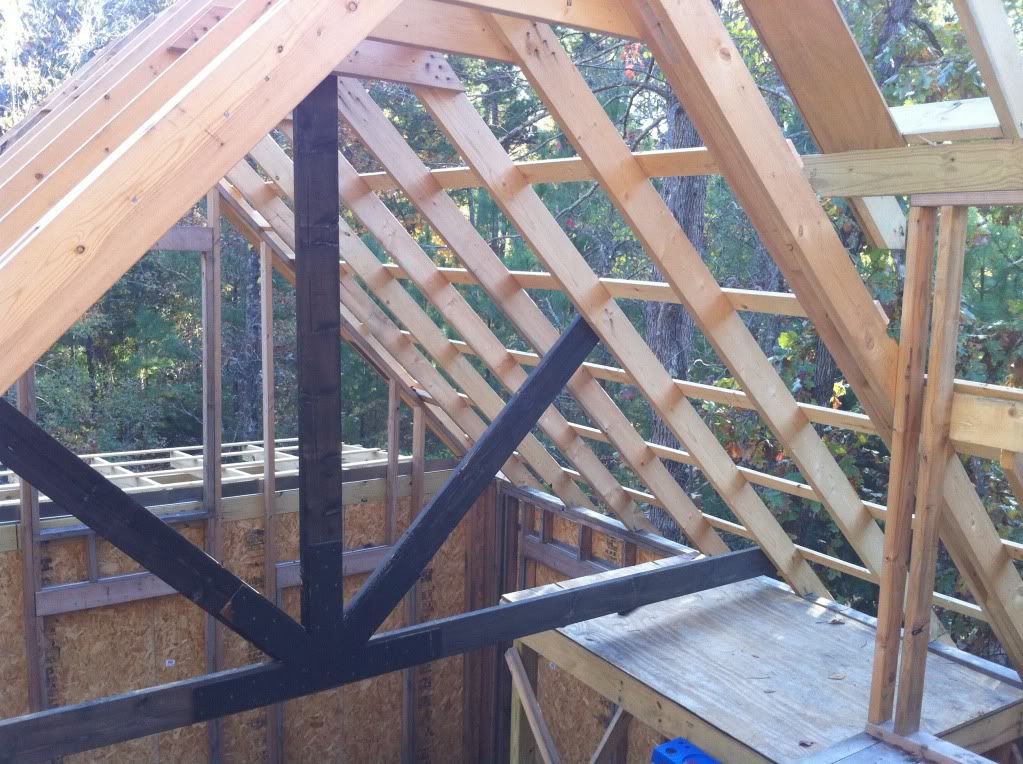
Thanks Timberjack. It actually wasnt as hard as it looks. I dug the hole for the post a little wider than normal to allow me to slip it in at an angle, once in the hole ( still at full length) I pushed it snug to the beam and made my mark to cut the post to the correct lenght. It took a little pursuation from the back side of an ax to get it to nudge under the beam but its a pretty tight fit. Im not sure how much of the load it is carrying, but if the beam ever sags a little or the cabin settles a bit then it will be carrying its full load. The reason for this is purely because I was doubting my decision to build that high in 4x4 post alone. If i could do it again I would try to save the extra bucks and go with 6x6 ( or even 8x8) posts from the start and be done with it
|
|
elkdiebymybow
Member
|
# Posted: 23 Jan 2011 11:03pm
Reply
Nathan,
Spectacular job! Keep posting as you get things finished up. I'm impressed with all the fine workmanship!
~Elk
|
|
pmichelsen
Member
|
# Posted: 3 Feb 2011 10:44am
Reply
Glad to see I'm not the only one building a cabin with electrical service. Looks good, can wait to see pictures with the roof on.
|
|
nathanprincipe
Member
|
# Posted: 3 Feb 2011 12:32pm
Reply
actually pmichelsen, up till the point you see in the pics we were using hand tools and a cordless saw. You will notice in the last few pics that the service was yet to be hooked up. We pre cut most everything at our home and brought it out for assembly. We now have power and things are moving more swiftly. As soon as I buy a new usb cord for my new phone I will up load more current photos. We have broke ground on the metal roof but didnt get far as I cut my nose open and needed stitches. When the weather makes a turn for the better we will get back after it
|
|
pmichelsen
Member
|
# Posted: 3 Feb 2011 12:53pm
Reply
I meant in the end; I see a lot of people's projects seem to be off grid and I felt a little out of place with my electric service, running water, and septic system. So it was nice to see another project that will eventually have electric service. Though I think mine will still be out of place, ha.
Can't wait to see the new pictures.
|
|
| . 1 . 2 . 3 . 4 . >> |
