| . 1 . 2 . 3 . 4 . >> |
| Author |
Message |
Jabberwocky
Member
|
# Posted: 12 May 2017 09:09am
Reply
Well, it's finally time to start a build thread. It's a slow day at work (the real job) and so I'm going to catch you guys up on the previous six months.
Here's the scenario: We sold our house last year and made a nice little profit. We wanted to build a small house on our two acres, but can't justify being tied to a mortgage right now because we want to accomplish other things first. So what we decided to do is build a 700 square feet apartment inside my dad's pole barn shop using the money we gained from the sale of our house. We dubbed it "The Outlaw" because A) It's in an OUTbuilding, and B) the wife is now living really close  to her IN-laws. Get it? It's not an in-law, it's an out-law... heh heh,... nevermind.. to her IN-laws. Get it? It's not an in-law, it's an out-law... heh heh,... nevermind..
So here's the run-down:
Central Oklahoma, climate zone 3
Barn runs north and south.
We are building under the roof on the northwest corner. - Not the most energy-efficient side, but much more privacy and the sunset views are amazing!
Here's a picture from the start of things (the "junk" classic car parts had to be moved out of our future living quarters)
Riley, our Pit Bull/Pointer mix is performing an inspection
|
|
Jabberwocky
Member
|
# Posted: 12 May 2017 09:12am
Reply
See, with views like this you would build on the "hot" side of the building too!
20161019_183601.jpg
| 
20170502_195906.jpg
|  |  |
|
|
Jabberwocky
Member
|
# Posted: 12 May 2017 09:15am
Reply
Stage one: Clean out the area
Stage two: Run electrical wires through the ceiling.
Yeah..... first mistake... hopefully the last big goof... I thought it was a great idea to use the space between the roof panels and the purlins as electrical chases - I hadn't thought about how much a pain in the butt it would be later to run them through the insulation and keep them air-tight 
|
|
Jabberwocky
Member
|
# Posted: 12 May 2017 09:26am
Reply
Next step was to install a radiant barrier. I understand that the jury is still out on how effective a radiant barrier is, particularly depending on climate, however I have installed it in our other, much older barn and it made a noticeable difference in comfort. It seemed like a good precaution since we will be picking up a lot of afternoon sun.
After the radiant barrier was up, it was time to start insulating. We chose XPS rigid foam board for the job due to its many benefits. Found a good deal on Craigslist - buy one pallet get one free. Had to drive to Fort Worth Texas for it, but it was worth the trouble. It's used of course, so a few damaged pieces, but more than enough for what we needed.
We used two layers. The first layer was 3" thick (approximately R-18), and the second layer was 2.5" thick (R-15). We chose these thickness based on the fact that our rafters are 2x6s. While the math works, the actual practice does not. The foam ended up hanging below the rafters about .5", thus requiring spacers for our final ceiling straps. More on that later.
Here's a picture of the radiant barrier and first layer of foam board going on:
|
|
Jabberwocky
Member
|
# Posted: 12 May 2017 09:36am
Reply
Whoops! I forgot a step that we did - spray foamed where the wall meets the ceiling. We have painstakingly air-sealed as I want the most energy-efficient, weathertight building envelope possible given our scenario
|
|
Jabberwocky
Member
|
# Posted: 12 May 2017 09:41am
Reply
Okay, back on track, here's showing the entire first layer of foam installed. Notice the spray foam in-between each joint. This was extremely tedious work that we are glad is finally behind us. What the picture doesn't show is that we came behind this and taped all of the seams with the generic equivalent of Huber Zip-tape. While it seemed to work well as it was being applied, in a few days it started to lose its adhesion due to the fiberglass backing on the foam board. Live and learn.. 
|
|
Jabberwocky
Member
|
# Posted: 12 May 2017 09:53am - Edited by: Jabberwocky
Reply
The second layer of foam board went up exactly as the first with two key differences:
A) We had to use 6" screws instead of 3.5" in order to penetrate the two layers and adequately secure the second layers to the roof purlins. Three boxes of 6" screws was pricey (approx. $90).
B) We spray-foam sealed all the edges of the second layer as well, but didn't bother taping them, as we already learned it didn't work from the first layer.
We also silicone caulked all of the screws/holes in the foam, especially concentrating on the second layer, in which the screws went all the way through both layers. Some might say that's a little anal, but I believe that "a job worth doing is worth doing right." Plus I wouldn't want to incur the wrath of certain building experts over at greenbuildingadvisor.com 
Some of you are probably saying that it would've been easier and better to have just spray-foamed the underside of the roof. You are correct, however I didn't do this for two reasons:
A) It wasn't in our budget to do this for the amount of product it would have taken, and
B) I've read too many horror stories of the product being sprayed/mixed improperly or at the wrong time of the year and never curing completely or the smell going away.... Just knowing what kind of "luck" I typically have made me leery of this LOL
|
|
Jabberwocky
Member
|
# Posted: 12 May 2017 09:57am
Reply
Before we got all of the joints spray foamed, I came out to work on the project one morning and found that a little bird couple decided to evict a large chunk of the foam board and replace it with a nest. Fortunately they had just completed it and had not moved in yet..
I removed the nest obviously, and we laughed about it... I can just hear the mother bird griping now... "Harold! I thought you told me you secured that!"
"I did Martha, I did! I don't know what happened!"
|
|
|
Jabberwocky
Member
|
# Posted: 12 May 2017 10:01am
Reply
It has continued to be a problem, and due to the fact that I work full time and can only tend to this project on the weekends, we had one bird couple actually get to the point of laying eggs before I had to evict them.
I gingerly relocated the nest to another part of the building that wouldn't be disturbed, but unfortunately they abandoned it.
|
|
Jabberwocky
Member
|
# Posted: 12 May 2017 10:07am
Reply
So here we are in May... Storm season in these parts. I'll never get tired of the skies here. This on the backside of one that passed through a few days ago:
|
|
Jabberwocky
Member
|
# Posted: 12 May 2017 10:10am
Reply
My good buddy Riley has been with us through thick and thin. As you can see from the second pic, he's a very vocal supporter
20161113_121239.jpg
| 
20161119_150556.jpg
|  |  |
|
|
Jabberwocky
Member
|
# Posted: 12 May 2017 10:14am
Reply
This is where we are at currently:
We had to install some 1x1 spacers to the bottom side of the rafters because the foam board hung down lower than the rafter bottoms. After the spacers were installed, we covered everything up with a smart vapor retarder. Stuff is not cheap, but it's an added layer of security, and as such, allows us to put whatever we choose for a finish ceiling without worrying too much about vapor permeance of the material.
|
|
Jabberwocky
Member
|
# Posted: 12 May 2017 10:19am
Reply
You can see down at the far end in the previous pic that we also are installing some 1" poly-iso board to the girts of the north wall. This will act as a rainscreen of sorts. I caulked (on the inside) all of the sheet metal seams. The foam board will be spray-foam and tape-sealed.
The 2x4 stud wall will go in front of this, and the foam will prevent thermal bridging through the studs.
We hired a carpenter to frame the walls for us because I just don't have the time or expertise to do it myself. He's working on it today. We have also started the rough plumbing. More pics and info to come....
|
|
Steve_S
Member
|
# Posted: 12 May 2017 12:36pm
Reply
Ahhhh Photo = 1000 words ! Got what your talking about now, was trying to visualize it, wasn't working so good.
Agree on the view - that's too good to not wanna have windows facing it... So some sort of sun shading for mid day heat may be in order.
I certainly have a feel for what you went through with the insulation in the roof... I used 2x8 Rafter's which came out to 7-1/4" as opposed to the expected graded 7-1/2". Because I installed 3.5" & 4.0" ISO between the rafter's I had to float the rafter's with 3/4" thick x 1.5" wide plywood strips. Injecting foam in all seams and edges and much fiddly work. Many Lessons Learned and I have to say, Thank Goodness it is my last build ever. Happy to share lessons learned for those who interested, a couple of doozies there too.
Wee bit of a difference from my method to yours but that's due to climate differences & diff building code requirements but not too major. Ours tend to be tougher on the envelope & sealing aspect because when it's -30 outside things are not so forgiving if you mess that up.
|
|
toyota_mdt_tech
Member
|
# Posted: 12 May 2017 04:11pm
Reply
My cousin bought 5 acres with an AG building on it. He converted it legally by adding full septic and changes to a section of the AG building for habitation, he has the full occupancy permit. Its nice inside. Just like any house, never know you are in an AG building.
|
|
Jabberwocky
Member
|
# Posted: 15 May 2017 01:20pm
Reply
Steve_S
You made my wife very happy to know that she was not alone in irritation over the tedium of insulating the roof. You know what they say: "Misery loves company." 
toyota_mdt_tech
Yes, obviously we have no problem living in a pole barn. Fortunately we are in a little pocket of area that doesn't belong to any municipality. We won't have to worry about permits or inspections of any kind. That being said, we certainly aren't cutting corners and having licensed contractors do the plumbing and electrical.
|
|
Jabberwocky
Member
|
# Posted: 15 May 2017 01:41pm
Reply
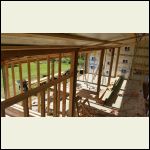
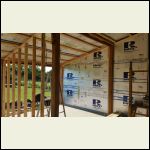
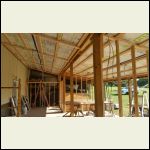
Good progress made over the weekend. Here's some photos: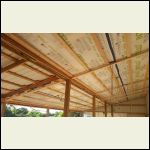
20170512_191740.jpg
| 
20170513_180834.jpg
| 
20170513_180925.jpg
| 
20170513_180943.jpg
|
|
|
Jabberwocky
Member
|
# Posted: 15 May 2017 01:43pm
Reply
Drain plumbing roughed in and ready for re-pour. Kept all the plumbing needing floor draining against the back wall to make it simpler to install with as minimal amount of concrete cutting as possible.
|
|
Jabberwocky
Member
|
# Posted: 15 May 2017 02:55pm
Reply
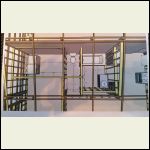
It occurred to me that it would be helpful to show everyone the floor plan of our apartment. I gave my wife certain parameters to work with and she drew up the plan. Her plan is a lot better than the ones I came up with - a lot simpler and more functional 
Once we agreed on the layout, I drew everything up in Sketchup. It's been very helpful to the process.
The room to the far left (Northwest corner) is the bedroom. To the rear is the closet which will also house our washer/dryer. Rear center is the bathroom with a separate water closet. Above the closet and bathroom will be storage.
Front center is the living room, while front right is the entry/ dining room. The kitchen will be in the 10x10 section to the rear with the preexisting door that goes into the enclosed shop area.
The last room is the rear left corner, which will be an office/media room with a sleeping loft above.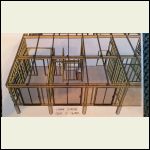
20170513_191818.jpg
| 
20170513_191841.jpg
|  |  |
|
|
Steve_S
Member
|
# Posted: 15 May 2017 05:07pm
Reply
LOL Jabberwocky & Missus Jabber....
Indeed, is that considered CoMiserating ? somethin like that eh !
If I had to do it again, I know I would do it differently, using a 15Lb Sledge to convince the foam into place is not optimal and get's tedious to say the least.
Looking really good and making great progress !
|
|
Jabberwocky
Member
|
# Posted: 17 May 2017 11:34am
Reply
Yeah, when it came to installing insulation, I never graduated to a sledge... only a framing hammer and 2x4 block 
The missus overrode a design decision based on the suggestion of the carpenter (who wants to make more money obviously)  - We now have a giant hole in the north wall (the one with all the pretty R-max insulation in the previous photos that I spent time sealing). She decided she wanted the french door on that wall of the bedroom instead of the west wall (front face). It was the better option overall, so I got over it. Will upload pics later this week. - We now have a giant hole in the north wall (the one with all the pretty R-max insulation in the previous photos that I spent time sealing). She decided she wanted the french door on that wall of the bedroom instead of the west wall (front face). It was the better option overall, so I got over it. Will upload pics later this week.
|
|
Steve_S
Member
|
# Posted: 17 May 2017 12:12pm
Reply
Yeah, I started with the 2x4 & framing hammer but as you realized that kills the arms, especially when working overhead like a ceiling... Maggie grabbed a hunk of 2x6 one said and told me to whack that with the sledge... (we were doing a wall section with 5-1/2" thick EPS-II foam in 4' sections) so why not... well that instantly became the way to do it ! ~ Lessons Learned through experience eh! Trick was to not whack too hard and DON'T MISS the 2x6 ! Ok... there was a miss but considering Magz helped trim 2 of my finger's with a circ saw before... suppose it all balances out eh... ;) ;) nudge, nudge...
Ahhh the adventures.... hehehe as long as you can laugh at it all later...
|
|
Jabberwocky
Member
|
# Posted: 17 May 2017 04:43pm
Reply
Quoting: Steve_S there was a miss but considering Magz helped trim 2 of my finger's with a circ saw before... suppose it all balances out eh...

Well, marriage is all about sharing, right? Sometimes that includes injuries. 
So far the worst injury I've sustained while working on this project was a freak concussion from hitting my head on one of the rafters last winter. Was pretty miserable for a few weeks and it slowed us down. Then there was the time that I punctured my head with a rusty nail on our old barn... Had to get a tetanus shot...Hmmm... I seem to be head injury prone 
|
|
Jabberwocky
Member
|
# Posted: 18 May 2017 09:06am
Reply
New stuff today. I love that things are getting done while I'm at work! I really wish I was able to do it all myself but I just don't have time.
Here's the design change the missus made: Switching the positions of the bedroom window and French doors. The door will now be on the north side. Should be a really pretty view when the snow comes in winter.
|
|
Jabberwocky
Member
|
# Posted: 18 May 2017 09:13am - Edited by: Jabberwocky
Reply
The view from the kitchen looking out through our front door and dining room windows. We purchased our doors on Craigslist, but ordered new windows from our local lumber yard. The reason for the studs splitting the window opening is because we didn't originally intend to put two of them side-by-side in this spot.
We obtained the 4x6 bedroom window for free, but I am spending $100 to have one of the lights replaced because the vacuum seal was broken. So all in all we have $880 invested in windows and exterior doors. Still a pretty penny, but less than I budgeted for.
|
|
Jabberwocky
Member
|
# Posted: 18 May 2017 09:18am
Reply
New concrete is now covering the channel cut for the plumbing drain. We left a box around the drain for the tub unpoured to allow room for error.
|
|
Jabberwocky
Member
|
# Posted: 18 May 2017 09:21am
Reply
This is showing the kitchen area where the existing doorway leads into the shop building. Originally they poured a ramp coming up to the door sill, but we had to cut it out and smooth it over to allow room for the doorway to my office. It would be much better in the long run for practicality and appearance anyhow.
|
|
Jabberwocky
Member
|
# Posted: 18 May 2017 09:28am
Reply
Last but not least for the day is a picture of the future sleeping loft above my office. We made the ceiling as low as possible without being too short for the average man - hence the joists being hung inside the stud wall perimeter rather than set on top of the top plates.
The stud wall will continue up past the loft floor to enclose this space. We are going to try to find an old vintage wood window to frame into the high side above the office door to allow for airflow. The idea is to make this an extra "bedroom" for when we have guests. We can sleep up there and since the hatch will go down into my office, the unit as a whole can serve the function of being a bedroom complete with a changing area.
|
|
Jabberwocky
Member
|
# Posted: 24 May 2017 09:05am
Reply
The framing is basically done. Starting to wrap the outside. Dunno if I mentioned it but we are trying to use the PERSIST method - Completely seal the outside sheathing with roofing membrane and installing rigid foam on the exterior. Unfortunately I will only be able to use 1" thick across the front due to the lack of overhang - can't have it stick out further than the roof obviously.
After we wrap the outside with Grace Ice & Water Shield we will install the windows and doors, but will otherwise change phases and work on finishing the inside. The reason is because the siding we will be using to finish the exterior is currently sheathing the building that's storing all of our stuff. So we will need to move in basically, then dismantle the storage building and recycle the siding.
|
|
toyota_mdt_tech
Member
|
# Posted: 24 May 2017 10:48am
Reply
Nice work J/W. I have mentioned to the wife about retiring to an AG building on our 40 acres converted for habitation in part of it, she has no issues with it at all. Cool chick.  
|
|
| . 1 . 2 . 3 . 4 . >> |

