|
| Author |
Message |
BadKarma
Member
|
# Posted: 1 Dec 2010 14:17
Reply
Have been thinking about building a small cabin for full time living and found this outstanding site. I'm going to start stockpiling building materials. I'm planning on a 24'x24' A-frame on a Dek-Block foundation. How far apart should I put the blocks? So far the plan is to use 2x8's.
Great site.
Thanks
Karma
|
|
fthurber
Member
|
# Posted: 1 Dec 2010 19:53
Reply
Hi Karma
Are you sure you want an A-frame? I would think that they can be dark inside and they don't seem to have a lot of living space in comparison to all the work you have to do to build them. I would try staying in an A-Frame to see if you like it.
|
|
MtnDon
Member
|
# Posted: 1 Dec 2010 20:33 - Edited by: MtnDon
Reply
1. There is no simple answer without knowing more about the property and what possible restrictions you may face. Questions: Is there any need to meet codes? Building permits/inspectors involved? Do you have freezing weather with the resultant possible ground/foundation heaving concerns? What type of soil is there, clay, gravel, rock? Wet/dry/drainage?
2. I echo the question about the A-frame design. I find most of them to be rather like tunnels, windows and doors at each end and solid sides. The A-frame shape can create issues with counter tops ranges and the slanted walls. Ditto on passing a wood chimney through the roof/wall and maintaining proper clearances to combustible surfaces. Those can all be solved but should be considered. Then there is the question of the long rafters that are required. First they may be longer than any readily available length and may need special ordering. Then there is the question of safely raising them. Again, not insurmountable, but something to think about.
You mention stock piling of materials. Note that some materials, in some climates, do not store well, or require proper weather protection. Example: kiln dried lumber is at 19% or less moisture content when released from the mill. If it sits around for lengthy periods in high humidity it will pickup moisture. Ditto on panels like plywood and OSB. Just things to keep in mind.
|
|
BadKarma
Member
|
# Posted: 2 Dec 2010 07:06
Reply
Thanks for the replies y'all.
After talking with my brother, who will be helping me, I've decided to can the A-frame idea and go with a traditional timber frame with a half loft, 14'x20'. I lived in a smaller A-frame many years ago.
I live in the Ozarks near Branson Missouri, just outside of my hometowns city limits. The soil is pretty rocky and the frost line is pretty shallow. Building permits and inspections are pretty easy to get by here, we are hillbillies after all. ;)
The site has good drainage and the slope is minimal.
The stockpiling will be over the winter in our large shed, so humidity will be low and any lumber will remain banded until time to use it. I want to have enough to get the floor, walls and roof on with no break in the action before the rains start.
Since the ground is rock laced clay mostly, would the Dek-Blocks be alright? They would be the easiest to do, but a post hole digger would be a major pain with all the rocks. A couple of years ago, we had a huge Oak tree in the front yard fall over in a mini tornado, it was 12' in diameter and it had NO TAP ROOT!!!!!! It had grown right on the flat bed rock. That's why it fell on my brothers truck!!!!
Thanks a ton for any advise y'all have. Since my Dad passed a couple years ago, I have no one to ask these questions of.
|
|
steveqvs
Member
|
# Posted: 2 Dec 2010 08:28
Reply
In southern missouri where I know of a few cabins going up they use post hole diggers (like the ones on a tractor) and dig the holes. Its extreemly rocky. Then they use the metal connecting plates to secure the wood to the concrete. I would look around this winter and see if you can find someone to do the holes for you. I think it would be a better way. The foundation is the most important thing to get right.
|
|
Gary O
Member
|
# Posted: 2 Dec 2010 09:28 - Edited by: Gary O
Reply
BadKarma
Yeah, A-frames really reduce living space. They are nice to look at, but, unless you have stub walls, there's just a lot of wasted space.
Foundation
steveqvs and Mtndon are the experts, and you can't go wrong doing as they suggest.
However, not to sway you one way or the other, but I think I know what you're after...simplicity.
If in fact you have no worries about codes and are fairly confident in your soil situation, here's an excerpt from my journal;
The foundation is, as always, critical. If you don't start out with a square, true base, you'll fight angles all the way thru your building endeavor.
In my opinion, a small cabin, shed, shop is somewhat forgiving when it comes to authentic foundation construction. This opinion, coupled with my inexperience with actual foundation fundamentals, brings me to my next journal entry.
There are many books, pamphlets, and magazines that help with very detailed info and illustrations, showing how to pour the cement, true the pilings for post and beam, and build your foundation the correct way.
I build mine bass ackwards. I'd like to think the early pioneers built theirs as mine. I determine how many cement blocks I'll need, then find the four corners of my structure. I then commence to level the ground (not the piling or post). It saves me some time, but is very tedious, as I place a straight board on the exterior blocks and find level with (what else) a level (a long one), tamp, dig, tamp, add soil, tamp, dig, etc..... until all blocks are even with each other.
To square the layout, I measure the diagonal corners. They've got to measure the same. Use your imagination as to how you get there. The inside blocks also need to be square, true and level. It's a bit easier, but grunt work just the same. Some may argue that tamped dirt is not stable enough.
That might be right, but of the six small buildings I've built, none have had problems with level over time. Things will and can settle, but a well placed shim can correct any of these issues. I've never had to shim, even though I've seen many a shim on cement poured posts......
The cement blocks I use are nothing fancy, just 12 x 6 x 4 inches deep.
Saving expense while yielding a solid structure is the goal.
Now you can lay the floor boards.
Some insist on tongue and groove. Its unnecessary expense if you buy kiln dried #2 or better.
Two weeks later, Fourth of July weekend, we bought timbers and blocks, loaded up our tiny trailer with tools, building materials, and mosquito spray, and headed back to the property, both of us with set jaws that we'd get the site leveled and the blocks and beams laid. No camping. Too much stuff and prep just to get going. We were going to stay on task.
We'd seen some interesting A frame motel units 15 miles north of the property. So I looked 'em up on the web. Reasonable too ($42/night).
The people were very nice on the phone, so I reserved two nights.
On the way down, we talked about the movie 'Vacancy'...........got the creeps, and quit talking for awhile.
We dropped the trailer and contents at the property, fed the mosquitoes and went back to the motel. I studied their 'A' construction. Loved how they were made, but without any side walls they were not very efficient space wise and (I suppose) heat wise all going to the ceiling 20 some feet up.
OK the place was not clean, septic odor was present, and over all was lacking up keep. But the new managers were on task. Time will tell.
The kitchen and bathroom was designed as an afterthought. You had to move the tiny fridge to get into the silverware drawer, and you had to squat down to use the shower (of which they provided a plastic stool, nice touch).
The sunset shining thru the tiny bathroom window did give the knotty pine walls a golden cast.
I mentioned where we were staying to the guy at the mini mart, "Oh, yeah, crouching showers", he recalled. It was as though we were on the well known long abandoned set of a combined martial arts/gay western/porn movie..... "Crouching, Broke Back, Golden Showers".
The following morning we gulped down something (can't remember), swilled coffee, grabbed the water jug, and headed out, determined to complete our task of the day.
We grunted, thought, strained, and sat in 20 minute intervals (then we got out of the Jeep...just kidding). It took us a good part of the morning and a bit of the afternoon, but when we ceased toiling, the timbers and blocks were level, true and plum.
However, Karma, your structure is going to be a bit larger, so, if it were me, I'd go into the ground (as I am going to do on our next structure, after getting good advise from these guys).
Happy Building
Gary O'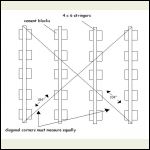
block_layout.JPG
| 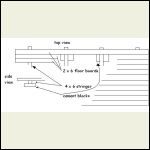
floor_layout.JPG
| 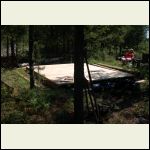
Tired wife, really didn't take her that long though...
| 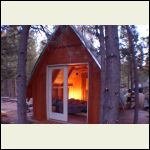
Cozy_cabin.jpg
|
|
|
BadKarma
Member
|
# Posted: 2 Dec 2010 09:44
Reply
Thanks Gary for that. It's giving me a lot to think about and some research to do. My local codes may be pretty lax, but I'm going to go talk to the county just to see what they suggest.
If I can't use the simple way, I've thought about this method:
http://www.small-cabin.com/forum/2_548_0.html
I just need to know how far apart I need to put these supports.
For a 14'x20' would I need, say, 6? Or 10?
|
|
MtnDon
Member
|
# Posted: 2 Dec 2010 11:26
Reply
Before getting too far into the discussion about how to build a foundation you should follow through with checking on the local requirements for permits. Once you know for sure what they will allow or what they want you're good to go. There may be no restrictions other than septic and basic electrical safety rules. ???
Are there other cabins nearby on similar soil? If so are there any that have been there for ten or more years? If they've been standing for years and are still level have a look at what they used for foundations. Soil conditions vary a lot around the country and what worked for my cabin may not work well for soil with lots of clay.
One thing to keep in mind about shallow (or basically surface) foundations it they provide little to no sideways stability nor do they provide resistance to uplift from high velocity winds.
You mention clay in the soil. Good drainage is a prerequisite to stable foundations in clay. Check on the local regs before thinking too much about how to build the foundation is my recommendation.
How many footings/post/piers and how far apart partly depends on the bearing capacity of the soil. The local building dept should have some info on that. Four foot spacing may be required to spread the weight out enough. I was fortunate to have a great base and used 7'6" centers. That also affects beam size.
|
|
|
BadKarma
Member
|
# Posted: 2 Dec 2010 11:50
Reply
I just got off the phone with the county planning and zone office and the only thing I have to worry about is that they get their $50 for the permit!!!
He said I could build it out of Legos if I wanted to and still be compliant!!!!!
He said that if it was him, he's use blocks since it's not a very large structure. We have another cabin on the property, an timber frame cabin my Dad moved in here 30 years ago, but it's on a full basement, but there are dozens of mobile homes in the area that have been here for ages that are on blocks.
|
|
MtnDon
Member
|
# Posted: 2 Dec 2010 12:12
Reply
I'd suggest digging out a square 16x16x8 inches deep and filling that with crushed rock. Tamped well in layers that will provide drainage and support. Precast concrete chimney blocks make a good pad when filled with poured concrete as well.
Placing the supports 4 feet apart would permit a 4x8 beam down each long side. You can position the blocks to have up to 2 feet of overhang on the beam ends. The beams can be placed inboard from the outer wall by 12 to 20 inches. Slight cantilevers like that can make it easier to square up the floor.
Note that any wood closer than 6 inches to the ground should be PT. Having 12 inches space under a beam and 18 inches under the joists makes it easier to do anything required under the cabin easier at any time down the road. That will necessitate proper bracing of any posts used to gain the elevation but in my opinion being able to crawl underneath is a good thing. I've added wire runs as well as gas pipes underneath since our cabin was "completed".
If you build 14 ft wide with the joists overhanging the beams 1 foot, 2x8 #2 southern pine on 16" centers can be used for floor joists.
|
|
BadKarma
Member
|
# Posted: 2 Dec 2010 12:38
Reply
Thanks Don.
Since I am a visual learner, could you direct me to a pic of the overhanging joists? I'm having a hard time picturing how they are attached to the beams.
I had planned on using 2 PT 2x8's bonded and nailed together for my beams.
Would the joists need a support in the middle?
|
|
BadKarma
Member
|
# Posted: 2 Dec 2010 13:24
Reply
Okay, a little Googlefoo and I see how that works. But I can't see the brackets. Are they a bit like an "L" bracket?
|
|
MtnDon
Member
|
# Posted: 2 Dec 2010 13:46 - Edited by: MtnDon
Reply
Sorry, no handy picture. I have used Simpson H-1 brackets. They are purposed as rafter ties but do a good job of locating floor joists as well. Nail them to their positions along the beam. Drop the joists in. Start with the two outermost joists. Get those set as perfectly square as you can by measuring the diagonals. Any error here will continue to be a source of grief later on as walls, roof etc go up. Once they are set and nailed use a string to get all the ends even. Double check the lengths of the purchased lumber, sometimes they vary a bit.
No center beam is required with the type and sizes, spacing etc of the 2x8 mentioned.
Simpson H series...
There is no need to glue the 2x8 PT planks together for a beam. Simply place all joints over a post/pier. Nails will suffice to hold them in alignment. The weight is carried by the wood.
My posts and beams....
|
|
BadKarma
Member
|
# Posted: 2 Dec 2010 13:59
Reply
Got it!!!!!
That makes sense.
|
|
fpw
Member
|
# Posted: 2 Dec 2010 17:04
Reply
20' x 22' Inside dimension log cabin. Pier foundation, I used 3 main support beams. The two outside beams have 5 piers per beam. the center only has 3 piers. Works just fine...photo below.
More info...
http://peelinglogs.blogspot.com/2010/11/two-more-days.html
|
|
fpw
Member
|
# Posted: 2 Dec 2010 17:07
Reply
PS...I like A frames. Going to build a Timber Frame Cruck contstructed A frame one of these days.
|
|
toyota_mdt_tech
Member
|
# Posted: 2 Dec 2010 22:36 - Edited by: toyota_mdt_tech
Reply
Here is my foundation system. It works real well. No critters have ever gotten inside. Crawlspace is inside, no outside access. (by design) It did cost me a total of $3,800, but its the first step and tough to change. Was actually much less work for me this way, but more $$$. In my area, there is no way to keep critters out unless you go this route. I have zero critters, no bugs, lifeless inside. :D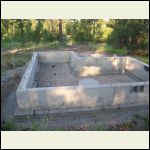
footing/stemwall back wall
| 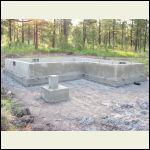
footing/stemwall front corner
|  |  |
|
|
BadKarma
Member
|
# Posted: 3 Dec 2010 06:54
Reply
There's a resort near my office that built all cabins, so I went out there to have a gander at how they did theirs and they did all of their cabins the way MtnDon suggested. Blocks with cement filler.
So Ive decided to follow that idea and add a 12" log end like fpw did.
Poured foundation is a real nice way to do it, but way out of my budget.
And Don made a lot of sense on something else too. The stockpiling of materials will proceed, but lumber and wood will be the last thing bought.
Thanks everyone for your input. I appreciate it.
Karma
|
|
fthurber
Member
|
# Posted: 4 Dec 2010 17:04
Reply
If I was smart and could afford it...I would buy all my siding now and let it age. You see I only use rough cut green lumber one I get past the floor and those green planks shrink a lot after I out them on. I use battens but I would really love to do it right just this once...naw
|
|
|

