|
| Author |
Message |
Cabinfun
Member
|
# Posted: 25 Oct 2013 11:38
Reply
Hi everyone, new to forum but looked at many times to get ideas.
In process of building cabin, almost done in Potter County, Pa. Spent a lot of time on internet trying to figure out a decent yet reasonable way to have water and a bathroom. I finally figured, what I feel is a great system since they wanted $7000 to drill well and $15,000 for sandmount, about $20,000 more than I want to pay for running water and a place to relieve myself.
I installed a 1000 gallon concrete privy set up so it could also be used with a sandmount if ever someone decided to go that route. Also bought a cool wooden cabin can ($245) for inside bathroom only for peeing. Doing #2 in privy. http://cabincan.com Wife is not a camper but very happy with this setup. All you need is saw dust to cover urine. It does not smell, works great and looks cool.
Now to water setup:
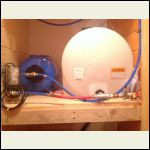
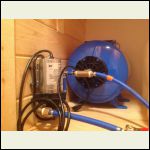
I purchase a SHURflo pump model # 2088-594-144 Complete with 6' Power Cord on eBay for $119. (Don't forget a strainer/filter like I did).
A 5 gallon pressure tank at lowes for $48, a 35 gallon leg style holding tank from Tractor supply for $99 http://www.tractorsupply.com/en/store/leg-style-storage-tank-35-gal?cm_vc=-10005
A 19 gallon hot water heater for $260 at lowes.
I plumbed everything with pex. Never did any of this before and all works great with plenty of pressure at faucets, still need to hook up water heater.
I also set up so I can drain and put air pressure thru system to help clear out all water. I have to double check the way I have this setup to make sure the air pressure will not damage shurflow pump before I use it.
I am planning on either harvesting rainwater or something else so I don't have to run to local stream or spring to transfer water. Now I have a few 5 gal buckets I fill with spring down the road.
I also purchased a $8 pump drill from lowes to transfer water into or out of 35 gallon tank.
I spent a lot of time figuring this out and thought if this could help anyone it would be nice to have it posted somewhere.
Hope it helps!
image.jpg
| 
image.jpg
| 
image.jpg
|  |
|
|
yankeesouth
Member
|
# Posted: 25 Oct 2013 12:11
Reply
Your system looks great. I am looking to do something similar for the winter when I shut off the water.
There is a gent who has a camper by my camp that runs a similar system. He has one of those blue 55 gal drums. Puts about a cup-ish of bleach and presto water. He did not use a 12v pump. He bought one of those all-in-one pump/pressure tank combos. (About $100.00) works pretty well from what I understand. His philosophy is when the pump/tank go bad....it's only about $100.00 to replace it.
The compost toilet is simple.....that's what I use. You can also put some charcoal in to diffuse the odor. I forgot about mine and it sat for about 3 plus weeks with more than pee.....when I came back to the cabin there was zero odor.
|
|
Steve961
Member
|
# Posted: 25 Oct 2013 16:12
Reply
Yours is very similar to mine, except I don't have a hot water heater. I have a 30 gallon water drum, 12V SHURflo pump, and a 2 gallon pressure tank. One thing I added to mine was an alternate feed line to the pump. This is so I can draw water from a bucket with heated water, such as from the wood stove in winter, to take a warm shower if necessary. It also makes it easy to introduce RV antifreeze into my system to winterize it.
|
|
Cabinfun
Member
|
# Posted: 25 Oct 2013 20:53
Reply
Steve962, nice suggestion on extra feed line. Do you run antifreeze into shurflow pump and pressure tank and then just flush it out in the spring?
|
|
Cabinfun
Member
|
# Posted: 25 Oct 2013 20:55
Reply
Steve, do you try to maintain any heat in area over winter?
|
|
Steve961
Member
|
# Posted: 25 Oct 2013 21:25
Reply
I first pump out my storage tank, then I run RV antifreeze through the pump, pressure tank, and the water line. My cabin is also unheated when I'm not there as I only have a wood stove for heat.
|
|
toyota_mdt_tech
Member
|
# Posted: 25 Oct 2013 21:53
Reply
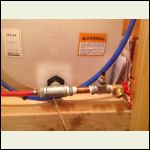
OK, I see an area of potential problems. Coming out of your tank, you have a galvanized "T" fitting with a copper reducer hooked to copper stub pipe into another galvanized pipe section. Hooking galvanized pipe to copper is a no no and you will have corrosion (dissimilar metals) and eventually a small leak. The corrosion and leak is certain, if you must tie galvie to copper, they usually install a bronze piece between, that buys you lots of time, but still corrodes.
Otherwise, looks great. I love PEX, especially the colored stuff for hot and cold. I like your crimped fittings too, much lower cost than the shark bite.
Nice work! 
|
|
Cabinfun
Member
|
# Posted: 26 Oct 2013 08:04
Reply
Thanks for the heads up. I'll keep my eyes on this and correct when I finish a few more cabin projects, like finish trim, install doors, install shower, install two exterior lights, put up backsplash, tin wainscoting in bathroom, frame out a closet area in bathroom, insulate utility area, put up a 12-18 strip of metal at peak a few inches below ceiling so I can put a rope light above it for mood in evenings. Probably a lot more too. Like everyone else on the forum, I'm lots of fun putting everything together. Any help or suggestions from anyone is very much appreciated. "In the multitude of counselors there is wisdom"
Thanks again
|
|
|
toyota_mdt_tech
Member
|
# Posted: 26 Oct 2013 20:43 - Edited by: toyota_mdt_tech
Reply
Quoting: Cabinfun Thanks for the heads up. I'll keep my eyes on this and correct when I finish a few more cabin projects, like finish trim, install doors, install shower, install two exterior lights, put up backsplash, tin wainscoting in bathroom, frame out a closet area in bathroom, insulate utility area, put up a 12-18 strip of metal at peak a few inches below ceiling so I can put a rope light above it for mood in evenings. Probably a lot more too....
Go ahead and do some studying on galvanic corrosion. It doesnt take long.
http://www.familyhandyman.com/plumbing/repair/join-galvanized-pipe-to-copper-pipe/vie w-all
|
|
Cabinfun
Member
|
# Posted: 26 Oct 2013 21:17
Reply
Sorry if I sounded like sarcasm, didn't mean to. I really do appreciate your suggestions. How would you recommend fixing this? All galvanized or plastic? Does same problem happen when you attach bronze with galvanized?
Thanks for your help.
|
|
toyota_mdt_tech
Member
|
# Posted: 26 Oct 2013 21:39 - Edited by: toyota_mdt_tech
Reply
Cabinfun, I'd just remove the 2 galvanized T's you have. Get 2 copper T's to replace them, but you will need to sweat (solder) in the 3 female threaded ends onto each T, to replicate the galvanized T's you are replacing. Then they will go right in the same spot as your galvies with no other adapters, reducers etc. to buy. The crimped fitting at the end of your PEX will turn right in place and wont leak. The crimped in end will spin right inside the PEX, another great advantage of PEX. So you can remove the galavanized pipe without having to undo any of your PEX crimps. This makes it super easy to change out.
Brass to copper and bronze to copper is not an issue. 
Copper or PEX is great stuff, basically use anything but galvanized. Galvanized is only to repair existing galvie pipes currently in homes.
What type of crimper did you use on your PEX. The small hand plier type? I have a set I got from Home Depot but havent used it yet.
|
|
Cabinfun
Member
|
# Posted: 26 Oct 2013 22:24
Reply
Thanks for your suggestions. I purchased all my pex stuff at homedepot. Crimpers are the Apollo Pex Quick-Cinch Clamp Tool, worked great. Thanks again
|
|
|

