| . 1 . 2 . >> |
| Author |
Message |
islandguy
|
# Posted: 22 Dec 2007 05:18pm
Reply
I am currently building a 16x24 ft cabin in the North Thompson River Valley just north of Kamloops, British Columbia. Our property is 175 acres owned by my extended family, on an island on the Thompson River. It is accessed by our own brige, 200 feet long, 14 feet high, and will handle about 5 tons. Lots of black bear, deer, beaver ect.
I wanted to call it a cottage, my wife wants to call it a cabin, so we compromise: its the "cabbage" I would like to share cabin stories with others, so this site looks ideal. Talk again soon.
Warm stove, cold beer.
|
|
Vince P
Member
|
# Posted: 23 Dec 2007 10:42am
Reply
That's sounds familiar. When we built our place (also 16x24) we had a similar naming convention, sometimes referring to it as the cabin, the shed, the lodge, the camp, etc. Nowadays, I love to simply call, it "The Shack" in reference to it's simplistic nature. :)
|
|
drmargy
Member
|
# Posted: 23 Dec 2007 05:02pm
Reply
Hi islandguy. We call ours "The Float" for obvious reasons. We are in Powell River, BC, floating on Powell Lake. -- Margy
|
|
nrvswyf
Member
|
# Posted: 8 Jan 2008 05:17pm
Reply
We are building a cabin in the Sangre de Cristo mountains in southern Colorado... beginning as soon as the snow breaks in the spring. Am enjoying reading about your building experiences... and would love to talk with others who are living off the grid as we are planning to do the same.
Marcy <><
|
|
drmargy
Member
|
# Posted: 11 Jan 2008 01:17am
Reply
Hello Marcy - Nice to see you here. Maybe the others would like to see your website. - Margy
|
|
islandguy
|
# Posted: 11 Jan 2008 11:55pm
Reply
I'n not actually off the grid. We have a limited supply of power from a nearby power line. I expect to use it to run a charging sustem which will run a 12 volt system indefinitly. I am opting for 12 volt since the power requirements are less, and it enables me to easily adapt RV plumbing and electric systems. I'm hoping to use a demand type propane hot water heater. I have already purchased a CSAapproved woodstove, nearly new, at a flea market. I have a virtually unlimited supply of birch on hand, so I'm really looking forward to those crackling fires in the fall. Since we travel 4 hours to get on site, I'm not able to work on the cabin as often as I'd like, so our "schedule" is: year one, build to lockup, year two, habitable, year three, finished, more or less. Since we just finished our first year, I'm pretty close to being on schedule, since were framed and sheeted, but have yet to install doors and windows.
|
|
bobrok
Member
|
# Posted: 14 Jan 2008 10:39pm
Reply
islandguy, please share any information you have found for on-demand propane hot water heaters. Are you looking for RV style or camping style?
I would have thought that I could find a variety of products but this is becoming a real challenge.
Thanks
|
|
islandguy
|
# Posted: 16 Jan 2008 11:46pm
Reply
Bobrok, I just started looking into this.it appears there are several types, including newer versions that do not use a pilot light, using either batteries or self generating spark for ignition. some are ventless, and equipped with an oxygen depletion cutoff. I expect to use an RV or cabin type, probably 60-75,000btu, which should provide about 2-4 gallons per minute with a good rise in temp. Some of the camp type units have very slow flow rates with minimal rise in temp. Well water or glacier fed water can be very cold. I expect to use a UL orULC listed model for safety and reliability. The problem is the $1000 I was quoted for a Bosch unit from an RV dealer. I may opt for a standard 6 gal RV heater for about half that amount, since we use such a unit now in our RV with good results. If you find out more on these units let me know.
|
|
|
islandguy
|
# Posted: 25 Mar 2008 12:39am
Reply
just back from the first visit to the cabin in 6 months. I was able to frame in the bathroom, hang the bathroom door, buy a bathtub, frame the gable ends, and stockpile the ashphalt shingles I need to complete the roof, hopefully on the May long weekend. The cabin withstood the winter well. My current project is to finish the pair of antique french doors I bought for the front of the cabin. They are pine, only 24" wide each, but I need to scrape and paint them, and replace some of the glass panels. The panels are $5 each, if I install them myself. I am also nearly finished converting a 125 gallon furnace oil tank to a septic tank. The tank is new, but was dropped from a forklift, so its a bit dented, so I got it for nothing. I'm not looking forward to digging the hole to put it in though.
|
|
CabinBuilder
Admin
|
# Posted: 26 Mar 2008 09:59am - Edited by: CabinBuilder
Reply
Welcome back islandguy.
I haven't visited my cabin this year yet - we had lot of snowfall, I can't wait when snow melts to get there and see how it survived the winter.
Can you elaborate on septic system you are making using that tank?
I assume the tank is for intermediary settlement, afterwards liquids will flow into the ground...?
|
|
islandguy
|
# Posted: 26 Mar 2008 11:08pm
Reply
Hi cabinbuilder. I'm no expert, but similar systems are in use in the area I'm building in. The tank is indeed for settlement of solids, but primarily acts as the "septic" chamber. This is the bio-degredation of the solids by bacterial action, reducing them essentially, to soil. (thats also the reason no bleach or cleaning products should be poured down a septic tank...you don't want to kill the microbes) The liquids are, as you guessed, drained from the tank, then travel to the "field" which distributes the liquid waste over a lerge area. The liquid, through bio-degredation and natural filtration through sand and soil, will eventually reach the water table as clean clear water.
This is done by using tee fittings and drop-tubes in the tank. The incoming waste is baffled by the tee fitting, so minimal agitation is the result. To much waste coming into the tank to fast can stir it up quite a bit, and hinder the bio-degredation of the waste. The outlet is set a bit lower than the inlet, so waste water exits the tank as fast as it is introduced. Septic tanks have layers, reffered to in technical terms as the "sludge" layer, the scum layer and the liquid layer, in the middle. The drop tubes are designed to insure the inlet and outlet pipes are not plugged by those layers. If you, or anyone, is interested, there are lots of diagrams on the net by googleing "septic tank." Discussions on "waste management" for cabin builders is always interesting and ,well, colourful. (;-)
|
|
Vince P
Member
|
# Posted: 28 Mar 2008 08:50pm - Edited by: Vince P
Reply
You might want to look at this document as an alternative to handling liquids from septic tanks for cabins:
http://www.sun-mar.com/PDF%20Files/RecyclingBed2004.pdf
|
|
islandguy
|
# Posted: 3 Apr 2008 12:06am
Reply
On a slighly sweeter note than septic tanks: the antique french doors. I paid $100 fpr them, even though the paint was peeling on them, and several glass panels were broken. I overpaid for them, but they have a lot of charm. I made the mistake of sandblasting the old paint off them, which although much easier to get the paint off, was a mistake for these reasons. First, I had to mask the glass with masking tape. The sandblast actually removed the top layer of tape, leaving the gummy stuff, which is VERY time consuming and tedious to remove. Second, the blast also removed some of the tape, and frosted small parts of the glass. I ruined about 6 panels of glass which I now have to replace, and finally, the sand "etches" the wood, leaving it very grainy: some actually like the look, but I would have preferred the smooth look. I still have to replace most of the hinges and hardware, but hopefully the charm and beauty of a pair of old exterior french doors on my cabin will make it all worthwhile. I have a backdoor as well, partly for convenience, but mostly for the possible need for an alternate exit in case of fire.
|
|
Anonymous
|
# Posted: 10 Apr 2008 05:40pm
Reply
Quoting: islandguy I made the mistake of sandblasting the old paint off them
What equipment did you use for sandblasting?
Is it possible to change the abrasive material to something which is gentler on the wood? I read somewhere that you can use crushed walnut shells? or plastic beads???
I am planning to refinish some kitchen cabinets and thought that sand blasting could be an alternate to chemicals and elbow grease!
Thanks!
|
|
islandguy
|
# Posted: 17 Apr 2008 01:13pm
Reply
I used a heavy-duty sandblast unit designed for blasting steel, so yes you are correct, there are a number of different materials, including walnut shell, and lighter settings, but you may wish to experiment a bit before you begin blasting. Wood has alternating bands of grain which diifer in hardness, so the softer grain is blasted away before the harder grain, so thats why my doors became so grainy. If you are blasting materials that have no grain, such as particle board often used in cupboard units, you should not have that problem, but try a little experiment first. On the positive side, the paint on my doors did dissapear in very short order. (;-)
|
|
CabinBuilder
Admin
|
# Posted: 20 Apr 2008 10:53am - Edited by: CabinBuilder
Reply
Quoting: islandguy Wood has alternating bands of grain which diifer in hardness, so the softer grain is blasted away before the harder grain, so thats why my doors became so grainy.
Perhaps it adds a desirable texture to the wood?
|
|
Camper
Member
|
# Posted: 15 May 2008 12:59pm
Reply
I knew I wasn't alone! There are people out there just like me.
I started my cabin project in 1982 and finally completed it in 2004. That's a little overly dramatic, but I found my plans for my cabin in a magazine in 1982 and spent the next 20 years acquiring the property and materials, doing the site work and then building the cabin ..... in my garage.
Since I am frugal (read: cheap), it took me most of that 20 years to accumulate almost all the building material for my 12 X 16 cabin for free. All the material was good and solid, but was previously something else. When the Little League was going to tear down their press box, they let me take the vinyl siding off first. When my boss was redoing the office, she let me take the knotty pine panels down first. When my friends were replacing the windows on their house, they gave me the old windows. Well, you get the idea.
Like many "cabin" owners I live away from the site (8 ½ hours) and I'm off the grid. So, I decided to build the cabin in sections in my garage and then trailer it to the site. This way I could make the cuts, drill the holes, work when it's raining/snowing, not spend 17 hours on the road; all in the company of power tools and electric lighting. Nice.
Long story, short. It took me three weekends over the summer of 2004 to trailer everything to the site and put it together – by myself. My little slice of heaven did cost me about $850 for concrete foundation piers, treated sub-floor, a deep cell marine battery, treated deck, hardware and paint. Well worth every penny and all those years of dreaming.
Now if we can keep gas below $4.00/gallon maybe I can afford to go there.
|
|
islandguy
|
# Posted: 15 May 2008 01:20pm
Reply
Hi Camper. My brother has a similar story. Someone gave him an old shed, also 12x16, on skids, so he skidded it almost a kilometer to our property, where it sat for 5 years. He moved it closer to his chosen site, got it stuck, left it for 2 more years, moved again, left it for 2 more years, before finally moving it to its present permanent site, and began converting it to a rather nice cabin, over another 2 years. Like you, I am quite frugal, so I like to comb auctions and flea markets for good "finds" although I also recently spent many $ on a deep cycle gel cell. Its lighter and smaller, packs more power, has no water or acid, produces no gas when charging, and can be installed sideways if need be. But Oh that price....
|
|
islandguy
|
# Posted: 15 May 2008 03:20pm
Reply
PS. I also "prefabbed" my wall sections in 8x8 foot sections, trucked them in and set them up in less than a day. Regarding free building material, the manufacturing plant I co-own/operate produces shocking amounts of waste. Pallets are available free at many places, and I obtained some good 1" wood in 4 foot pieces for general use at my cabin, although an ambitious person could scarf-join them together for free 8' 1x6 boards. We also use many 5 and 6' lengths of 2x4, so we buy them in 10' lengths, which means when we use 6' lengths, 4 footers are leftover, and very useable as building material. I have actually seen cabin or garage plans which use 4' lengths of 2x4 for framing by adding a sill piece in the middle, or basically "stacking" 2 four foot walls to make eight feet. Free framing, free siding. Next, we use a significant amount of packing material, often styrofoam, so free insulation to someone who has more time than money. (I'm a bit short of both (;-)
I intend to use some of this free material for decking, shed building, and possibly pipe insulation. Free stuff, and you help the enviroment by recycling. Before anyone wants to contact me for some of this free stuff, I suggest you contact larger industries or friends you know who work in industrial areas. I also recall reading somewhere on the net about a family who was going to build a cabin/small house and try to do it without spending one single penny. It would be possible, but difficult.
|
|
CabinBuilder
Admin
|
# Posted: 15 May 2008 03:25pm
Reply
Welcome to the forum, Camper.
Interesting story - thank you for sharing.
8 ½ hours drive to the cabin - quite a dedication. How long is your typical stay there? Few days, or more?
|
|
Camper
Member
|
# Posted: 16 May 2008 12:01pm
Reply
Lately my trips have been three day weekends, but I have spent as much as a week in the cabin. When I was young and single I would make the 8 ½ hour trip almost every other weekend (April – October) and just pitch a tent. That evolved into going once a month and staying in a camper. To what is now a challenge to schedule time between coaching and watching the kids play in baseball, volleyball and basketball games just to spend three days in the cabin.
Such is the cycle of life.
|
|
Vince P
Member
|
# Posted: 20 May 2008 09:10pm - Edited by: Vince P
Reply
Quoting: Camper I would make the 8 ½ hour trip almost every other weekend
I'll never complain about the 3 ½ hour ride to my cabin again!
|
|
Futurecabinboy
Member
|
# Posted: 20 May 2008 10:54pm
Reply
Greetings to All! This is the most interesting website I have ever seen (and I have seen 3, not about cabin life I mean altogether...kidding) I am scheming about retiring to a off-grid cabin somewhere in the next 11 to 16 years, and as a warm up I lived off-grid on a acreage in the middle of Surrey B.C. for two years. I am looking forward to picking your brains and sharing the benfit of my own expensive mistakes.
Put another log on the fire:
Mark.
|
|
littlesalmon4
|
# Posted: 4 Jun 2008 05:39pm
Reply
We are in the process of "finishing" our cabin. We started May long weekend 2007 and slept in it by September 2007--working every weekend and 2 full weeks in the summer. We used it every long weekend over the winter--including a week at Christmas (-35!! We're in the Yukon, so that's "normal" for us!!)We chose to use 6x6's for the walls therefore eliminating the need for insulation, framing etc...we have "2" lofts which are connected with (as one person called it) a "runway"!! we also incorporated the upper "coffee" deck off of our side of the loft which is 4 x 20. We had lots of help from family and friends, but most of the walls were done by my husband and i--while our 2 girls occupied themselves by playing on the beach or in the bush!! it was a great experience, but now that it's over, I'm glad it's the summer of 2008 and not 2007!!!
|
|
islandguy
|
# Posted: 5 Jun 2008 03:33pm
Reply
Hi futurecabinboy and littlesalmon4 Welcome. I assume you stacked the 6x6s "log" style. Do you have any concern with your girls playing in the bush about bears?
I have finally installed all my doors and windows (including the french doors) and locked my place up. My last home project was a 45 gallon water tank. I bought a heavy translucent plastic drum, food grade, and put an outlet at the bottom, purchased from a marine supply store. Made a metal cover and welded fittings for venting and filling the tank. Total cost about $30, although I am just learning welding, so the welds are a bit rough. Hope to have my place completly done on the outside by september.
|
|
littlesalmon4
|
# Posted: 6 Jun 2008 12:20pm
Reply
Hi Island guy
yes we stacked them, sil plate foam in between, and pounded in 12 inch spikes. we went 18 rounds with 2 8x10 beams for the loft and walkway. we are now decided how to finish the floor and what will work best for the shrinking/expanding while the cabin warms up while we're out in the winter.
As for the bears, we have never actually "seen" one around, but occasionally we have seen sign. The girls are never that far and with the noise they make, bears know they're around!!! We have had moose walk up and down the beach. one with a baby with her--they swam all the way across the lake to the opposite shore!!
|
|
islandguy
|
# Posted: 10 Jul 2008 03:21pm
Reply
Just back from 100 hours work in 8 days on the cabin. Put an ashphalt shingle roof on, and 20 sheets of smartboard siding.
Worked 12 hours a day in mostly 100 f heat, or, when it cooled down to about 80 in the evenings, hordes of mosquitos. Cabin is beginning to look like something. Hope to post a pic soon.
|
|
Pyro
Member
|
# Posted: 2 Aug 2008 07:30pm - Edited by: Pyro
Reply
Hi folks, New guy here.
I have been restoring a 100 y/o lake cabin (Camp) up in Mid State Maine.
I've found writings on the wall that date to 1918. The 5 floor joists are old cedar tree trunks cleaned of all bark with a draw knife. The rest ofthe original camp is all rough sawn 2 x 3 construction. (That makes using 2x4's a pain!)
I re-worked the roof from a 2 stage pitch, asphalt to a single pitch with a steel roof. I raised the central part of the roof to do this. The drip edge walls were not raised. (See the pics the link)
Click here to see the slide show of camp remodeling pics
Here are some seasonal pics of it.
|
|
Pyro
Member
|
# Posted: 2 Aug 2008 08:24pm - Edited by: Pyro
Reply
As you can see (If you looked at the remodeling pics) I only insulated the front porch wall & the ceiling.
I didn't insulate the old outside walls because they are, (thru the years) one layer of Cedar shakes, then Tyvek, then Clapboards, then burlap, then tar paper, then 3/4" pine, then the studs. I've been inside at 18 degrees w/20 mph winds & still been very cozy. I only used rigid foamboard for insulation so if mice get inside, they do not make nests in the insulation. They do that with fiberglass, then you end up with odors that are hard to get rid of. Yuk!
That's me doing the circle on the ceiling. That was just on a whim so as to break up the ceiling's v-groove pine. The ceiling fan itself was what I used as a pivot for my tramel point (stick) to make the circle.
My Father in Law did the outside shingles. It took him four years! But I appreciate his effort. I've varnished the cabinets in that last photo & still have to install the 4" granite backsplash on the sink counter.
The hand pump at the sink draws up lake water for washing dishes. We still have to bathe in the lake. (Brrrrr) That's ok for summer, but fall & winter are still a problem. I'll be asking you folks about getting a shower going in the bathroom soon. We already have a Biolet toilet that works pretty good. But what's a bathroom w/o a place to shower????? LOL.
Joe
|
|
islandguy
Member
|
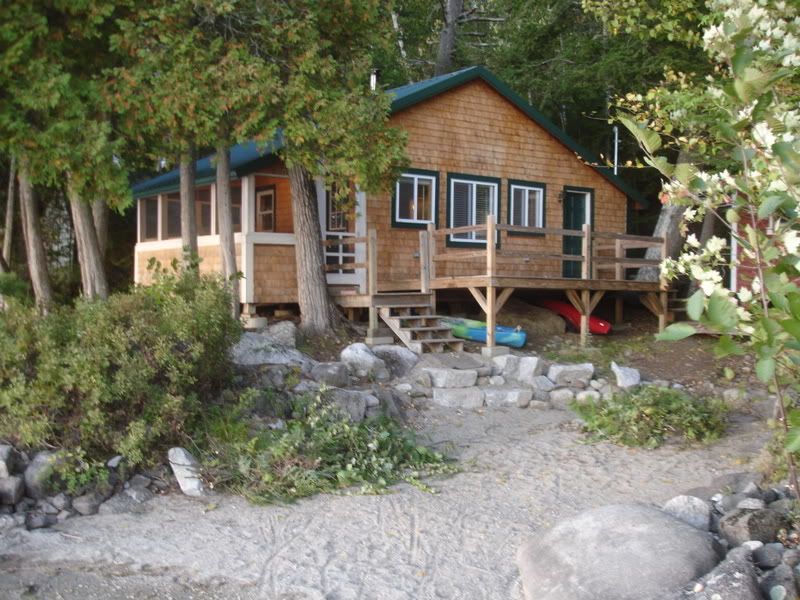
# Posted: 11 Aug 2008 05:20pm
Reply
Here is the first picture of my new cabin, nearly finished outside.
|
|
| . 1 . 2 . >> |
