|
| Author |
Message |
Grizzlyman
Member
|
# Posted: 18 May 2021 05:27pm - Edited by: Grizzlyman
Reply
Hi all. I’m looking for the best way to tie the ridge board to the rake wall. Ridge BOARD not beam. This is not load bearing.
I would like to extend it 24†past the rake wall for overhang. The rafters are 2x8 which necessitate a 2x10 ridge board.
2x8 rafters cut at angle have a thickness or length if you will of 8 1/4â€. That means that an extra 1 1/4†of the ridge board will be below the rafters.
Since the rafter sits on the rake wall the ridge board needs to be lower than the rake wall as if I set them on there the ridge board would be above the rafter top.
My plan is to notch the ridge board by 1 1/4†on the bottom so the top of it will sit flush with the top of the rafter.
Is this the way to do it?
See drawing:*** EDIT I’m an idiot and just realized I drew the lookout upside down please ignore that aspect (facepalm)***
|
|
ICC
Member
|
# Posted: 18 May 2021 11:39pm
Reply
Does the below image help?
We would use the flat lookouts when snow loads were lighter and the other when snow loads were greater. Build the gable infill framing shorter than usual and the lookouts bring their upper surface level with the tops of the other rafters. You can use hangers positioned upside down on the inner rafter face to take the up-direction load from the lookout. If needed or wanted short lengths of 2x can be inserted between the lookouts directly over the shortened gable end wall to give support to the end sheathing panels. Probably a good idea if going for a 24" rake overhang. We usually did 16" max and used 32/16 rated sheathing. There is also 48/24 rated available. (as long as each panel has at least 3 supports.... no short fill in sheathing pieces at the rake ends.
|
|
Grizzlyman
Member
|
# Posted: 19 May 2021 04:16am - Edited by: Grizzlyman
Reply
So you don’t frame a top plate in gable A?...Or rather The plate is really just at the top of a square wall and the other studs are just filled in and tied to the the rafter? Interesting... I hadn’t seen that beforehand.
I have a plate already framed so A is out.
On gable B - how is the ridge board over the gable peak. Is it notched like in my drawing? It’d have to be right?
|
|
Brettny
Member
|
# Posted: 19 May 2021 06:57am
Reply
Quoting: Grizzlyman So you don’t frame a top plate in gable A?...Or rather The plate is really just at the top of a square wall and the other studs are just filled in and tied to the the rafter? Interesting... I hadn’t seen that beforehand.
Cut a piece of the gabel end top plate out. That wall isnt load supporting and your ridge board is way more important than the top plate under it. Cutting a notch out basically makes your ridge board the thickness of what you dont cut out.
|
|
ICC
Member
|
# Posted: 19 May 2021 10:03am
Reply
If you have a rafter positioned directly over the end wall I would prefer to cut away from the end wall framing at the peak. My reasoning for that instead of notching the ridge board is to ensure that the angle cut ends of the upper rafter ends are fully supported; the ridge dropping at least to the lower end of the angled cut. The whole idea of having the ridge bottom face at or below the angle end of the rafter is to prevent possible splitting at the unsupported part. (I hope that is clear; I am sometimes not so good getting ideas across in written word.)
Normally one would install the rafters and then infill the triangle gable section with a stud inserted under the ridge board at the peak and the doubled top horizontal plate for method A. For B my brother is the whiz when it comes to calculating the end wall stud lengths and building that end before the rafters go up. I would never try myself, but would also use infill after the rafters are up. Adding the fly rafters last of all.
|
|
Grizzlyman
Member
|
# Posted: 20 May 2021 10:55am
Reply
Quoting: ICC ; the ridge dropping at least to the lower end of the angled cut. The whole idea of having the ridge bottom face at or below the angle end of the rafter is to prevent possible splitting at the unsupported part.
I’m not sure I get your meaning. That’s precisely what I’m trying to accomplish. Dropping the ridge so the rafters are fully supported. Notching is the only way I can see to do this.
I did do a lot of research on framing this prior to building and several framing books suggested balloon framing rake walls- which is why I did it that way. They also suggest rafters directly on the plate.
I do like the “b†idea of forgoing a rafter and using multiple lookouts however that will not work for me as I’m sheathing the roof with 8†12’ boards. Which means the lookouts are parallel to the boards in that method. Reason for boards is it’s a cathedral ceiling and aesthetics.
Interestingly enough though- I can’t find anything about the ridgeboard over the rake wall in any of them or online frankly-which to me means it’s really not a big deal either way. It is a minor detail and being as the ridgeboard has no load bearing purpose - probably doesnt matter at all.
I was just looking for the BEST way to do it. I think the positive in all this is this is really the only unresolved question- which if I’m sweating Minor details is a good thing!!
Notching the rake wall plates to me seems more difficult than simply notching the ridgeboard
|
|
Grizzlyman
Member
|
# Posted: 9 Jun 2021 10:18am - Edited by: Grizzlyman
Reply
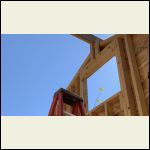
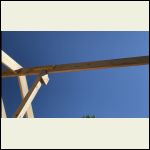
Btw. Just to close this thread off. I notched the ridgeboard and it worked perfectly- got the height perfect. It was nice to have the ridgeboard continue past the wall for fly rafter connection. Asthetically it looks cool and made it easier to attach fly rafters by myself.
I used to scabs on either side of the peak to hold it in position while I lifted the other side onto a temporary support. Worked like a charm.
10C3F48B74CC4D3A8.jpeg
| 
DD5259D3D21D4214B.jpeg
|  |  |
|
|
|

