|
| Author |
Message |
Asuaviator
Member
|
# Posted: 26 Dec 2025 12:58pm
Reply
Getting ready to start on our interior siding and have some questions. We want to keep the Pine looking natural and light colored. What’s the best seal to use to achieve this? A water-based polyurethane? I heard oil-based will yellow over time. Is there any reason to use a natural stain first prior to sealing? I’m assuming it’s better/easier to treat the boards first, then hang them?
|
|
MtnDon
Member
|
# Posted: 26 Dec 2025 02:06pm
Reply
An oil based poly is inherently yellow right out of the can. It will get more yellow/amber as it ages. Water based poly dries crystal clear and does not change over time.
We have 15 year old T&G on our ceiling and one wall. We used Minwax Polycrylic satin finish water based poly. The ceiling is T&G pine and I cannot see any changes. The wall is T&G aspen. The only changes that can be discerned is if I remove the clock I made and hung on the wall. One can see the exposed wall area has darkened a very small amount over time. The difference is so sub to le that if the clock is removed I cannot see the difference from 8 to 10 feet away.
I applied the poly after that T&G was installed. However, when I have planned on using a coloured stain, have stained the T&G before installation in order to have the tongue fully stained in case of shrinkage post-install. That has worked out well.
The only advantage I can see to applying a natural stain might be if there was a desired difference in the way the wood looks when comparing only water based poly vs. natural stain and water based poly over that. I have seen a natural stain increase the contrast between the light/dark grain on some wood. Whereas the water based poly by itself did not. That probably calls for a test before installation.
|
|
Steve_S
Member
|
# Posted: 26 Dec 2025 02:41pm
Reply
All of my T&G (tons of it, even closet ceilings and more are all T&G) is also done with Minwax Water-Based Poly. Note that I chose one that has UV Protector in it because sunshine can bleach the wood. All of my T&G is a mix or Red or White Pine and the red pine does age nicely and darkens a bit within the grain as a result of it's sap. Looks really great !
On my beams & planks I used a lot of Shellac (that is so expensive now it isn't practical), which darkens as it ages and adds character, it also does not have any UV protection. However, I have to add that all my beams & planks, closet doors (white cedar) are rough cut from a local mill with only a mild sanding (get the fuzzies off) to show the full texture, including saw cut marks. All of my 4"casings, 6" baseboards, trims & mouldings I milled myself from 1" thick White Pine which I finished with a gloss Polyurethane.
All my cabinetry is also all made with 1" thick Pine with the doors also showing all the cuts & somewhat rough... Because these are kitchen/washroom and subject to more moisture, all finished in gloss Poly as well.
Everything was all prefinished before installation (10:12 Pitch roof & Cathedral ceilings, nuts to try & finish it afterwards - way too old for that nonsense).
I avoided as much synthetics as possible and was after a rustic & natural look/feel. Even my counter tops are 12"x24" Glass Finish ceramic tile.
IMPORTANT !
Be very aware of the limitations of whatever finish you use and where... moist damp areas using only Poly Finishes. Shellac for instance will absorb moisture. Also, if you use Shellac, you can never coat that with anything oil based ! (It's a Fugly mess) and "some" water based Poly's are OK while some others are not. BTW, that includes latex paints on top... Water Base Poly is the safest of the lot to use. Oil Based Poly on wood floors makes for really tough finishes but it takes more work.
Last note, Minimum of 2 coats with sanding in between, 3 coats is best. Follow manufacturer recomendations for best outcome. Applies to everything being "varnished".
Hope it helps, Good Luck.
|
|
Fanman
Member
|
# Posted: 26 Dec 2025 06:10pm
Reply
I prefer shellac. It's a lot more pleasant to work with than polyurethane, dries fast, and doesn't have that plastic look. Easy to repair, too. The big box stores sell in in clear or amber, but if you buy shellac flakes online (to which you add your own alcohol solvent), you can get a range of colors.
Quoting: Steve_S if you use Shellac, you can never coat that with anything oil based ! (It's a Fugly mess) and "some" water based Poly's are OK while some others are not. BTW, that includes latex paints on top...
If you think you might topcoat it later, you should use dewaxed shellac (what Zinser calls "sanding sealer").
|
|
gcrank1
Member
|
# Posted: 26 Dec 2025 07:05pm
Reply
So....????
Can you put the Zinser Sanding Sealer over a previous shellac finish and be good to go for a potential topcoat?
|
|
travellerw
Member
|
# Posted: 26 Dec 2025 07:59pm
Reply
Quoting: gcrank1 So....???? Can you put the Zinser Sanding Sealer over a previous shellac finish and be good to go for a potential topcoat?
According to the technical data Zinser bullseye Sealcoat is nothing more than "shellac-based sanding sealer" (a direct quote). However, also in the technical data it says "Compatible with all clear finishes, including oil-based
and water-based polyurethane, lacquer and shellac".
So the answer would be "Yes" you would be good to go once you topped with Sealcoat.
P.S. Some may ask why Shellac based Sealcoat is OK, but standard Shellac is not. I'm not an expert, but pretty sure its because Sealcoat is de-waxed!
|
|
Steve_S
Member
|
# Posted: 27 Dec 2025 05:50am - Edited by: Steve_S
Reply
Quite right on the De-waxed Sealcoat which is a great sealer & primer. I used gallons of Shellac (I just saw current $ OMG ! insane!!) and it suffices to say, I tried a few things when I was building my place and accidentally used some Shellac coated Pine, which I thought was Poly'd and put Gloss Poly (oil based) on it not realizing... Simply put, I did a Major Fred Flintstone imitation and had to spend two days sanding & cleaning that (bubbled up & foggy mess) ... hindsight, I should have ripped it down and started over but I just didn't want to waste the wood.
The more painful the lesson the more it sticks in memory. Especially after a LOT of "Ruckus, Stuckus, Frickus, Fruckus" 
|
|
Fanman
Member
|
# Posted: 27 Dec 2025 08:21am - Edited by: Fanman
Reply
Quoting: travellerw pretty sure its because Sealcoat is de-waxed!
Yes, the sealcoat is simply dewaxed shellac. Though Zinser also makes "BIN primer" which I believe is shellac mixed with white pigment.
One thing about shellac is that every coat dissolves into the underlying coat, so a couple of coats of sealcoat may be necessary to prevent the underlying waxy shellax from bleeding through and causing trouble.
One other nice thing about shellac is that it can be applied over anything.
|
|
|
Brettny
Member
|
# Posted: 28 Dec 2025 05:31am - Edited by: Brettny
Reply
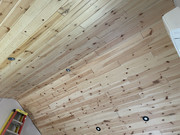
We used minwax crystal clear water based satin. It dosnt even look like we did anything to the wood until your really close. I sprayed this on with a $60 harbor freight airless sprayer. I did one quick coat on the back, flipped and did the front. Waited 15min on the hot sun and did another front coat. About 2hrs later I could stack them up and put them away, or install them. The back coat isnt really needed. Theres no way I would brush or roll this on now that I have used this $60 air less sprayer.
20250513_063646.jpg
| 
20250511_192655.jpg
|  | |
|
|
bushbunkie
Member
|
# Posted: 28 Dec 2025 10:25am
Reply
After all the work it took to do my cabin walls (main room, mud room and bathroom) in 1” log tongue and groove siding, I didn’t put any coating on it and just moved onto the many other projects I needed to finish to get my final occupancy from local municipality.
That was 5 years ago and it still looks the same as when it was installed…I’m planning on just leaving it.
|
|
Asuaviator
Member
|
# Posted: 28 Dec 2025 01:11pm
Reply
Thank you all for the replies! Sounds like water based is the way to go and a sprayer would speed up the process. I’d like to seal it because it’s a recreational cabin and will go from negative temperatures to 80* every time we use it. So those heat cycle will pull all the moisture out of the air.
|
|
Brettny
Member
|
# Posted: 30 Dec 2025 10:31am
Reply
Moisture is one thing but with out sealed wood anything that touches it like dirty fingers from install or normal wear and tear will forever be there until sanded.
|
|
utherjorge
Member
|
# Posted: 3 Jan 2026 10:42am
Reply
Not to hijack this thread, but brettny, that looks gorgeous, and exactly the sort of thing I'm looking to on the walls on my build. I'd love to see more, and a PM is fine vs. clogging this thread up.
|
|
Tanner
Member
|
# Posted: 14 Feb 2026 02:03pm - Edited by: Tanner
Reply
Our camp ceiling is red pine, pre sanded to 150 grit, then prefinished with four coats of Varathane satin indoor poly. Did it all myself alone at 75 years of age including installation. Yikes, not likely to be doing that again in this life...but it is beautiful to behold.
Gary
|
|
Tanner
Member
|
# Posted: 14 Feb 2026 02:05pm
Reply
That was waterbased satin poly. couldn't be happier with the results
Gary
|
|
|
