|
| Author |
Message |
optimistic
Member
|
# Posted: 14 Oct 2013 10:02am
Reply
I would like to install some 1x3 furring strips next time I am at the cabin - these are what we wish to use as wall cover. We like the look.
I am trying to figure out how do I install them so they are straight - especially from the ceiling.
I was thinking that I first find the middle point on my rafters and then install one furring strip straight in the middle to go off that for the rest of the furring strips... Only problem with that - how do I find do this? (find that point and make sure it is really parallel to the side walls which will amke it straight?)
Also, any general guide on how do I hang these on the wall so they are straight? any technique for that?
|
|
toyota_mdt_tech
Member
|
# Posted: 14 Oct 2013 10:38am
Reply
Use a level, set the very first one, then use a block to space them apart so its consistent. Use the block and pin the top, then use the block (gauge) and pin the bottom. Use the level to square up the middle of the run. Then block and pin each one from there (top, bottom and middle) periodically checking with a level. I think once the first one is set, you should be OK using the block as a gauge. Is the building nice and plumb/square???
|
|
TheCabinCalls
Member
|
# Posted: 14 Oct 2013 02:31pm
Reply
TMT has a good plan. Since you had issues with your door being level you're really going to need to check the corners before getting to far into the nailing of the strips. You may need to scribe the corners or otherwise cheat those pieces so the eye always sees parallel lines.
How are you calculating how far apart each strip will be? How are you going to make sure you don't have undesired gap left at the end of a wall? With tile we make sure we don't have a tiny piece to end the wall and therefore center the entire batch, some times trimming off both ends.
Do you have plywood walls? or are you trying to hit a stud?
|
|
optimistic
Member
|
# Posted: 14 Oct 2013 10:10pm
Reply
TMT - what is a block? can you show a link? I rather not have gaps between them and if I most have - then very very thin...
Thecabincalls - I have studs that I will need to hit. I am not sure how I will make sure I don't get an odd size at the end... Maybe when I am left with the last 10 rows to the floor I will measure and adjust those last piece with tiny gaps so they end without a small thin piece....? Not sure.
I am more concerned with have the strips develop an angle that will make everything look crooked. I cant try to see how straight I am every so often by either a level (but then again - how level is everything else) or by using a triangle tool and see if it is 90 tot he studs (I know for sure that some of those studs are bent...)...
|
|
Gregjman
Member
|
# Posted: 14 Oct 2013 10:37pm
Reply
Furring strips are seldomly of a finish quality. Maybe consider carsiding(toung and groove pine). It's very easy to install if you start with a level line right off your floor around the entire perimeter of your room. Then in your corners you use regular 1x pine boards for trim.
Tools needed, miter saw, level or laser level, table saw or circular saw(for when one full width piece doesn't fit at the top of your wall) and a way to nail.
Here's a rough idea from youtube. http://youtu.be/giNMu2f8EdU
|
|
MtnDon
Member
|
# Posted: 15 Oct 2013 12:00am
Reply
If I understand the concept proposed, you wish to use 1x3, placed horizontally and butted up against each other as tightly as possible. I think using the term 'furring' has confused some folks as furring strips used as furring strips are placed 16 to 24 inches apart and used as something to nail other stuff to.
I've done this in our gazebo; on the ceiling. I used 1x6 boards. The drawback as I see it is that with moisture changes there will be a varying gap between boards with seasonal moisture changes. The good thing is with narrow boards the gaps between boards are smaller than with boards that are wider. Wood shrinks across the face of the board the same but the shrinkage is spread over more joints.
T&G gives the same appearance, more or less and has the advantage of hiding the shrinkage as the shrinking / expanding is taken care of by the T&G joint. Either way if you are insulating and want to keep moisture in the air out of the wall space install a vapor barrier before installing the wood on the wall.
For the walls I would start at the bottom and work up. That is assuming the floor is level; the eye will assume that too. Are you planning on carrying this treatment across the ceiling / roof? If so, then for the roof start at the outside wall / roof edge and work to the opposite wall if the ceiling is flat, or to the peak if it is sloped.
Even the best installers can run into a situation where the top or final row may be "off". Mine are by a little but only I notice I'm sure.
Wood sold as furring is often not of highest appearance quality. Depending on the mill and how / where it has been stored since leaving the mill it may or may not be of exact equal width either. This can make a problem if one board is butt ended to another. But that just takes some planning and watching while working.
Note: if you do T&G and are choosing to stain the boards the most satisfactory appearance is had by staining before installation. That way the entire tongue can be stained. When staining is done after installation there is often unstained wood that may show after the wood shrinks a little.
T&G is nailed with finish nails in the tongue, at an angle. That hides the nails. If you use flat boards or furring strips the nails will be showing. That can look best if you are very careful to align all the nails in nice straight lines. At least it looks better to me. 
|
|
optimistic
Member
|
# Posted: 15 Oct 2013 08:36am
Reply
Don -
Great tips. You are spot on and I apologize if someone didn't understand: I will use furring strips to finish my wall butted up against each other.
I agree on installing them from the floor up on the walls but I am torn on how to do it on my ceiling which is a cathedral ceiling. If I start from the side and make my way up: I might get to the middle a little off which might make everything look bent... no?
Benefit of doing it from the side going up the ceiling is that it increases the chances of it staying straight.
I thought that if I first put a piece, as straight as possible, smack in the middle of my ceiling and then make my way on each side: it will look striagh when you look up and maybe a bit of where the ceiling meets the side walls if I can't keep it straight.. A bit torn still.
I used Roxul (amazing stuff - I'll never use pink again!) for my walls and I'm not sure if I should put a vapor barrier or not... what do you think?
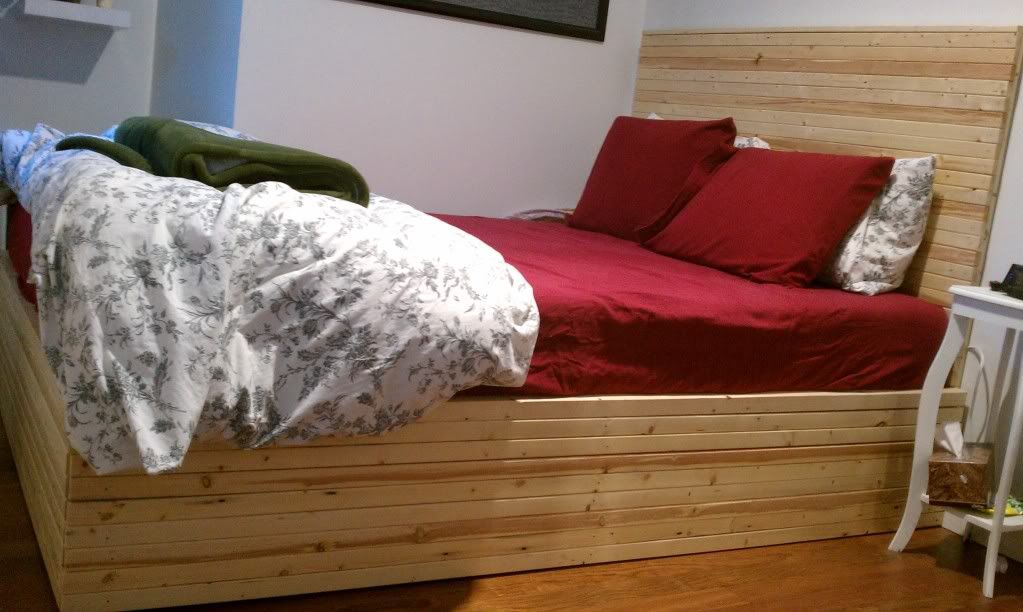
About the quality of furring strips: you are right but from my experience, you buy several bundles at a time at home depot - install the nicer pieces and return those you didn't use and then take more bundles... You will be surprised how many nice piece are in each bundle. I am attaching the bed frame I made for us a couple of years ago from smaller 1x2 furring strips.
|
|
MtnDon
Member
|
# Posted: 15 Oct 2013 10:41am
Reply
Nice looking bed. You managed to be selective enough to get straight and even sized strips.
As for the ceiling you could work from the wall to the peak. Then at the peak nail a wider board like 1 1x4 over the joint where the two slopes meet.
Vapor Barrier: You are in a climate zone that calls for a VB. If you don't use one the saving grace might be the only occasional use limits the amount of moisture created inside. But, by the book, a VB is recommended, even specified.
|
|
|
optimistic
Member
|
# Posted: 15 Oct 2013 03:38pm
Reply
Ok. I'll pu t vapor barrier - can you recommend which one? (thickness)
I didn't put any behind the 'fire-wall' around the wood stove for obvious reasons.
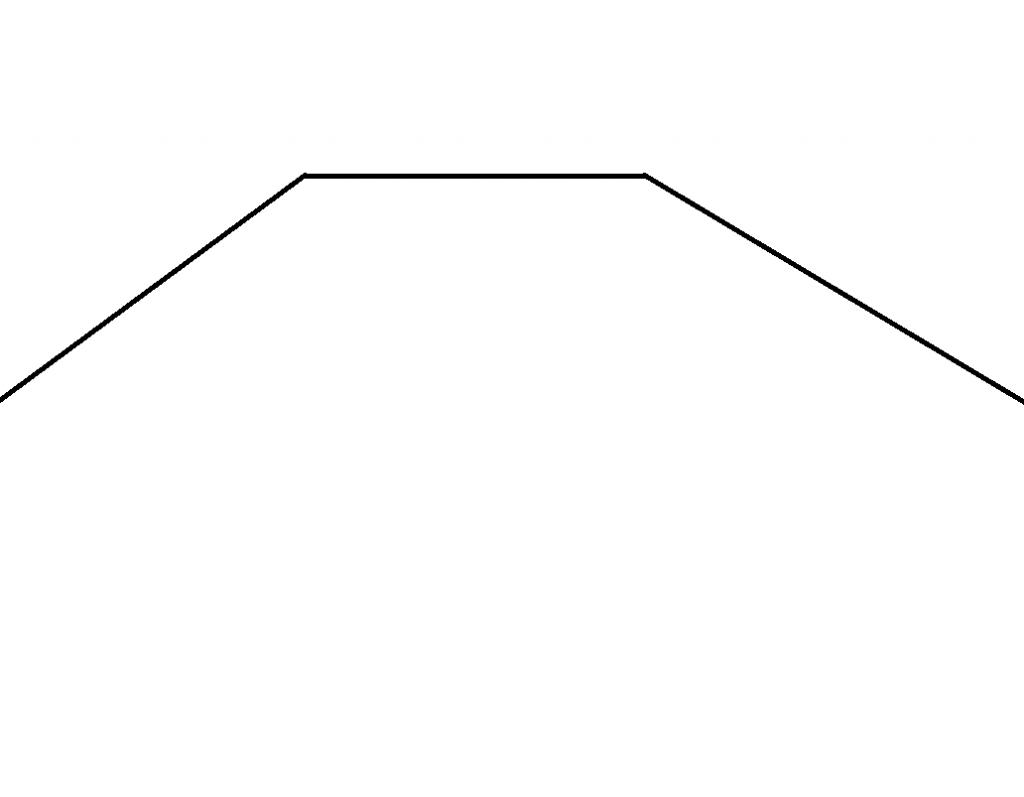
I am attaching an image of how my rafters are installed which will dictate my strip placement. As you can see, there is a flat part in the middle instead of an angle/triangle in the ridge...
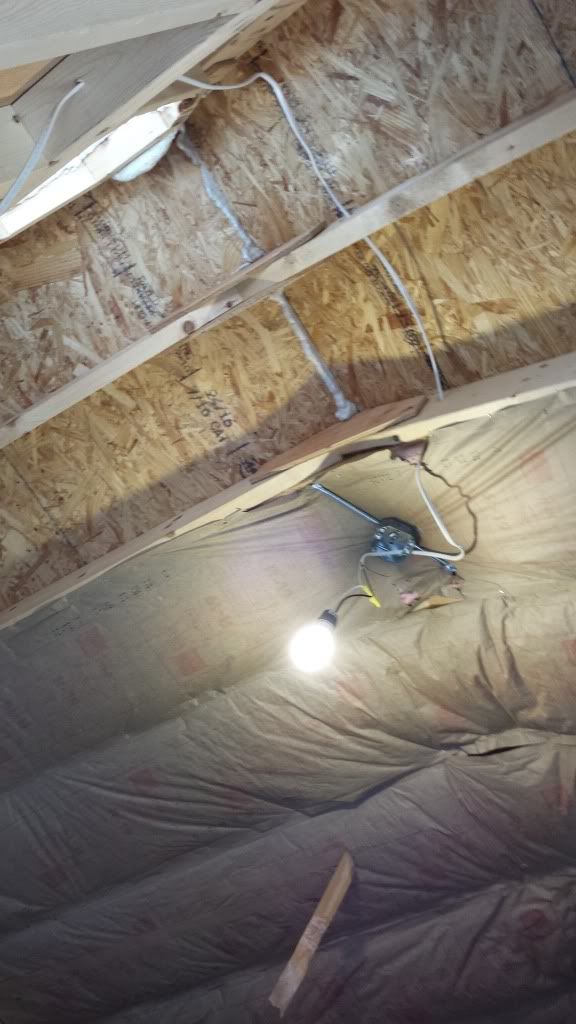
I forgot the name of the wood part that gives more strength to where the rafters meet but the way it sits: it makes this kind shape at the ridge:
|
|
MtnDon
Member
|
# Posted: 15 Oct 2013 03:51pm
Reply
Collar tie
6 mil poly for VB
So if the furring strips come out uneven at the angle I was thinking a wider board could be used to bridge the angle... running lengthwise down the angle; 1x4, 1x6...
If you are selective in picking out what materials to use there should be very little slant to where the 2 planes meet at an angle.
|
|
|
