|
| Author |
Message |
bronco_ed
Member
|
# Posted: 27 Oct 2013 08:00pm - Edited by: bronco_ed
Reply
I recently picked up stone from an older home being torn down. The stone once was on an entire wall surrounding a fireplace. It is old school veneer 3-7" thick ranging 8x12- 14x18 in size. I am unsure what type of support was used for the original wall.
Originally the thought was to re-use this behind a wood stove for the entire height of the wall. However I now have concerns, this stone is extremely heavy...
The cabin has a poured concrete slab and 2x4 construction.(I'll need to check if there is a footing @ the perimeter of the poured slab)
What type of support is generally required when using the heavy stone veneer for this type of application?
Thanks
|
|
bldginsp
Member
|
# Posted: 27 Oct 2013 09:35pm - Edited by: bldginsp
Reply
Typically masonry ties are used. They are short strips of corrugated sheet metal, or wire, or even just nails driven into the wood substrate behind. You locate them at the joints of the stone or brick and they stick out from the wall far enough to be embedded in the mortar. For heavy stone like this you might want to first put a layer of plywood on the wall, then apply cement board to the wall. The plywood allows you to attach ties anywhere, not just at studs, and the cement board allows you to mortar the stone to the wall in addition to securing it with ties. Of course you will want the stone firmly landed on your slab below. Don't go higher than one course each day, cause the weight of the stone will crush the unset mortar below. My grandfather lost half a chimney that way in 1927. Got ahead of himself. No one hurt, but they heard it fall across the lake.
|
|
bronco_ed
Member
|
# Posted: 28 Oct 2013 09:54am
Reply
Thank you, for the input...
It sounds like the actual weight of the stone for the wall on a poured slab will not be an issue. (Providing the noted installation procedures are adhered to)
|
|
hueyjazz
Member
|
# Posted: 28 Oct 2013 11:48am
Reply
I just got done working with my old school master mason and the rock wall behind my wood stove. Since my cabin is up on stilts I was quite worried about the weight. I resupported the wall directly under that particular area with jack posts. I also replaced a wood stove that weighed 600 lbs with one that weighed 220 lbs.
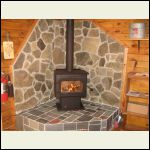
My mason had me collect double the stones need because he was very particular with the color, texture and pattern. many of my stones had fossils. I figure we put a 1000 lbs on the wall but as stated this was all tie back to the wall by metal ties. I'm delighted with the results as this is now the focal point of the cabin. The attach picture was how far we got the first day.
|
|
bronco_ed
Member
|
# Posted: 28 Oct 2013 12:14pm
Reply
Thanks for sharing, Looks very nice. I can see how that would become the focal point ;) Beautiful rustic look.
At mid/top of the picture the stones appear to be close in size and appearance to what I have recieved. Good to see an example on how the strips are used.
Happen to have a finished pic for posting?
|
|
bldginsp
Member
|
# Posted: 28 Oct 2013 04:00pm - Edited by: bldginsp
Reply
I'm assuming the slab is adequate to hold the weight, but I could be wrong. It's a lot of weight with the thick stone you have, and it all sits on the slab. The ties just keep the stone from falling, but even if they do take some weight, that weight is just transferred to the wall and then to the slab.
If the slab is only a 4" slab with no deepened footing, I'd be worried. Otherwise, with deepened footing and some, any, rebar, I'd tend to think you have the support you need.
I'd use the cement board and a lot of ties only because you are using thick chunks of stone and you want to be sure they stay on the wall. I personally don't see any reason to carry the stone up to the ceiling, except for aesthetics, and the higher the stone the farther it can fall and clonk someone, in worst case scenario.
|
|
bronco_ed
Member
|
# Posted: 28 Oct 2013 05:09pm - Edited by: bronco_ed
Reply
I'll check on the footing next time heading up.
There is already a stove and fake brick in the cabin. I may have to look to see what is underneath it plywood? cement board? It has been up since the 70's (hmmm maybe they did not even have cement board then?) Stove is great but the fake brick does nothing for it. Definelty want something like the pic that was just posted.
Originally thought that it would be easy to apply over but now I am scratching my head. The previous owner built the cabin and small barn, construction appears well built, If had to guess there will be a footing. There is in the garage/barn.
Anyone aware of a formula to determine how much weight can be applied to a given size and depth of concrete? The current brick goes up to the ceiling however due to the heavy stone another option may need to be considered.
I'll continue to do my homework...It may be better to use cultured or thinner stone and use this heavy stuff for another purpose.
|
|
bronco_ed
Member
|
# Posted: 28 Oct 2013 05:21pm - Edited by: bronco_ed
Reply
Looked at the stone again, 3" is on the thinner stone faces. Most ARE much wider. Since I have doubts I may just try to locate some thinner stone and use this outside for a fire pit.
|
|
|
bldginsp
Member
|
# Posted: 28 Oct 2013 08:49pm
Reply
Might be a good idea. Looks to me like the stone in the photo is flat and thin and probably weighs far less than what you describe. Stacking up large stones like yours sounds more like building a stone wall rather than applying veneer.
One other design possibility for woodstove surrounds is to build a brick surround that is spaced out one inch from the wall, with the space open on sides, top, and with breathing holes at the bottom. Advantage is that this allows clearances to combustibles from the woodstove to be reduced by 2/3 (at least so they allow where I am- but I don't think that's in the mechanical codes). So this lets you push the woodstove further into the corner saving space. But I guess it can only be done with brick, not stone, which is your choice for the surround.
|
|
hueyjazz
Member
|
# Posted: 29 Oct 2013 11:57am
Reply
Bronco
My stones were 1-3" thick with most of them around 2". If your stones are 7" thick then that's a lot of weight. Put of my joy was havasting the stone from my own stream and then finding stones with character. I yet to take a final picture as we were still working on it last week. I need to get back this weekend do a clean and work on the wood trim.
Attached is on of my favorite stones. Anyone see T-Rex?
|
|
hattie
Member
|
# Posted: 29 Oct 2013 12:23pm
Reply
WOW that is one amazing wall!!! I love that you have spent so much time in selecting the stones. That must have been an incredible amount of work to do even before you began putting the wall together! Obviously it was worth it though. You will have visitors coming and just staring at that wall for hours to see all the neat, little things hidden in the rocks. Great work!!!!   
|
|
trollbridge
Member
|
# Posted: 29 Oct 2013 04:41pm
Reply
We just are finishing up our stone wall too (double sided). When I hand picked the stones from the beach I always went with the lightest and flattest I could find and discarded the heavier ones. We also only put stone on the upper portion of the wall to reduce the overall weight. We balanced it with old dark tin on the bottom so that it wouldn't appear top heavy. We grouted last weekend and it turned out great. We need to go back now and clean the grout off the stones...this will be a chore!
My advice is to clean the majority of the grout up as you go- in other words while it is still wet 
Huey....I see T-Rex!
It looks great! I know it is fun to sit and look at the individual rocks and see images.
I will post pics of our project once I get last weekends on the computer.
|
|
Martian
Member
|
# Posted: 29 Oct 2013 07:49pm
Reply
Quoting: hueyjazz Attached is on of my favorite stones. Anyone see T-Rex?
Man! I want some of what you were smoking when you saw that! LOL
But then...I see it too!
Tom
|
|
Martian
Member
|
# Posted: 29 Oct 2013 08:04pm - Edited by: Martian
Reply
Quoting: trollbridge We need to go back now and clean the grout off the stones...this will be a chore!
TB if you wet the stones, and then drape a damp cloth over them, it will soften the excess grout. Time is your friend. Keep the cloth damp, use a fine wire toothbrush on the stones every now and then, and wipe the loosened grout with a wet rag. Repeat as needed. It may take a day or so, but you can do other things while you wait for the moisture to soften the grout. 
Tom
|
|
trollbridge
Member
|
# Posted: 30 Oct 2013 05:03pm
Reply
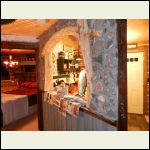
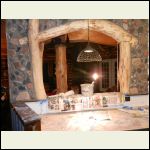
I hope this works...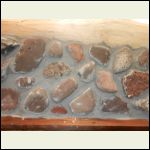
stone_wall.JPG
| 
stone_wall_2.JPG
| 
stonw_wall_3.JPG
|  |
|
|
trollbridge
Member
|
# Posted: 30 Oct 2013 05:04pm
Reply
Thanks for the tip, Martian. You can see that the stones need cleaning.
|
|
Martian
Member
|
# Posted: 30 Oct 2013 07:05pm
Reply
Quoting: trollbridge You can see that the stones need cleaning.
Yes. So I can see. 
Tom
|
|
silverwaterlady
Member
|
# Posted: 30 Oct 2013 07:33pm
Reply
I am enjoying all the stonework! Can't wait until I can share mine.
|
|
hueyjazz
Member
|
# Posted: 3 Nov 2013 06:43pm
Reply
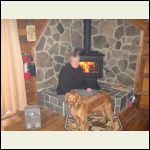
Finished project this weekend and installed new wood stove. Removed 600 pound monster stove that was way oversize for my 500 sf and ate wood like you couldn't believe. Replaced with Timberwolf 2100 stove.
Got there a day early before the wife and cleaned the whole place or she would have killed me if see saw the mess.
Now what to do with all of those leftover stones and I know where to get more. Sauna????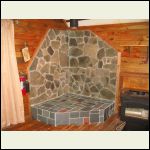
IMG_3807.JPG
| 
IMG_3809.JPG
| 
IMG_3813.JPG
|  |
|
|
neb
Member
|
# Posted: 3 Nov 2013 07:21pm
Reply
trollbridge and hueyjazz
Very nice I like it a lot!!
|
|
scout100
Member
|
# Posted: 9 Nov 2013 04:03pm
Reply
Great job! I see the wife enjoying the warm comforting heat and has a great big smile on her face.. Beautiful Irish setter - always loved those dogs.
|
|
leonk
Member
|
# Posted: 10 Nov 2013 07:53pm
Reply
Looks good, not sure what you mean to do with rocks in sauna..? 
Place around and on top of metal stove?
|
|
hueyjazz
Member
|
# Posted: 11 Nov 2013 12:12pm
Reply
Leon
Stone set in mortar would be for the floor of the sauna. My mason had me pick more than double the stones needed for the woodstove wall. We debated on the placement of each one.
I'm thinking of doing cordwood walls for a sauna. Still a pipe dream at this point as I have a lot of task to complete before that one. We've had the cabin for a year and have got a lot done with a lot more to go. Love stealing good ideas from this site.
|
|
|

