|
| Author |
Message |
AKfisher
Member
|
# Posted: 10 Mar 2020 12:42pm
Reply
I am thinking about getting another shipping container (conex) to supplement the one I already have. I would have 2 - 20' containers and want to put a roof over them, but would like the area between them for storage/garage. Anyone here done one? If each container is approx. 8' wide and I would want about 12 in-between them, that would make the truss span 28', add a 2' overhang = 32'. Doable? Also thinking it should be 6/12 pitch as we get a fair bit of snow and would like to atleast shed snow when it warms up in the spring.
Any thoughts, suggestions or ideas?
https://www.bing.com/videos/search?q=shipping+container+barn&qs=PF&cvid=5737249876e34 166a854359d4198b41b&cc=US&setlang=en-US&plvar=0&ru=%2fsearch%3fq%3dshipping%2bcontain er%2bbarn%26form%3dEDGEAR%26qs%3dPF%26cvid%3d5737249876e34166a854359d4198b41b%26cc%3d US%26setlang%3den-US%26plvar%3d0&view=detail&mmscn=vwrc&mid=43B6C651C985F33DD23C43B6C 651C985F33DD23C&FORM=WRVORC
|
|
Brettny
Member
|
# Posted: 10 Mar 2020 03:28pm
Reply
For sure doable. The metal to wood connection could be tricky if you can't weld onsite. You gain a ton of head room with a gambrel roof also.
I made 19ft wide gambrel trusses and set them with 2 people and didn't have a 8ft wide platform to stand on on each side like you would.
|
|
toyota_mdt_tech
Member
|
# Posted: 10 Mar 2020 03:41pm
Reply
Nope, never done it.  
container6.jpg
| 
container7.jpg
| 
container8.jpg
| 
container2.JPG
|
|
|
toyota_mdt_tech
Member
|
# Posted: 10 Mar 2020 03:42pm - Edited by: toyota_mdt_tech
Reply
Few more. I welded brackets to bolt on the 4X6 for top plate.
You'd be doing the same thing, just paired together or the breezeway in between.
container0.JPG
| 
container3.JPG
| 
container1.JPG
|  |
|
|
toyota_mdt_tech
Member
|
# Posted: 10 Mar 2020 03:44pm
Reply
Quoting: Brettny The metal to wood connection could be tricky if you can't weld onsite.
I prepped mine ahead of time, but one way is to drill holes and bolt on a top plate.
|
|
AKfisher
Member
|
# Posted: 10 Mar 2020 05:09pm
Reply
Quoting: toyota_mdt_tech I prepped mine ahead of time, but one way is to drill holes and bolt on a top plate.
Good idea. Some 4x6 brackets welded would be nice. Did you do 2 on each side? or have a couple saddles in the middle? I can source some 20' lumbers for this build. Thinking top plate, set truss, space and repeat.
Welding is probably quicker then drilling holes and bolting. Plus would give me a reason to get a welder.
|
|
jhp
Member
|
# Posted: 10 Mar 2020 06:16pm
Reply
Maybe check out this channel for some ideas, I probably wouldn't have thought to build a three part roof design like this but that should let you go as wide as you want but a little simpler and easier to DIY.
https://www.youtube.com/channel/UC-l69It3hxAY3tkBH_utLNQ/videos
|
|
toyota_mdt_tech
Member
|
# Posted: 10 Mar 2020 08:57pm - Edited by: toyota_mdt_tech
Reply
Quoting: AKfisher Good idea. Some 4x6 brackets welded would be nice. Did you do 2 on each side? or have a couple saddles in the middle? I can source some 20' lumbers for this build. Thinking top plate, set truss, space and repeat. Welding is probably quicker then drilling holes and bolting. Plus would give me a reason to get a welder.
AK, I used 2 10 footers for each side for top plate, its just a chunk of 3" 3/16 thick angle iron, hole drilled into it, a timber lock screwed into it. I spliced the 2 10 footers, just butted them up and used timber lock lags screwed in at an angle (like toenailing) You can see the brackets on the photo, the black paint is to cover the welds. I put them about every 2 feet or so.
For the sway brace, I just nailed a 2X4 from the peak of the gable end on the underside of the rafters down to the 4X6 top plate on both sides and both ends. (4 total) the ridge was non load bearing, so I spliced 2X6X12 footers. I used rafter ties on every rafter (went 24" OC) and I put collar ties also, on every rafter. So overbuilt. Sheeted roof with 1/2" plywood with H clips, 50lb felt, then metal roofing. No ridge vents, jusat 2 gavle vents and vents in between each rafter bay (3, 2" holes with bird/bug proof screening
|
|
|
toyota_mdt_tech
Member
|
# Posted: 10 Mar 2020 09:07pm - Edited by: toyota_mdt_tech
Reply
As you can see, I had to notch the 4X6 where is passed over the corner supports on the container. Across the front and back are 4X4's to close the gap and provide nailer. T1-11 blended right in, I used narrow strips down each side to tie siding/roof into container.
I also installed a mesh/screening to close off the fork lift pockets to keep varmins out. I also used a chunk of wood on the top corner support columns where containers are keyed and lock together, otherwise, those holes in the top corners makes a perfect access to the attic
P1020826.JPG
| 
P1020873.JPG
| 
P1020879.JPG
| 
container_painted_re.jpg
|
|
|
Steve961
Member
|
# Posted: 11 Mar 2020 12:33pm
Reply
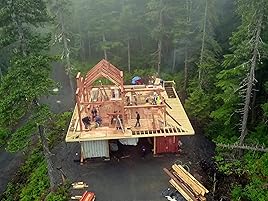
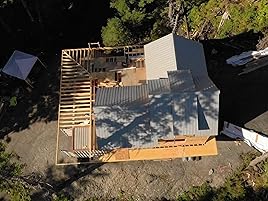
This is not mine, but it's one of the best examples of a shipping container "barn" build I have seen. It perfectly blends secure storage, a covered work area, and potential living area into one structure. If I had seen this before building my container cabin, it would have been a tempting design to consider.
.
|
|
toyota_mdt_tech
Member
|
# Posted: 11 Mar 2020 01:56pm - Edited by: toyota_mdt_tech
Reply
The advantage of these contailer structures is tax, its a container, not a building, roof is just to keep them cool and protect the container from weather. No foundation, just set on thick bed of packed gravel.
How cool would it be to put 3 20 footers side by side (so you have a 24X20 rectangle), then built a house on top of it with a cantilever porch all the way around it, steps coming up through the porch that can be closed off. You can tie the containers together inside via doorways or keep them separate. Maybe add stairs going up to house or not? So now your home is elevated, safe from large predators (bears in AK etc).
|
|
jhp
Member
|
# Posted: 11 Mar 2020 02:46pm - Edited by: jhp
Reply
They did something similar on "Building Alaska" a show on the DIY channel:
|
|
AKfisher
Member
|
# Posted: 11 Mar 2020 02:52pm
Reply
Quoting: toyota_mdt_tech The advantage of these contailer structures is tax, its a container, not a building,
I believe that is true, it is not a permanent structure, can move it. I already have a cabin. Looking for more secure storage as well as a nice covered area for working on projects and keeping snow/rain off the toys.
My carport that I threw up several years ago is still standing, but barely. Had to shovel it this last weekend. The deflection on the 2x6's and 4x4s was incredible...
|
|
Aklogcabin
Member
|
# Posted: 12 Mar 2020 09:18am
Reply
Man I hear yah about the snow. I love it! Haven’t had a chance to get to my cabin yet. I’d guess 6-8’ on the ground. I will have to let it settle a bit or get stuck. Again n again n again etc. Had to stomp out a path to get my snogo out of my shed at home. Glad I have my own plow truck.
The moose are probably packed up I’d guess.
|
|
AKfisher
Member
|
# Posted: 13 Mar 2020 07:40pm
Reply
Here is a sketch. I figured I could make the gambrel truss, span 16' between the two conexes, then hang a rafter off of the second pitch to hang over the conex. The overhang isn't captured fully in the sketch, but a 16' board will get be about 4' that I would support with posts. The sketch also says 5/12, it will really be 6/12 which I would rather have for snow shedding.
Gambrel truss I can build at home. Gusset them up, stand them, block, then run purlins. Makes for a long roof, 24' of tin to cover it. 3- 8' sheets of tin would work.
Thoughts?
Gambrel Truss with overhang
| | | |
|
|
|
