|
| Author |
Message |
Tim_Ohio
Member
|
# Posted: 30 Dec 2020 08:36am
Reply
Hello everyone.
I've owned land in southern Ohio for about seven years. I've been gardening, creating trails, revitalizing the spring for drinking water, mowing and comping out. My ambition was to build a small 12 x 24 ft cabin to stay in on weekends, or move to if the second marriage didn't work out  , chuckling. Anyway, over the years I would work on installing concrete piers for the cabin. In the spring of this year, I was sent home for the pandemic and told not to come to work. For that reason, I finally had enough time to commit to building the floor, installing the sub-floor and moving onto the cabin. I was called back to work in July, and left the floor covered with tarps. , chuckling. Anyway, over the years I would work on installing concrete piers for the cabin. In the spring of this year, I was sent home for the pandemic and told not to come to work. For that reason, I finally had enough time to commit to building the floor, installing the sub-floor and moving onto the cabin. I was called back to work in July, and left the floor covered with tarps.
In the meantime, I managed to buy and store all of the materials to start framing the cabin. In September, I took off work for nine days and camped on the site. In nine days, the cabin took shape and had all of the framing, osb sheathing and a roof covered in 30lb felt to be eventually covered with metal. Since then, I've managed to finish the exterior, including gutters and a porch in preparation for the winter season. I had one day of help with sheathing the exterior of the walls from a friend. Then, another friend helped with lifting the six used windows and used full view glass door into their respective openings. The siding was painted in advance with one coat of elastomeric paint on my garage floor at home, before taking it to be installed.
I'm 56 years old and this project is one of my bucket list items. I still look forward to finishing the inside and am presently planning the wood stove installation and the layout of the interior. I'm enjoying hanging bird feeders and watching from the comfort of sitting inside since the weather has changed. I look forward to when it is all finished.
Tim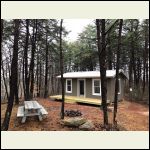
Cabin, finished exterior
| 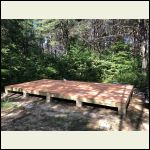
Sublfoor
| 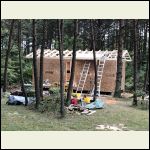
framing
|  |
|
|
paulz
Member
|
# Posted: 30 Dec 2020 09:00am
Reply
Very nice Tim. Same size as mine (I have a bathroom add on, and 1-1/2 stories), and I was the same age when I started.
Fun times ahead!
|
|
Nobadays
Member
|
# Posted: 30 Dec 2020 09:01am
Reply
Nice! Looks like years of enjoyment there!
|
|
gcrank1
Member
|
# Posted: 30 Dec 2020 11:57am
Reply
Yes, nice work! And a good size.
My first cabin was built in a woods not unlike yours. As the years went by we kicked the trees and brush back a good bit, but not far enough (and realized we should have done it before building). The Jack Pines went past prime and into decline and a couple of wind storms dropped 3 on my roof  . .
A high hitched winch and a favorable wind can help you drop some of those too close but you still have to watch out for a top tangle as they come down.
There is always more to do, even if you have to make stuff up 
|
|
Ol Slim
Member
|
# Posted: 30 Dec 2020 12:31pm
Reply
Looking good !
|
|
Tim_Ohio
Member
|
# Posted: 30 Dec 2020 01:07pm
Reply
Yes. I knew going into it that the trees might cause
future problems. I've dreamed of being in the thick of
the woods and understand the risk. I built it using the post and beam framing as you can see in this picture. I set the rafters on top of a ridge BEAM, not on the face of a ridge board. I still have a column to put in under the center of the collar ties, of which there are
two that also act as beam supports. I'm hoping if a tree comes down on top while I'm occupying it, that I won't be killed. It is a worry.
|
|
Tim_Ohio
Member
|
# Posted: 30 Dec 2020 01:10pm
Reply
Here are some pics of ridge beam construction.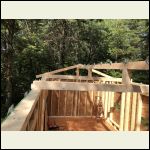
ridge_beam_with_coll.jpeg
|  |  |  |
|
|
Tim_Ohio
Member
|
# Posted: 30 Dec 2020 01:17pm
Reply
Here is another. There were ties added later across from one rafter to the other on top of the ridge beam.
The framing was all 2x6 for wall "crushing" strength as well. It's not your usual construction method, but an option I preferred for the above mentioned reasons.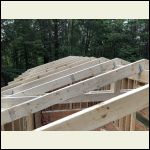
rafters_in_place.JPE.jpeg
|  |  |  |
|
|
|
Nate R
Member
|
# Posted: 31 Dec 2020 11:12am
Reply
Nice work! 
Looks like it'll be a nice place. How much land do you have?
Do you know what you'll use for a wood stove?
I feel the same about the trees, we want our cabin to feel like it's IN the woods, not in a field with trees at the edges. I like your ways of bulking up the framing for that slight risk.
Keep us posted as you finish the interior!
|
|
Tim_Ohio
Member
|
# Posted: 31 Dec 2020 11:22am
Reply
Hi, Nate.
The parcel of land is 13 acres total. It's mostly wooded with some pasture for gardening. I'm lucky, since I have a pole barn down by the road with electric and a shower that I'm able to use, not unlike being at a camp ground. The cabin is about a quarter of a mile from the road up on a hill in the woods. It's isolated like you are on a larger piece of land.
As for the wood stove, I bought a US Stove 1269E from Rural King that had been returned. I jumped on it because it was half price, but I'm not sure I'm going to like it. I would really rather have a small one with a glass front door. I'd like to be able to see and enjoy the fire as well as monitor it without opening it up too often. So, I'm likely to install the first one and see how it goes, then maybe change it out with something more desirable.
Tim
|
|
gcrank1
Member
|
# Posted: 31 Dec 2020 12:30pm - Edited by: gcrank1
Reply
Lol, we wanted to see the fire too but the glass door stoves were always out of reach. Think I rebuilt the antique upright in '84, solid cast iron door, no view. It is still running as of now and we 'adjusted' to heat is good, view is optional.
Pls use high quality class A dbl or tpl wall chimney, straight up through the roof, near the peak is best. The trees can make for strange drafting and so can the roof peak/ridge if you run the chimney closer to an eve, + it needs to be what, a min of 2' above the roof line anyway? 3 would be better.
When figuring how far from the wall to put the roof hole you need a min 18" for sgl wall stovepipe to the combustible surface (sgl often used from stove to chimney) then reduced clearance class a chimney up and out, and min 36" from stove to combustible surface unless you do a heat shield.
Just sayin that it is best to set the stove and do the distances for safety before cutting a chimney hole and finding out something didnt figure right.
Wood heat is wonderful but the footprint and clearances are big.
|
|
Aklogcabin
Member
|
# Posted: 1 Jan 2021 11:20am
Reply
I also prefer glass doors
|
|
SE Ohio
Member
|
# Posted: 1 Jan 2021 08:00pm
Reply
Nice cabin. Welcome to southern Ohio! I’m in Vinton County. We’re well represented on this forum.
SE Ohio
|
|
|

