|
| Author |
Message |
dvgchef
Member
|
# Posted: 21 May 2010 07:09pm
Reply
Dear all;
It's my turn! I have utilized this site for I don't know how long, and now I am finally getting to build my cabin! The piers are in and a blog has been posted - see http://catskillcabin.blogspot.com
|
|
Rob_O
|
# Posted: 23 May 2010 10:26pm
Reply
Congratulations on finally breaking ground on your property.
2*6 studs on 24" centers will be fine for your cabin walls. I'll be building mine with 2*4 studs, 1/2" plywood and 2" of foam insulation to keep the floor area just under the 120ft^2 allowed without a permit. Gluing the plywood to the studs makes the structure incredibly strong
|
|
dvgchef
Member
|
# Posted: 24 May 2010 10:00pm
Reply
Thanks for the info. What kind of glue, simple carpenters? And thanks for the reminder about insulation; I will be doing that too - 2" foam sheet below the ground floor to start, then the rest after the shell is built.
|
|
Rob_O
|
# Posted: 25 May 2010 12:42am
Reply
Use a construction adhesive like liquid nails to attach the plywood to the studs. When it dries, it will be stronger than the wood
|
|
dvgchef
Member
|
# Posted: 25 May 2010 07:35am
Reply
Sounds sweet, also seems like it can act as a wind block.
I assume you do, but need to ask... Are you using nails or screws in addition to the glue?
|
|
Rob_O
|
# Posted: 25 May 2010 08:54am
Reply
Yes, the glue takes a few hours to dry so you nail everything as usual
|
|
MindenGal
Member
|
# Posted: 19 Aug 2010 12:32am
Reply
That is a beautiful looking cabin! I hope you will post interior photos sometime, I would love to see them....
|
|
Gary O
Member
|
# Posted: 26 Aug 2010 08:53pm
Reply
Progress dvgchef?
I'm piqued!
Love to see original creations.............
|
|
|
Borrego
Member
|
# Posted: 26 Aug 2010 09:57pm
Reply
Glue and screw!!!! Nails will pull out even with the glue....
|
|
dvgchef
Member
|
# Posted: 27 Feb 2011 08:26pm - Edited by: dvgchef
Reply
Still posting at http://catskillcabin.blogspot.com, but here is what I have so far...
The ladder is 16 feet long and made with 5/4" by 6" yellow pine. I built it in a friends shop, so it was easy to do with all his tools.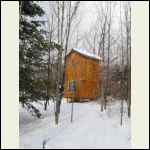
cabin in winter
| 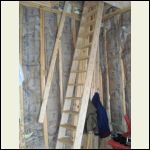
ladder from downstairs
| 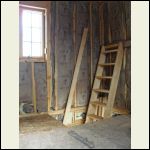
ladder upstairs
|  |
|
|
dvgchef
Member
|
# Posted: 27 Feb 2011 08:29pm
Reply
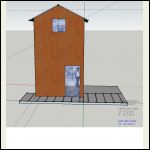
And the plan for next spring...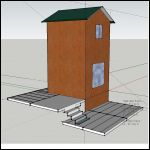
from the North West
| 
from the East
|  |  |
|
|
simplelife
Member
|
# Posted: 6 Aug 2011 07:24pm
Reply
My Brother and I build this little cabin back on a hilltop on a farm I grew up on in Eastern Kentucky. Just a place to go "home" to.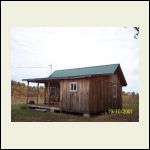
my 12 X 24 cabin on a hilltop in Eastern Kentucy
|  |  |  |
|
|
Erins#1Mom
|
# Posted: 7 Aug 2011 09:18am
Reply
dvgchef,
Looks wonderful esp with the staining of walls.
simplelife,
I would love to see more photos of your cabin, esp the interior.
|
|
unixfmike
Member
|
# Posted: 19 Aug 2011 10:54am
Reply
Nice 3D model and building. That looks like a fun place to hang out. How hard was it to build the roof?
--MikeW
|
|
trollbridge
Member
|
# Posted: 19 Aug 2011 11:27am
Reply
dvgchef,
I went to your blog and liked your outhouse sink and water system. Where did you get your barrel and do you add anything to the water? Also, did the barrel come with the spigot at the bottom of it or did you have to add that? This is exactly what we would like to add to our outhouse! Thanks.
|
|
dvgchef
Member
|
# Posted: 19 Aug 2011 03:48pm
Reply
Mike -
Thanks, it has been an enjoyable summer, hanging out!
I got to the roof part of the project at the height of the heat wave last year and it was way too hard! Working with 8' long 2 by 12's in the roaring sun was not a lot of fun, plus it was about then that I got vertigo - although that could have just been from the heat.
I did the framing alone so it took a long time to figure out the trick of getting the ridge up (braces anchored to the walls, duh) and trying to figure out how to install the rafters without having them slide over the wall and drop 20' was stressful. I did all the framing, and it is possible, to do alone, but it was a pain in the ... and would have been much faster with a second pair of hands and scaffolding.
I ended up running out of time so had to hire a team to do the actual skin of the roof. Best $ I ever spent. :)
|
|
dvgchef
Member
|
# Posted: 19 Aug 2011 03:50pm
Reply
Erins Mom & Simple Life - Thanks!
SimpleLife, get some more pics up!
|
|
dvgchef
Member
|
# Posted: 19 Aug 2011 04:07pm
Reply
trollbridge;
Got the 15 Gallon water tank off of ebay - make sure the ad says food safe, or at least ID's what was in it. Mine held a non-toxic pool cleaner, so I just rinsed the heck out of it and it seems OK.
I added the spigots - one on the bottom and the other on the side for overflow - I have since added a hose to that and filled a 55 gallon drum that is on the ground. Adding the spigots is very easy to do, especially if you buy the correct size drill bit!
We don't do anything to the water, but we don't drink it - it is only for washing. At the beginning and end of each season we do rinse with a 10% bleach solution.
We originally had the water drain directly into the loo, but that was too much liquid for the system, so I have added an elbow and a 10' length of pipe to push the water away.
Good luck!
|
|
dvgchef
Member
|
# Posted: 19 Aug 2011 04:09pm
Reply
Just found out that my piers are too small for the cabin - oops! HAve to replace with 8 by 8's. This will be interesting!
|
|
trollbridge
Member
|
# Posted: 19 Aug 2011 05:42pm
Reply
Why 8 by 8's???
Thanks for the tank info!
|
|
dvgchef
Member
|
# Posted: 19 Aug 2011 06:05pm
Reply
Noticed a bit of rocking on the second floor. An engineer came by and looked at the cabin from the outside. The 6" by 6" piers themselves were moving!
I was impatient during the first build and hadn't gone deep enough, or wide enough, I guess!
|
|
trollbridge
Member
|
# Posted: 19 Aug 2011 06:46pm
Reply
I would think the 6x6 are strong enough for the weight, if you could sturdy it up from swaying. How deep did you go down? Couldn't you just add some wrap around decking that is tied to the cabin with deep enough post or wouldn't that work? Maybe a porch roof that has pillars that go down deep too? Not an engineer...just asking?
|
|
dvgchef
Member
|
# Posted: 19 Aug 2011 06:53pm
Reply
Good ideas all, but after just one year I have already had a frost heave. I was my impatient self when I put in the posts and they are only set in between 2 and 3 feet in an area that calls for four.
My original cabin wasn't going to cost as much as this one ended up costing, so I want to keep it for awhile; plus I really like it. :)
The engineer had just seen something similar at another location. Something about the slope and the amount of moisture in the ground, he felt the solution would be 8 by 8 plus bracing.
|
|
soundandfurycabin
Member
|
# Posted: 21 Aug 2011 03:52pm
Reply
Bracing the piers will stop the sway.
As for the frost heave, can you get a truck in to your place? You could lay XPS foam board around the piers then top with a foot of mulch if you have room under your cabin for it. Google "frost-protected shallow foundation" for more info. Try to grade or ditch around the cabin to keep runoff away.
|
|
dvgchef
Member
|
# Posted: 22 Aug 2011 08:05am
Reply
soundandfury -
thanks for the link, will read more later about frost-protected shallow foundation.
|
|
trollbridge
Member
|
# Posted: 12 Oct 2011 08:23pm
Reply
Hey dvgchef,
Just read your "adventures" with putting in your new foundation post and I have to say it seems like you stayed so calm during all your trials and tribulations. Perseverance paid off though and now all problems are resolved I hope? I must admit I did chuckle a time or two(or more) while reading but I also felt your pain! I really admire your sense of humor through it all! Congrats on getting it done...now I need to ask-did it completely take away all the sway you were having?
|
|
dvgchef
Member
|
# Posted: 13 Oct 2011 08:57am
Reply
trollbridge
Thanks, it took me a few days to be calm enough to write on my blog!
The sway is gone (I hope!) Certainly not noticeable when I am in the cabin by myself; I will find out next week when I go up with my wife.
http://catskillcabin.blogspot.com/
|
|
Erins#1Mom
|
# Posted: 14 Oct 2011 03:28pm
Reply
dvgchef,
I just finished reading about your adventures. I feel your pain. I had two locations picked out for my build. One had access to electric and water, the second, would have to have been off grid. I was leaning to the second until the spring storms hit, esp. hard. One of the ridgelines above the second site, washed out. Filled the creek with not only dirt but uprooted trees as well. It would take thousands of dollars to repair.
|
|
Nirky
Member
|
# Posted: 14 Oct 2011 04:03pm
Reply
Read your latest posts and see a positive to all this: more potential deck area.
|
|
|

