|
| Author |
Message |
nicalisa
Member
|
# Posted: 9 Sep 2015 04:35pm
Reply
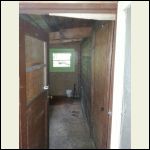
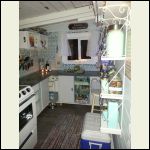
Still have the sink to install, but it is almost done and I love it!!! Whole project cost under 500 dollars (the stove and fridge were included in the cabin when we bought it) and I adore the space now. From Dexters kill room to a cute country kitchen!
kitchen before
| 
kitchen after
|  |  |
|
|
Just
Member
|
# Posted: 9 Sep 2015 05:21pm
Reply
nice job ,just a little TLC.
|
|
fickle_serendipity
Member
|
# Posted: 9 Sep 2015 06:14pm
Reply
nice and bright with lots of fun details to swoon over....just as i knew it would be! btw....dexters kill room?! too funny....but creepy true!  Enjoy! Enjoy!
|
|
creeky
Member
|
# Posted: 9 Sep 2015 07:09pm
Reply
nicalisa. see your sign above the window. that's me.
i have certainly spent more time and probably more money on my kitchen. but i look at your kitchen and i thinks to myself. geez. i hope nicalisa is taking a vacation in my neck of the woods and needs gas money. 'cause I'ze gots a job for her.
how did you afix the tile to the wall? is that glued?
anyway. looks great. he says. not looking anywhere near his kitchen.
|
|
turkeyhunter
Member
|
# Posted: 9 Sep 2015 08:38pm
Reply
beautiful transformation !!! Looks ready to cook a meal in for sure!!!
|
|
nicalisa
Member
|
# Posted: 9 Sep 2015 10:12pm
Reply
Creeky, I would be thrilled to help in any way that I can and I am sure that your kitchen is beautiful!
The tile is set with mortar and then grouted. The tile came a used building supply store. It cost 30.00 for all of it;)
|
|
Gary O
Member
|
# Posted: 9 Sep 2015 10:48pm
Reply
simply gorgeous
|
|
NorthRick
Member
|
# Posted: 10 Sep 2015 11:29am
Reply
Wow! What a difference.
|
|
|
creeky
Member
|
# Posted: 10 Sep 2015 01:02pm
Reply
nope. sorry nicalisa. my kitchen is not beautiful. but i'm working on it. and it will get there.
i am still in awe of your tiling. who thinks to do 4 rows one kind. 4 rows another. 4 rows. 2 rows. 2 rows. 4 rows. like that. 
not me that's for sure.
and if you'd like to talk abit about why you did what you did... those little cabinets on the wall. are they glass front? is that tile or some'at behind? is the wall behind the kitchen help wanted sign really pale blue?
awe. awe i say. thx for the inspiration. now to go find some shelves and some bottles to store stuff in. and a can of white paint. and...
|
|
naturelover66
Member
|
# Posted: 10 Sep 2015 07:58pm
Reply
Love your new kitchen!! Great work. 
|
|
silverwaterlady
Member
|
# Posted: 10 Sep 2015 08:44pm
Reply
Wow! It's lovely. Quite the transformation.
|
|
hattie
Member
|
# Posted: 10 Sep 2015 11:52pm
Reply
WOW, what a beautiful transformation! It just makes you want to come in and make yourself a cuppa and grab a cookie. So warm and welcoming. Excellent job! You should be very proud of it!!!!  
|
|
nicalisa
Member
|
# Posted: 11 Sep 2015 01:01pm
Reply
Thank you all for the compliments I have been working away from the time we decided to look for a cabin in the interior of BC. We didn't even have the cabin yet and I was already inspired by the painted glass jar look (I love depression glass dishes so it is no wonder that this look hooked me). I collected all of the jars that our groceries came in, went to garage sales to pick up old canning jars for pennies, and painted them with chalkboard paint and then baked them to make them able to be washed.....that was the inpiration for the kitchen. I have been working away from the time we decided to look for a cabin in the interior of BC. We didn't even have the cabin yet and I was already inspired by the painted glass jar look (I love depression glass dishes so it is no wonder that this look hooked me). I collected all of the jars that our groceries came in, went to garage sales to pick up old canning jars for pennies, and painted them with chalkboard paint and then baked them to make them able to be washed.....that was the inpiration for the kitchen.
Creeky, the walls are indeed blue. A shade darker than the rest of the rooms in the cabin still underway. The cabinets on the wall are made of unfinished wooden crates from home depot 9.99 each, I painted them white, distressed them, and then put a marine grade clear protective coating x 5 coats on them. I placed a shelf under them to make sure that they were strong and used cheap 1x2 studs to make the frame for the door. I decided against glass and instead used chicken wire in the doors for that upcycled look (and plus I arealdy had chicken wire from another project so it was an economical decision
The counters are simple 1 inch thick pine craft slabs that I stained, stenciled, and again protected with many coats of sealer.
The tile design was born of the materials I had available. The tile was bought as leftovers from a used building supply store. The glass "chicklets" are two different sizes so it inspired the design by necessity! but hey for 30 dollars for all of the tile, I can be happy for what I had
|
|
creeky
Member
|
# Posted: 11 Sep 2015 01:24pm
Reply
 

|
|
beachman
Member
|
# Posted: 11 Sep 2015 02:47pm
Reply
Well done! The kitchen is usually the hardest part of any build and you guys have done great. So nice to have a functioning space like that. I know we have appreciated ours
|
|
abby
Member
|
# Posted: 14 Sep 2015 06:49am
Reply
it's a beautiful kitchen! what a great use of space, and I wouldn't mind cooking there one bit!
|
|
LoonWhisperer
Member
|
# Posted: 14 Sep 2015 03:18pm
Reply
Great job!! 
|
|
jaransont3
Member
|
# Posted: 14 Sep 2015 05:09pm
Reply
I love it. Really cute space and looks quite functional. I love the creative use of materials.
|
|
|

