|
| Author |
Message |
buckybuck
Member
|
# Posted: 15 Dec 2015 07:06pm
Reply
I plan to finish the interior walls of a 10 x 20 cabin I'm working on using rough cut hardwood lumber. I got a deal on a bundle of red and white oak hardwood lumber from a sawmill. As near as I can tell, I got at least 600 board feet, so unless my math is way off, I have enough.
The board are all 1 1/4" thick and at least 8' long. My preference would be to run the walls horizontally, because that probably would involve less waste and because I'm lazy. But my dilemma is the lumber is random widths, with boards ranging from 6" to 13" wide. It would probably be luck if there were any two boards the same width. So, to my mind, running the boards vertically is the only way to go; I can't see any good way to piece the wood together horizontally so rows of boards would line up evenly. The only idea I've come up for running them horizontally is to do it in 4 foot or 8 foot sections with some sort of vertical trim or molding separating the sections, and not worrying about whether the board rows match up between sections.
Any suggestions?
|
|
pash
Member
|
# Posted: 15 Dec 2015 07:40pm
Reply
I build reclaimed pallet wood back splashes. Sometimes i create breaks in the wall, i put them on luan and glue the sheet to the wall. Basically, make rectangles that stop abruptly, the rows dont continue, after a few its the pattern. They dont look bad. Its kind of like the cheap laminate floor pattern on a larger scale. where you see the breaks but it kind of just all goes together. Another secret i have learned in doing these is to paint the wall/luan black or whatever color i want to makke the gaps that inevitably occur uniform. So in your case maybe use a plastic or felt paper before the wood, but that all depends on your climate and where vapor barriers are needed. You could use craft paper or something similar and embrace the gaps.
|
|
bldginsp
Member
|
# Posted: 15 Dec 2015 10:36pm
Reply
If you sort them carefully you will find a lot of width match ups, I'll bet. But if these are rough sawn they won't be straight and you will have gaps between, even if the widths do match up. I agree with pash to put black paper behind. Also you can get a small table saw and use it to straighten edges and bring them to a series of uniform widths. To straighten boards on a table saw, install a long fence, the longer the better.
|
|
Don_P
Member
|
# Posted: 15 Dec 2015 11:44pm - Edited by: Don_P
Reply
Quoting: bldginsp Also you can get a small table saw and use it to straighten edges and bring them to a series of uniform widths. To straighten boards on a table saw, install a long fence, the longer the better.
+1, I group into sizes then clamp a long straight board to the tablesaw with an outfeed table so the boards slide out nice and smooth. Put the concave side of the bowed board against the fence for the first pass... end tips on the fence and knock the belly off with the saw. Run that group to that setting. This straightlines the board. Next pass move the fence in and put the straight edge against the fence. Work through the groups from widest to narrowest, you can keep nibbling defects out that way if needed. I've made good money neatly cutting that off fall into kindling and neatly packing it into a wooden crate.
Then I'd run a horizontal row of blocking at 32 and 64" off the floor and stand them up. If it isn't dry, oak gaps impressively from green to dry.
|
|
skootamattaschmidty
Member
|
# Posted: 16 Dec 2015 05:49am
Reply
I would also do the same as the others mentioned. Run your boards through a table saw. If you do not have one, another suggestion would be to clamp a straight edge to the boards and run a skil saw along them to straighten them out and make uniform widths. As don said, any cut offs make great kindling wood.
|
|
bldginsp
Member
|
# Posted: 16 Dec 2015 08:31am
Reply
Best way is to run them over a long bed jointer first, then rip at a table saw, but I assumed that is not available. But that's an assumption.
|
|
buckybuck
Member
|
# Posted: 16 Dec 2015 09:33am
Reply
You guys honed right in on my other worry—what's this wood going to look like when it dries? Right now, it's stacked inside with air gaps, and I don't plan on doing anything with it until May at the earliest. Not long enough, I know.
In addition to being lazy, did I mention I'm on blood thinners? If these boards end up being too far out of straight and need extensive saw work, I'll go with Plan B. I don't have a lot of money invested in this lumber and can find other uses for it. (I like the idea of rough cut hardwood walls but honestly, the main attraction was this lumber was less expensive than the cheapest, flimsy paneling). My intent was to tack up tar paper first, mainly to help hide any gaps, and then figure out some way to stuff rope chinking or caulking in the really big gaps.
Another consideration I had about whether to go horizontal or vertical is, from an engineering standpoint, would running the boards vertically contribute significantly more to the structural integrity of the cabin than running them horizontally?
|
|
Atlincabin
Member
|
# Posted: 16 Dec 2015 10:41am
Reply
From a structural point of view, diagonal would likely be the best to keep the wall from tilting (you make a triangle between the vertical studs and the top and bottom plate). Might also be a decent look if run that way, but you might also feel like you are in a gravity warp looking at the walls..
Greg
|
|
|
leonk
Member
|
# Posted: 16 Dec 2015 03:02pm
Reply
or you could do this (scroll through the pics there)

|
|
skootamattaschmidty
Member
|
# Posted: 16 Dec 2015 07:44pm
Reply
Now that looks nice!!
|
|
bldginsp
Member
|
# Posted: 16 Dec 2015 07:57pm
Reply
Totally cool, leonk.
Buckybuck- the reason for T+G is to hide gaps as wood shrinks. An easier way to do that is just cut a rabbet on each edge with a router and lap the rabbets at the edges. Boards wouldn't even need to be perfectly straight.
|
|
Don_P
Member
|
# Posted: 16 Dec 2015 09:19pm
Reply
This is some hickory V pattern T&G I made after a large hickory fell in the pasture on one job. The crown crossed our road in, I got there and the electrician was several batteries deep in with his little sawzall, and making good progress 
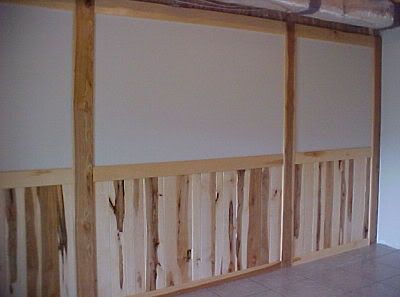
It was quite a house, they had a sauna, which served quite nicely as a dry kiln.
This is some ambrosia maple flooring I made with a square edged tongue and groove joint.
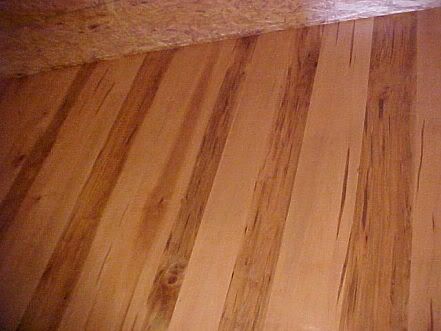
Those were done with a planer and router.
Hmmm, one early way of doing flooring is a groove in both edges and loose tennons (strips that slip in both abutting grooves). A router with a wing cutter
|
|
Steve_S
Member
|
# Posted: 17 Dec 2015 06:27am
Reply
WOW LEONK !!! Now that is some gorgeous wood flooring there ! {Scroll through the pics there ? } Where ?? I wanna see more !
|
|
Don_P
Member
|
# Posted: 17 Dec 2015 07:04am
Reply
http://www.eetupuurtinen.fi/
Click on the table, awesome
|
|
Steve_S
Member
|
# Posted: 17 Dec 2015 07:22am
Reply
Thanks Don... Geez, much to look at there and drool over ! Wait till Neb hits those pages, I'm sure his mind will start fermenting on ideas and possibilities. Did you see the Log "wheel chair" recliner ? COOL !
|
|
buckybuck
Member
|
# Posted: 17 Dec 2015 10:53am
Reply
I'm just ballparking here. Say the average width of these boards of mine is 9 inches and I'd need to trim both sides—for a 10 x 20 cabin, I figure I'd be trimming about 1,000 feet in total. Frankly, I'd like to avoid running that much wood through a table saw. (In addition to my earlier excuses, did I mention the nearest neighbor to my cabin is within earshot and works nights?)
But I'm curious about the idea of rabbet cuts. I've used dado blades with a table saw before, but I've never played with a router. Since the boards I've got are 1 1/4" inch thick, we're talking about 5/8" deep cuts along both sides of each board, right? Maybe 1/8" in? Could I do that with a trim router, or would I need something bigger? Any idea how long something like that would take?
|
|
bldginsp
Member
|
# Posted: 17 Dec 2015 01:51pm - Edited by: bldginsp
Reply
I'd make the rabbet 5/8" x 3/8" or 1/2". I'd use a 3 horsepower router to make it go fast, with a typical 3/4 or 1 horse router it would take longer, but not too much. With a 3 horse and a sharp bit (bearing guided) you'd be done in 2-4 hours. Makes a hell of a racket. A little trim router, like they use on laminates is definitely too small, you'd be there forever.
|
|
NorthRick
Member
|
# Posted: 17 Dec 2015 06:24pm
Reply
You could go board and batten. That would be vertical look but would probably be the easiest way to cover your walls with what you have.
|
|
|
