| << . 1 . 2 . |
| Author |
Message |
Pyro
Member
|
# Posted: 9 Mar 2010 06:49pm
Reply
Let's brainstorm.
Well, the easiest thing you can do is to leave it almost as is. (Leave the horizontal ceiling beams as a natural looking support.)
Do any & all wiring changes before you close in the ceiling!
Then insulate between the upper rafters with rigid insulation, being careful to leave a vent area above the rigid foam boards to prevent decay. Vent the outside soffets & the ridge of the roof as well to assure moisture getting up & out of the vented area.
Mice do not eat or nest in rigid insulation like they do Fiberglass batting.
You could remove the vertical 2x4's that go from the ceiling beams to the rafters. I doubt they are adding a lot of help anyway. Once insulated, you can cover over the insulation like I did in mine.
Use strapping like I did if you want to have room for wires on teh underside of the rafters. Then your ceiling boards can go from the walls to the ridge.
Now, use the "top" of the ceiling beams to mount lighting that reflects off the new ceiling above. Do this in several places. Just be sure that you whitewash, or paint the ceiling wood a light color to reflect the light back down nicely. I suggest something that will hide the lightbulb from below so as to not create glare from the light source.
This will keep most of Grandpa's work, while allowing you more headroom. Sure the horizontal beams will still be there, but just rip off any nails & 2 x stock that was nailed to them & let the natural wood that they are be the decor of the camp.
Your thoughts?
|
|
DLMcBeath
Member
|
# Posted: 9 Mar 2010 07:30pm
Reply
That's a good plan but, the beams look kind of rotten. I plan on white washing the the wood I'm putting on the ceiling like yours. the cabin is 12x36 and is divided into 3 rooms each 12x12. I want to change the ceiling throughout. my wood stove is in the center room (living room) and I want to put ceiling fans in each room the help disperse the heat. I want to put bunk beds in the bed room and I think the beams will be too low for someone to sleep on the top bunk. I really like the idea of the beams. I think they are from an old railroad trestle. I may try to leave two beams in each room.
|
|
Pyro
Member
|
# Posted: 21 May 2010 10:26am
Reply
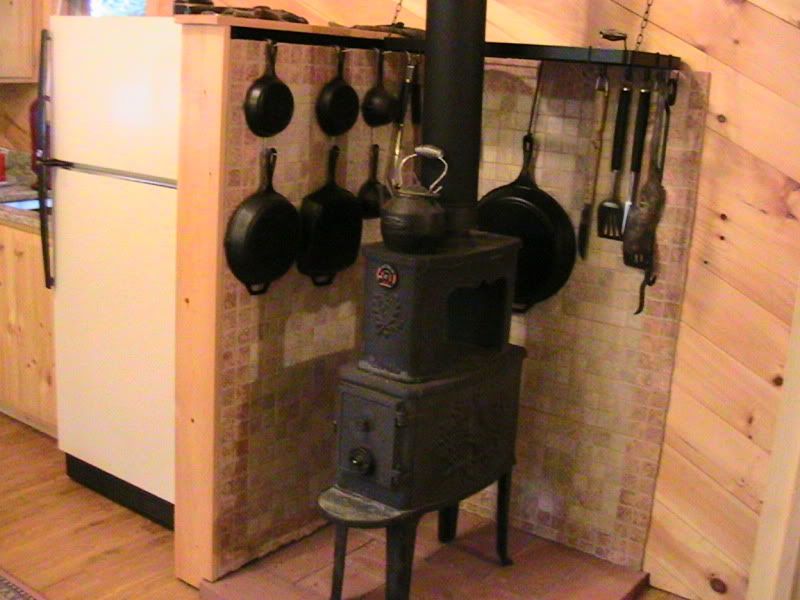
The marble tiles I first used in the earlier pictures here were a BAD choice. Not only didn't the gloss tile look like it should be in the camp in the first place, but the heat from the woodstove compromised the tiles ability to stay on the wall.
Here are the smaller 2 inch tiles I replaced the Marble ones with last year. I think they look much better & they should hold up to the heat better.
My Central Heating system......
|
|
Pyro
Member
|
# Posted: 26 Oct 2010 10:37am
Reply
As the warmth of summer fades, the woodstove tiles are working very well. I'll head up to the camp soon to howl at the moon. (And light a fire. It's getting cool!
|
|
MtnDon
Member
|
# Posted: 26 Oct 2010 12:11pm - Edited by: MtnDon
Reply
Cool looking old stove!
What's under the tiles and what did you use to fix them in place? cement based mortar or a pre-mixed adhesive?
The stove seems to be a tad close to the walls, to me though.
|
|
Pyro
Member
|
# Posted: 26 Oct 2010 08:09pm
Reply
Hi Don,
The stove is close, but that specific stove allows for very close placement. It's an original "Morso 2B Classic" Today they are made with a glass door & an ash pit under it.
If you scroll back to the pics in the first post of this thread show it's placement before the inside of the camp was re-finished. There leaning in place, you can see the cement board I installed to the studs. On top of the cement board I have a layer of 12 x 12 Marble tiles. The Marble only failed on the partition side of the stove, so what you now see on the wall behind the stove is 1 layer of tile, then a layer of marble, then the cement board, then studs & insulation. I used Dry cement mix with a silicone additive to mix it.
The Fridge partition has only the 2 x 2 tiles & the Cement board. There are only studs at the wall & the end, not in the middle. The black air gap at the top allows any excess heat to escape. There is Pine backing on the fridge side with a vent at the bottom to allow passive air flow.
|
|
Pyro
Member
|
# Posted: 26 Oct 2010 08:15pm
Reply
You can actually see in the earlier pics the marble I originally installed over the cement board. It's the last pic of the original post in this thread. (August 08) I cut the pine wall covering "around" the marble, not behind it.
|
|
MtnDon
Member
|
# Posted: 26 Oct 2010 08:20pm
Reply
Good to hear there are no studs in the middle of the wall run. Too many people do not take proper precautions with wood stove installations and I wondered. A stove like that will serve for many decades to come.
|
|
|
turkeyhunter
Member
|
# Posted: 9 Mar 2011 12:24pm
Reply
pryo====that is a awesome traditional Maine camp====i love visiting Maine in the summers and fall. Great job on the re-build!!!!!!
|
|
Pyro
Member
|
# Posted: 9 Mar 2011 06:12pm
Reply
Thanks! We were just up there with the sleds a couple of weekends ago. Had to cross the lake to get to the camp. I also joined the Snow Devil's Snowmobile Club. I love how well they've taken care of their trails this year.
|
|
turkeyhunter
Member
|
# Posted: 9 Mar 2011 07:33pm - Edited by: turkeyhunter
Reply
pryo--are you near Moosehead lake ??? BTW--moosehead is my favorite place in Maine.
ps---love the cast iron hanging by your wood stove---i have bought some good pieces of cast iron in Maine, at yard sales and flea markets and auctions.
|
|
Pyro
Member
|
# Posted: 9 Mar 2011 07:49pm
Reply
South of Moosehead. Near Hartland, on Great Moose Lake.
|
|
Pyro
Member
|
# Posted: 30 Nov 2011 09:46am
Reply
Here is a 360° view taken from my kayak on the lake in front of my cabin in Maine.
http://360.io/67Ddpq
|
|
dstraate
Member
|
# Posted: 30 Nov 2011 11:14am
Reply
This place seems like a 4 season wonderland. I love the way you're improving the place without compromising the history of it. It seems like between fishing, snomobileing, and hunting, you'd hardly have any time to build.
|
|
Pyro
Member
|
# Posted: 30 Nov 2011 11:26am
Reply
You hit the nail on the head! More like 3 seasons though. The early spring has weak ice, mud, & the bugs start to come out en masse. April & May do not have a lot to offer up there in my opinion.
In the last year I only have the ceiling in the 2 small rooms insulated w/ rigid foam, Two new slider windows installed on the back, and two more walls in the small bedroom covered with Pine. Other than those work tasks, I've been up there to play & relax about a dozen times.
BTW, here is a 360° view of the inside of the main room of the camp...
http://360.io/2X3M9u
|
|
Pyro
Member
|
# Posted: 30 Nov 2011 11:33am
Reply
That last panorama of the inside of the cabin was taken last Friday (Black Friday) after we had arrived for the weekend. It was 34° inside & 30° outside. We pull the covers off the bed so the mattress can warm up, turn on the electric oven to start to kill the chill (see my wife rubbing her cold hands over the oven door) and crank the woodstove to get the whole place up to temp. (At which time we do not use the oven) LOL
It's always a process bringing the camp back to life in the winter. :-)
|
|
trakker2
|
# Posted: 30 Nov 2011 01:53pm
Reply
Do you have any sort of a floor plan drawing? From reading thru the notes & looking at some of the photo's, I am trying to see how you squeezed in 2 bedrooms & a bath. Also, I notice you have two enty doors- one on the front of the cabin (which appears to maybe go to a bedroom) & then one that enters into the kitchen/main living are via the screened in porch.
|
|
Pyro
Member
|
# Posted: 23 Aug 2017 09:12am
Reply
I'm sorry to see that all the photo links have been disabled by the Photobucket cash grab. At $400- a year to keep these photos up, it's just too much $$
|
|
| << . 1 . 2 . |
