| << . 1 . 2 . 3 . >> |
| Author |
Message |
neb
Member
|
# Posted: 22 Dec 2011 08:35am
Reply
Great place you have there. The cabin is looks awesome. Also great bow buck.
|
|
TomChum
Member
|
# Posted: 22 Dec 2011 01:25pm - Edited by: TomChum
Reply
Nice! I like your windows too, they look handmade - I like handmade. Your project makes me wish my cabin was a little bigger.....to accomodate more friends. I bet you have many good times ahead.
I like the choice of stain, and everything else about the cabin. I thought about staining my cabin, but got lazy - maybe this spring. Porch post with kneebraces looks right. Are you going to add some wood to the ceiling someday?
|
|
AU2009
Member
|
# Posted: 23 Dec 2011 12:14am - Edited by: AU2009
Reply
Thanks for all the kind words.
we wanted to do some tongue and grove ceiling and floor, but it was just going to be too expensive. Also, with the vinyl floor, I can walk in with muddy boots and not worry about it. The ceiling may eventually get changed to tongue and grove, but the sheet rock does lighten it up some and it was way less than tongue and grove. With the extra money we are going to put in a stone hearth for the stove and under pinning along with some sort of water system and toilet.
its definitely a work in progress. This time last year this was only a thought and we didn't start building it until June. Hopefully this time next year we will have made more progress!
edit: thanks on the buck! You sure don't see many like him around this part of TN! He is an 11 pt and scored 153 4/8"! Going on the wall!
|
|
AU2009
Member
|
# Posted: 4 Jan 2012 11:12pm
Reply
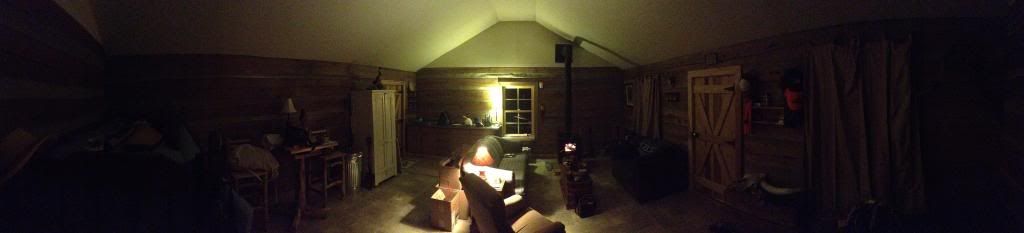
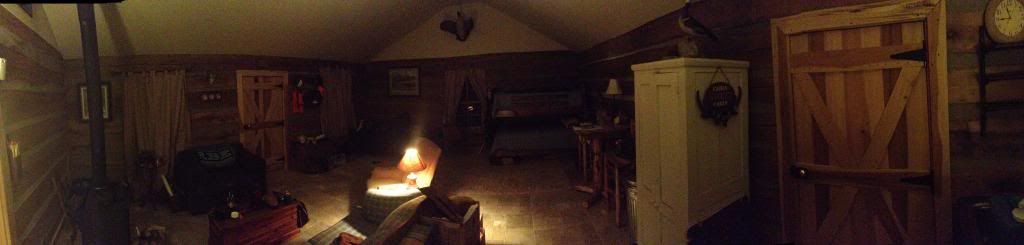
here are a few cell phone shots of the inside. Still lots to do!


|
|
MtnDon
Member
|
# Posted: 4 Jan 2012 11:43pm
Reply
Yes, I surely like the looks of this one! 
|
|
turkeyhunter
Member
|
# Posted: 5 Jan 2012 08:25am
Reply
Quoting: MtnDon Yes, I surely like the looks of this one!
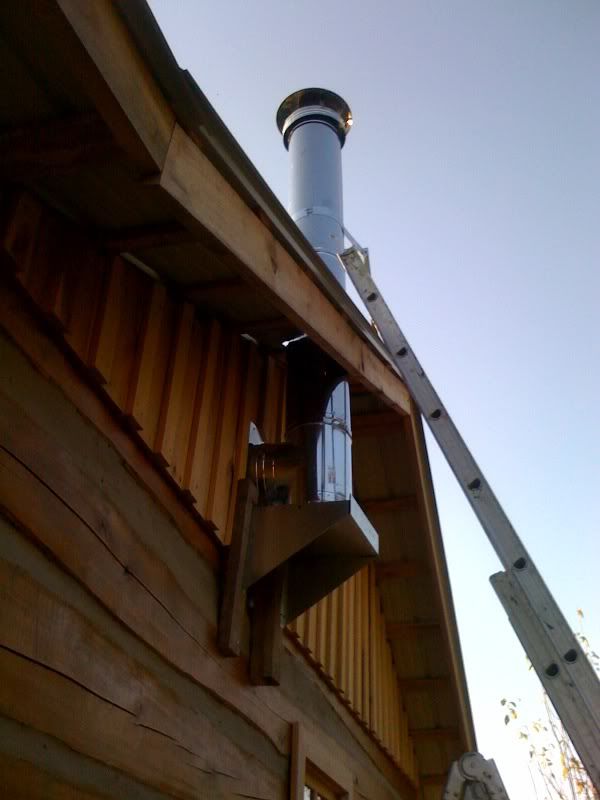
x2 fine build for sure!!!! does the stovepipe go through the wall or ceiling???
|
|
neb
Member
|
# Posted: 5 Jan 2012 08:37am
Reply
Very nice.
|
|
tnky03
Member
|
# Posted: 5 Jan 2012 10:16pm
Reply
What a beautiful cabin! I have enjoyed seeing it's progression. I grew up north of Cookeville, still have lots of family there. TN has a beauty all it's own. Enjoy the hunting, looks like you already are. We will be starting our cabin in the Spring, can't wait!
|
|
|
AU2009
Member
|
# Posted: 19 Jan 2012 09:37pm
Reply
turkey hunter. I bought a "through the wall" install kit at Northern Tool locally. They carry them at tractor supply also. It was more than we wanted to spend on it, but it's done right.
Thanks for all the kind words for everyone. We are in the process of doing a rain catch system, and figuring something out for the toilet. I'll post more photos as it progresses.
|
|
AU2009
Member
|
# Posted: 17 Mar 2012 11:36pm
Reply
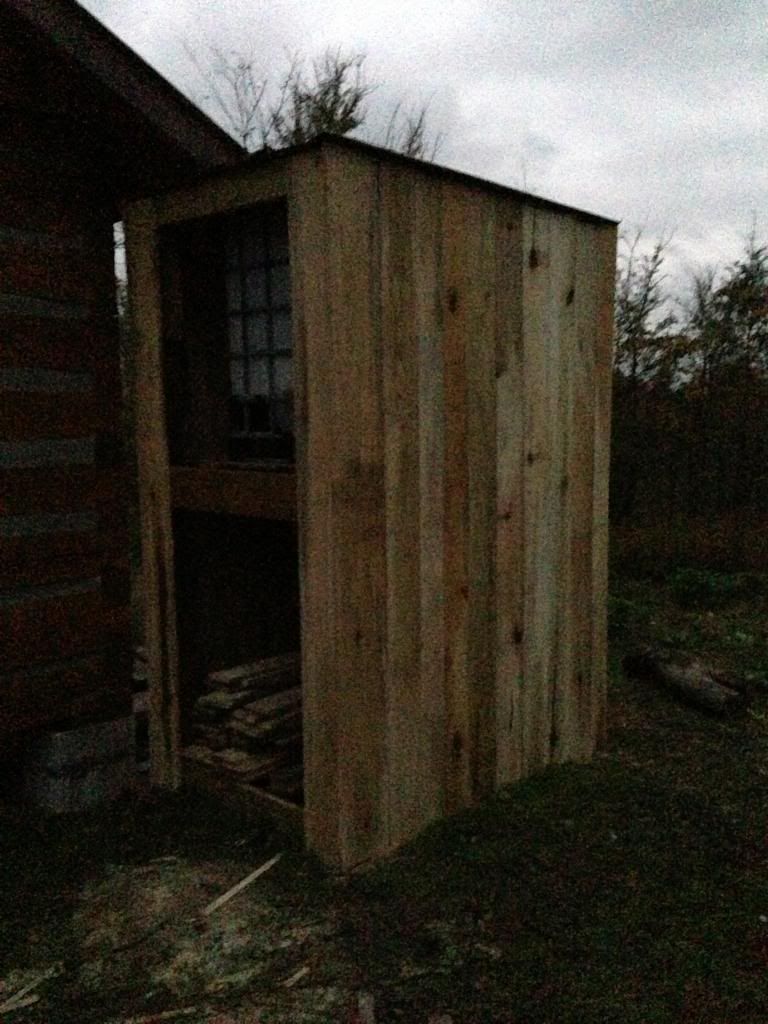
So, we are working on doing our water system. We plan on building off the back a carport of sorts, and building the bathroom off the back under this shed. It will also serve as a spot to park the tractor since our barn could fall down at any minute. a gutter is going to go on the backside of the shed/carport to collect the water.
Anyways, is anyone out there doing a gravity fed water system? We have a pretty good idea of what we are going to do but am curious of anyone else's systems!
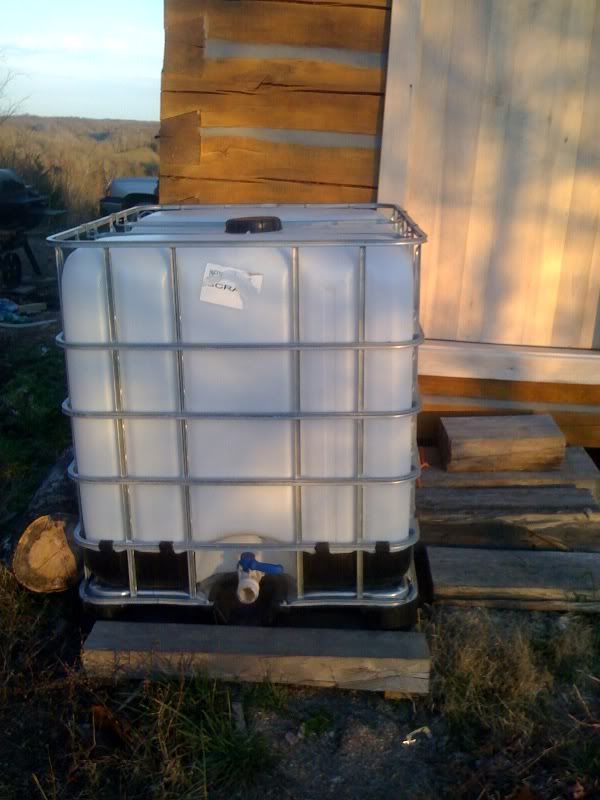
Here is our tank we plan on using!
|
|
Icebear
Member
|
# Posted: 18 Mar 2012 02:45am
Reply
AU2009, those IBC tanks are great but you know you can't use them for drinking water??
Drinking water needs to be stored in something that blocks UV completely, this is why the tanks are usually black, green, brown etc.
Your IBC tanks are perfect for watering the garden etc, but will go green without chemicals being added.
|
|
TomChum
Member
|
# Posted: 18 Mar 2012 11:44am
Reply
I like your cabin AU! Very nice.
I found one of those tanks on CL for $75 but it didn't have the cage. I set it on a high point and built a sturdy plywood box around it. Good points Icebear about excluding light 100%. I haven't started using it yet.
|
|
trollbridge
Member
|
# Posted: 18 Mar 2012 11:44am
Reply
We have this same tank but were thinking we would either enclose it or paint it. It will be interesting to see how you set up your system. We will not be using ours for drinking water. Post lots of pictures and info please!
|
|
Icebear
Member
|
# Posted: 18 Mar 2012 01:47pm
Reply
Those tanks are mostly food grade and used for shipping olive oil, and all sorts of ingredients. If you get a good one, nicely cleaned, then in theory drinking water would be ok.
I would think putting it in a ply box would be suitable, or possibly painting it; just make sure it is permanently in the dark 
I would also dose it with chlorine before putting it into use... Love your cabin by the way!
A
|
|
AU2009
Member
|
# Posted: 18 Mar 2012 10:00pm
Reply
We don't plan on using it for drinking, just using it to flush a toilet, run a shower (doubtful, but it will be set up), and hooked up to a kitchen sink so you can wash up and clean a pot or pan. We plan on elevating it right under the roof line and enclosing it with the same siding we used for the eaves.
I got this off craigslist for about 50 bucks. A guy had 30-40 of them, they were all used for honey.
I am thinking we are going to set up a chlorine drip system, but we are still kicking around ideas. My dad works for a biocides company and they do a lot of environmental water testing in the lab I work in. I've been talking to some of the people about the best set up so hopefully we will get it figured out soon!
If anyone has any ideas please chime in!
Thanks fellas
|
|
AU2009
Member
|
# Posted: 13 Nov 2012 11:44pm
Reply
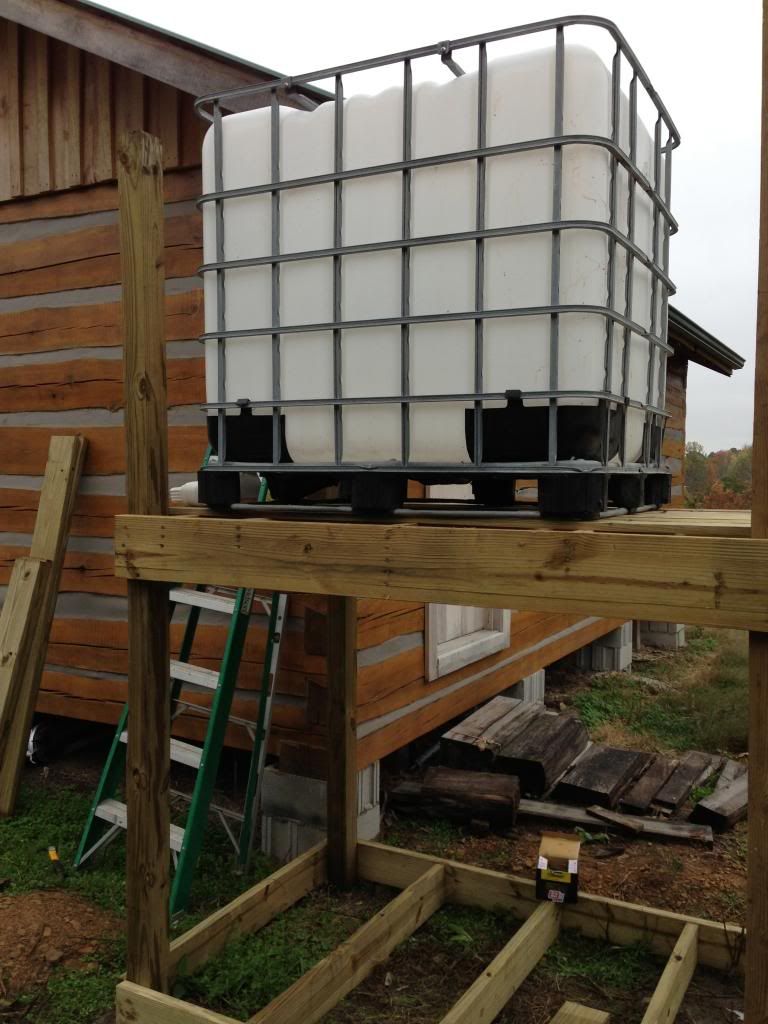
we made out gravity feed water rain collection system. We plumbed it for a garden hose, a future bathroom and to the kitchen sink. They all run on valves and have a single drain valve. I will take pictures this weekend!
|
|
AU2009
Member
|
# Posted: 18 Nov 2012 10:15pm
Reply
Alright, I tried to snap some photos of the rain collection system. We built a platform for the tote to sit on and positioned it under the gutter. All of the gutter has gutter guard and then I also rain a screen in the bottom of the gutter at the collection point. It runs through a plastic connector that I used filter screen in also. 2 ounces of bleach will give me about the same amount of free chlorine that city water has.
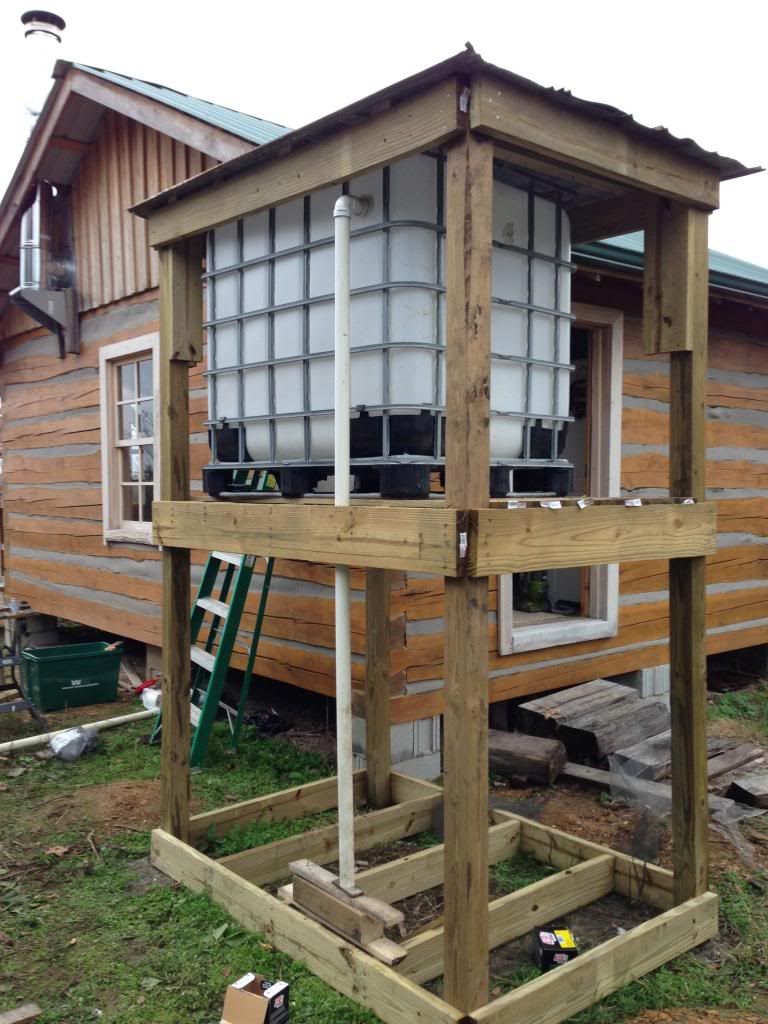
Off the main valve we ran a rubber elbow and reduced it down to 1/2" pvc. We installed a brass gate valve right after the reduction here to act as a back up to the totes plastic valve. From here we ran 1/2" pvc out of the shed underneath the cabin and up through the floor for our sink. We also ran a connection off for a garden hose. To prevent vacuum we installed a 1/2" vacuum line on a valve and also installed a drain valve so we can open the valve when we leave to drain all water out of the pipes. We also cut a hole in the tote and installed a 1 1/2" overflow line.
It doesn't give us as much head pressure at our sink as we had hoped for but it still isn't bad. We might run an inline pump and run it off of the generator. It's nice having running water though!
|
|
AU2009
Member
|
# Posted: 19 Nov 2012 10:55pm
Reply
|
|
AU2009
Member
|
# Posted: 5 Dec 2012 11:15pm
Reply
I think I am going to get one of those little pumps from west marine, pressure switch and will work off my generator. I'll let yall know how it works! So far though it has been nice to even have a trickle of water. And we bought a port o jon which has been nice.
|
|
croyer
|
# Posted: 6 Dec 2012 12:28pm
Reply
AU2009,
That Cabin is awesome. I have started planning to build a small appalachian log cabin like yours. I have the land and I'm looking into how to get the raw logs to build the cabin (not enough good trees on the land. Recently logged).
My biggest fear is that the logs will twist and shrink too much if I don't let them dry long enough. I'm not trying to build a log "house". In fact just the opposite. I'm trying to keep it small and very rustic (and by rustic I mean imperfect) so I'm fine with checking and some shrinking etc.
Did you use green logs? Did you let them sit for some time to dry before using? Did you get the logs already milled and seasoned?
Thanks
|
|
croyer
|
# Posted: 6 Dec 2012 12:31pm
Reply
AU2009,
That Cabin is awesome. I have started planning to build a small appalachian log cabin like yours. I have the land and I'm looking into how to get the raw logs to build the cabin (not enough good trees on the land. Recently logged).
My biggest fear is that the logs will twist and shrink too much if I don't let them dry long enough. I'm not trying to build a log "house". In fact just the opposite. I'm trying to keep it small and very rustic (and by rustic I mean imperfect) so I'm fine with checking and some shrinking etc.
Did you use green logs? Did you let them sit for some time to dry before using? Did you get the logs already milled and seasoned?
Thanks
|
|
toyota_mdt_tech
Member
|
# Posted: 6 Dec 2012 01:02pm
Reply
Croyer, harvest your logs int he witer, it eliminate the leaking sap. I'd let them dry out before milling. I woudl suspect you can buy a log truck load of logs by putting an add in the paper with your requirments, ie type, how long diameter etc.
|
|
croyer
|
# Posted: 7 Dec 2012 12:06pm
Reply
Thx for the tips toyota.
|
|
AU2009
Member
|
# Posted: 10 Dec 2012 10:55pm
Reply
The guy that built it owns a saw mill about 15 miles away. He cut the logs locally let them dry for about 6 months and then cut them and set the cabin up on his property for another 8 months before they set them on site. It then sat probably another 4 months before it was chinked using permachinking.
I have to say I have not been pleased with the permachink, but we think it wasn't put on right. A rep came out and looked at it and is going to give us enough to fix some spots where it has settled...Ideally you'd let your logs dry about a year, set it for another year and build it in that time before you chink it. That time depends on the type of wood and climate you're in.
The guy built a log office at his mill and it sat for a year and a half before chinking and it hasn't had any problems.
Also the one he did on his site in mortar chinking has held up well.
|
|
AU2009
Member
|
# Posted: 10 Dec 2012 11:00pm
Reply
I know what you mean croyer...we wanted to keep it very simple. We don't put anything up there we care much about and don't lock the door. It has gotten to be nicer than we planned, but with no power and just running off the generator its somewhat low-key.
Good luck with you're build, you won't regret it.
Also, I think we have a little pump picked out and hopefully we will get the rock work done after deer season. We are also going to disassemble the old log barn we have and use what logs we can to build a room off the back for a bathroom/mudroom (should be enough logs). We are thinking about running an entirely separate outdoor stove to fire a hotwater tank and feed it to a shower....just fire up the stove when you want hot water. We have found it doesn't take much time at all to get a full 250 gallons of water with a good rain!.
|
|
AU2009
Member
|
# Posted: 10 Dec 2012 11:06pm
Reply
one more thing, don't know where you are but there are several people on local craigslist selling small cabin kits for a price that isn't bad at all in my opinion.
http://nashville.craigslist.org/for/3434347860.html
|
|
AU2009
Member
|
# Posted: 29 Jun 2014 12:19am
Reply
Just wanted to update this thread a little bit. We haven't done much in the past few years, but enjoy the cabin. We have gotten by without installing our pump on the water tower, but its on the agenda. Life has gotten in the way.
We plan to finish underpinning and a hearth for the wood stove near the end of the summer. We have daisy chained sockets around the edge of the cabin which is nice. We can just plug one plug into the generator and have everything in plugs so we don't trip over extension cords.
We also put in a port o jon for an outhouse on a simple septic using 55gal drums. Its basic for now as we plan to use the barn logs to add on to the cabin rear.
I've been doing some reading on wood fired hot water heaters using a gas hot water heater so that is on the project list as well as a new intake system from the gutter.
For those using rain water off the gutter, what are you doing to filter it?
|
|
Nirky
Member
|
# Posted: 29 Jun 2014 01:35am - Edited by: Nirky
Reply
It's been 3 full years, have you come to any conclusions about the permachink? Also, what did you put in the log gaps before you chinked?
|
|
AU2009
Member
|
# Posted: 29 Jun 2014 01:44am - Edited by: AU2009
Reply
Overall I'm not impressed with permachink but I still think it wasn't done right. It's a long story by we are still looking for a more permanent solution.
For the gaps just foam insulation was used.
You can look in the photos and see.
|
|
Nirky
Member
|
# Posted: 29 Jun 2014 01:58am - Edited by: Nirky
Reply
Rigid foam or spray foam? Hope it was spray foam; if it was, have you noticed any separation?
Edit: it looks like from a closer inspection of your photos you elected to put elastic foam in the gaps. Is it effective at sealing?
|
|
| << . 1 . 2 . 3 . >> |
