| << . 1 . 2 . 3 . >> |
| Author |
Message |
Just
Member
|
# Posted: 7 Feb 2019 08:58am
Reply
I can tell you it had to be 18 in. To get two bedrooms up there. But in the next one that was 9x12 the stair became 22 in. wide .
|
|
Steve_S
Member
|
# Posted: 7 Feb 2019 09:19am
Reply
Quoting: slatecreek What Steve S said about "cool roofs" is a great idea too.
The proof is in the pudding as it were. Last summer in mid heat wave, Pumphouse thermometer (outside on north side of wall in shade) registered 40C, inside of cabin was 27C. No fans, no AC, just open windows. On top of that, my roof is forest green tin, so it's not reflecting anything, although I do have shade from a very large spruce on the south side.
I do attribute much of that to the roof system which in mine has 2" clear airspace. Well I am also heavily insulated but the roof makes the difference.
On the Solar Stuff. You can put together something with what you have (I just peeked at your other thread) but you'll likely be disappointed with recharge times using 50W panels. I cannot ID that inverter but it likely is not a Pure Sine unit so do be cautious with fine electronics (those USB ports guarantee nothing) and turn it off when not using it as it will still draw power on idle. Simplest Suggestion is to get a Battery Disconnect Switch you attach to your battery so you can quickly shut everything down, better for when your away from cabin too.
Just posted a good example with the Gambrel Roof.
BTW: Here is a great site for working out the math, cuts, angles etc for your project... Makes life a whole lot easier when planning. Look at the "directory" there and knock yourself out LOL.
https://www.blocklayer.com/roof/gambreleng.aspx
|
|
rockies
Member
|
# Posted: 7 Feb 2019 05:16pm - Edited by: rockies
Reply
Hey. I was looking over your plan again and decided to draw it out with my architectural software. At 8 x 12' it's a very tight fit, but I was wondering if you would consider going to 10 x 10?
The reason is primarily the loft. With most roof types you get an awkward loft space. A 12:12 pitch gable on an 8' wide cabin only gives you about 3'8" of headroom in the loft, and there's not much space left over for any kind of storage.
A gambrel roof (or a barn roof) gives you more headroom across the width but as with the gable design the best place to put the ladder or stairs is in the center of the main floor, not near the side walls where the ceiling starts to interfere with head clearance.
I saw this cabin featured on a tiny house show. It's 100 sq feet with a shed style roof (very easy to build) and has a functional loft with extra storage.
https://c2hh.com/product/nomad-live/
As built it is very "urban" but could be built in a more rustic style. I did a redesign to include a wood stove (and omitted the bathroom) but the main principles are the same. If you don't want to run the stairs up the wall over the counter you could use a ladder on the opposite wall next to the built-in sofa/dining bench (there are openings in the loft floor on either side of the bed).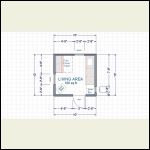
Floor Plan
| 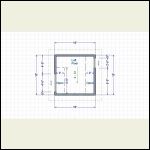
Loft Plan
| 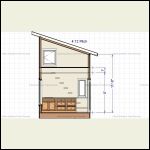
Section East
| 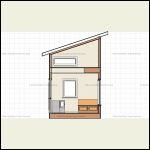
Section West
|
|
|
rockies
Member
|
# Posted: 7 Feb 2019 05:18pm - Edited by: rockies
Reply
Section east with stairs. The stairs over the counter are 10" deep and 24" wide and the height from step to step is 12". At the top is a 2' deep landing.
|
|
Just
Member
|
# Posted: 7 Feb 2019 07:28pm
Reply
This one we built at our place at the lake along Rockies line of though . It is a 9x12 sleeping cabin only , has a queen down stairs and 2 twin beds up with a place to stand at the top of the ladder to change . It was easer to build .
|
|
fiftyfifty
Member
|
# Posted: 7 Feb 2019 08:29pm
Reply
Wow, a lot of plans to consider. A shed roof design does have some advantages. Then again, I keep coming back to Rory's very first design. One thing it has is a place to hang your coat (right behind the door on pegs.) I am familiar with Rory's climate, and there is just so much volume of clothing in the winter: snow pants, bulky jackets, boots, hats, mittens. And all of it snowy and needing to be hung up to dry.
|
|
Whiskey Jack
Member
|
# Posted: 7 Feb 2019 09:27pm
Reply
I do have pictures of our solar setup, but I can't seem to find them at the moment. If you ever want to come out for a day and check out what we did to get some ideas let me know. We have extra sleeping space.
|
|
socceronly
Member
|
# Posted: 8 Feb 2019 02:04pm
Reply
For loft spaces in the 100-108 sq ft places, say just to sleep.... since the bathrooms for these almost always outside... has anyone built access to the loft from the outside?
It would save so much space on the ground the level.
|
|
|
socceronly
Member
|
# Posted: 8 Feb 2019 03:04pm
Reply
Quoting: rockies Section east with stairs. The stairs over the counter are 10" deep and 24" wide and the height from step to step is 12". At the top is a 2' deep landing. Stairs
Given a 10x10 building like this, which I assume is on skids (since it comes as a kit).
What would our experienced builders here consider the maximum height for a building with that footprint on skids would be?
Would 16' be too high?
That one looks to be close to 14' at the highest point.
|
|
Just
Member
|
# Posted: 8 Feb 2019 04:07pm
Reply
Of the three I have picked on this thread None of mine are over 13 ft . The beige one is the tallest because it has a 9 ft. Sidewall and a 6-12 roof. The old bylaw in my township said 12.5 ft. Mine all have at least one spot to stand-that is 6 ft. Tall in the loft.
|
|
rockies
Member
|
# Posted: 8 Feb 2019 08:11pm - Edited by: rockies
Reply
I drew up Rory's cabin using his stated dimensions: 8' x 12' with a loft floor (2x6's) set at a 7' height and 10' high side walls. I also included a typical Gambrel roof.
The main problem is accessing the loft. Although the ridge height is sufficient for someone to stand, by placing the stairs along an exterior wall you have to twist to one side as you reach the top of the stairs so you don't hit your head on the sloped ceiling (the top of a staircase is not where you want to be leaning over).
Unfortunately, the best place to access a loft with short side walls (or no side walls) is in the center so you can climb right up without having to worry about hitting your head. That's why I suggested the shed roof.
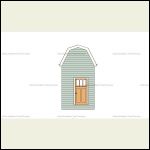
Personally, I don't really like Gambrel roofs. I understand that by using one you get more headroom in the loft, but because you now have two different roof slopes you need to support the joint where they connect as well as at the ridge. I think it's too complicated (and on a very small building a little unattractive). The cabin just looks too tall and thin, and it's a difficult shape to add on to.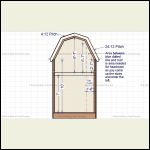
Gambrel Section
| 
Gambrel Shape East
| 
Gambrel Shape West
|  |
|
|
rockies
Member
|
# Posted: 8 Feb 2019 08:16pm
Reply
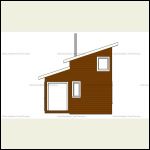
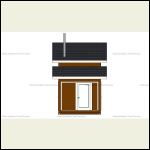
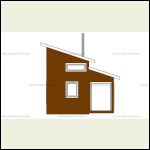
If you do choose a 10 x 10 plan with a shed roof, you can easily add on a screen porch, which I would recommend not only for sitting outside away from the bugs, but you could also add a storage bench and coat hooks for 3 season usage.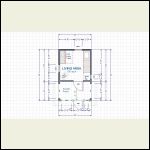
Screen Porch Plan
| 
Screen Porch East
| 
Screen Porch South
| 
Screen Porch West
|
|
|
rockies
Member
|
# Posted: 8 Feb 2019 08:17pm
Reply
One final thing about a shed roof, if you want to have more headroom in the loft you can easily increase the pitch of the roof.
|
|
Just
Member
|
# Posted: 8 Feb 2019 10:20pm
Reply
Rocky, if you turn the roof 90* you won't hit your head going up and it is certainly better than a ladder @ 3am. Turning the roof also brings the cabin closer to balance so it doesn’t appear so tall. The fellow I built the biege one for is 6ft.4 in and often puts his kids to bed .
|
|
Rory
Member
|
# Posted: 9 Feb 2019 03:29pm
Reply
Those are some really cool designs rockies I appreciate all the ideas. And thats a pretty awesome program I might look into getting one was it free? You make a pretty good point about the height issue at the top of the staircase but I think I can counter that by moving it to the east or west side wall. My original plan was for a 10x10 but I do want to stick with the 12x8. I know the gamrel roof can look out of place on a small structure but to me it's for sure worth it for the extra head space. especially since not many people will be around to judge my build design haha. I'm also not concerned about adding on in the future due to the issue of not being able to get a building permit. Which is also why adding an attached screen porch probably isn't an option even though I would be awesome to have in the summer.
socceronly- that's an interesting idea I dont believe that i've seen anything with an exterior staircase yet I'd also be curious if anyone has done that.
Just those are some good looking cabins, how many have you built? You must be a pro by now haha.
WhiskyJack I might have to take you up on that offer its a pretty close drive and you did a great job with your place I would probably learn a lot
|
|
Just
Member
|
# Posted: 9 Feb 2019 04:05pm
Reply
I think 6 the oldest Is still standing and in use. Good luck with York build .
By the way you should look
around for some gravel on your property ,that way all you need to import by boat would be some Portland cement for your foundation .
|
|
Rory
Member
|
# Posted: 9 Feb 2019 04:10pm
Reply
well there happens to be a railway near by with a ton of gravel that has fallen down the slope onto the edge of my property so i might just go on a little walk and "borrow" some of the piles I find haha.
Fifty you make a good point to I should keep the bulky clothing storage in mind for the front entrance for sure. preferably near the fire to dry everything.
|
|
rockies
Member
|
# Posted: 9 Feb 2019 06:14pm
Reply
You should check with the building department to see whether a screen porch is considered part of the 100 sq' allowable footage. If not, add a screen porch.
|
|
socceronly
Member
|
# Posted: 9 Feb 2019 07:38pm
Reply
I was thinking, if you did build a second floor and had an exterior staircase for access it doesn't have to be 'part' of the building. It could just be a separate structure that happened to be shaped like a staircase for storing wood or whatever.
That way you keep the 9x12 profile with an odd shaped storage space for firewood.
|
|
Rory
Member
|
# Posted: 10 Feb 2019 01:57am
Reply
Ya that's a good idea rockies ill have to look more into that a screen porch would be very nice.
That would be really cool socceronly haha i'm going to look around to see if I can find that's done something similar.
|
|
rockies
Member
|
# Posted: 10 Feb 2019 06:07pm - Edited by: rockies
Reply
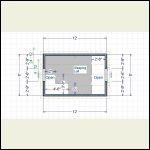
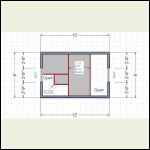
Your idea to run the stairs to the loft up one of the shorter side walls solves a lot of problems with the layout of the main floor plan, and I think by putting the loft in the middle of the cabin and having open areas on either side solves the problem of the loft layout as well.
If you look at my suggested layout for the main floor you can see that the loft stairs are in the southwest corner of the cabin. The bottom four steps of the staircase are actually built out of a series of 2 foot deep storage boxes (each one 12†high), but each box gets progressively shorter to form the next step. For example, the base box is 24†W x 12†H x 54†D, the one on top of that is 44 D, the next one is 34 D and finally the last one is 24†D.
When you turn the corner there is a triangular "winder" step and then two more steps which are made out of 1†thick boards measuring 24†W by 10†deep. Underneath these two steps there is a built-in seating bench and a fold down dining table. A post on the inside corner of the staircase helps support the southwest corner of the upper loft floor.
In the cabin's southeast corner is the kitchen counter and sink, and the wood stove is tucked out of the way in the northeast corner. Above the stove there is a 2’ 6" wide opening in the loft floor. This opening will make the main floor and the loft feel more connected and also allow space for the stove pipe to rise up to the ceiling without it interfering with the loft floor framing.
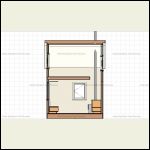
The loft floor itself is made out of 2x6’s with a 3/4†plywood subfloor set at a height of 7’6†(instead of 7’) so that the tops of the main floor windows aren’t crammed up right against the ceiling. Up in the loft there is enough room for a queen sized mattress as well as some extra space for low shelving and reading lamps.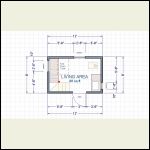
Floor Plan B
| 
Loft Plan B
| 
Loft Plan Beams B
|  |
|
|
rockies
Member
|
# Posted: 10 Feb 2019 06:08pm
Reply
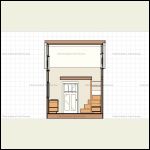
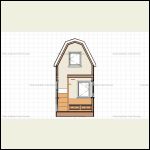
Sections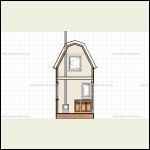
Section East
| 
Section North
| 
Section South
| 
Section West
|
|
|
socceronly
Member
|
# Posted: 10 Feb 2019 07:03pm
Reply
Great stuff rockies!
|
|
Just
Member
|
# Posted: 10 Feb 2019 07:31pm
Reply
I would be interested in how lCC would carry the roof loads of Rockies plan .
|
|
socceronly
Member
|
# Posted: 10 Feb 2019 09:19pm
Reply
Quoting: Just I would be interested in how lCC would carry the roof loads of Rockies plan .
Like this sir.
|
|
Just
Member
|
# Posted: 10 Feb 2019 10:40pm - Edited by: Just
Reply
By the way Rory I have heard many of the northern trains will stop and deliver goods anywhere along the line ,arrangements must be made in advance ,you could ask!!
|
|
rockies
Member
|
# Posted: 11 Feb 2019 08:01pm
Reply
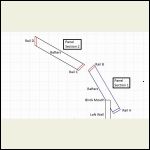
How to frame the roof? As I mentioned before, a Gambrel roof is more complicated to frame than a shed roof or a gable roof because there are two different roof pitches on either side of the ridge.
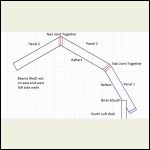
Ordinarily you’d have to engineer something similar to a truss to carry the roof loads down to the walls but because this cabin is so small I suggest building the roof using four prebuilt panels, two for the steep lower pitches and two for the shallow upper pitches.
Each panel will span the length of the cabin, so the panel’s 13’ long side framing members will act like beams, transferring the roof loads across the panels and over to the east and west loft walls (see framing plan for beam layout). All of the roof framing is 2 x 10 material.
The easiest way to build the roof panels is to first draw out a full scale section of your cabin roof on a couple of sheets of 4 x 8 plywood. Once you are happy with the roof pitches, draw in the 1 1/2 x 10" framing members you’ll be using for the panel’s side beams (the drawing will look similar to framing diagram A).
Measure the angle of the joints at the ridge and between panels 1 and 2 and then cut your rafters to the correct lengths (using measurements from the plywood template as a guide). You will also need to cut a birds mouth in the rafters used for panel 1.
Once you’ve cut all your rafters to the correct lengths lay them out 16†on center and nail the side framing members (rails A, B, C and D) to the rafters to form a panel.
You’ll have to make sure to place a rafter over the tops of the cabin’s side walls and also to leave enough room between two of the rafters where the stove pipe exits the roof.
Install the lower panel frames first (panel “1â€) on top of the loft walls using framing tie-downs and nails and then install panel “2†above it, nailing it to the tops of the east and west loft walls and also to the edge of panel “1â€. Repeat these steps for the north side of the Gambrel before nailing the two top edges of panel 2 together at the ridge.
After all four panel frames are installed you can attach the roof sheathing, shingle the roof, add insulation and then the interior finish.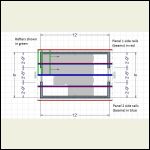
Roof Framing Plan
| 
Framing Diagram A
| 
Panel Detail
|  |
|
|
socceronly
Member
|
# Posted: 11 Feb 2019 08:29pm
Reply
Wayfair has a Gambrel roof kit.
Would that help?
Seems to get pretty good reviews.
https://www.wayfair.com/outdoor/pdx/2x4-basics-barn-roof-enclosure-kit-txfb1008.html
|
|
socceronly
Member
|
# Posted: 11 Feb 2019 08:34pm - Edited by: socceronly
Reply
Hmmm. Looking more closely at that kit, it would have been nice if it were designed to work with a proper top plate.
EDIT: if you dropped that, with stubby bits coming down onto a plate, which in turn attached flatly to a top plate, would that be creating a hinge?
|
|
Rory
Member
|
# Posted: 12 Feb 2019 07:58am
Reply
The roofs not an issue I already have the pieces built stored in my basement haha that was one of the easier parts for me to figure out. Those plans look great though rockies I think mine will end up very similar to what you have there.
Just - I've never heard that before that would be awesome if its true haha. Ill have to figure out where I can inquire about that.
|
|
| << . 1 . 2 . 3 . >> |

