| . 1 . 2 . 3 . 4 . 5 . 6 . 7 . 8 . 9 . 10 . 11 . 12 . >> |
| Author |
Message |
Stoney
Member
|
# Posted: 1 Oct 2010 06:19pm
Reply
Like many people I have always wanted a log cabin. I had helped a friend build one with about 200 logs and lot of back breaking work but it wasn't anything that I wanted to try on my own.
After seeing many sites with kits it dawned on me that I could build one similar to the laminated log homes and build it out of regular lumber.
I worked out the details and with the help of a good friend we put the walls up in about ten easy days with not heavy lifting and no chain saws.
This Idea basically uses just 2" by 8" lumber nailed and glued with construction adhesive to rebuild lumber back into logs that are then restacked and interlocked to create a low cost and very tight log structure.
Before stacking you just plane or router the four corners to give it that log look.
As far as chinking goes I just used more construction adhesive to fill the small cracks on the inside and outside.
This alternative construction method that I call Lumber Log Structures is low cost and green compared to Log Cabin Kits. I built all the walls on my 24' by 35' building for only about $3000.
The only thing extra I had to do to get a permit was to take my drawings to a local engineering firm here in town and pay him $50 to approve this new technique before the inspector would let me build it.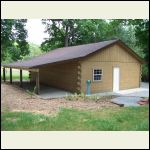
Log Garage
| 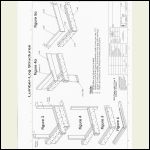
Cad Drawing 1
| 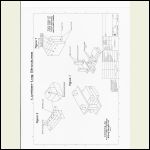
Cad Drawing 2
|  |
|
|
KC cabin
Member
|
# Posted: 1 Oct 2010 07:19pm
Reply
Ingenious and great looking faux log constuction! And sharp cad work, too. What sort of r value do you estimate you're getting with the triple 2xs?
|
|
Stoney
Member
|
# Posted: 2 Oct 2010 06:00am
Reply
Everyone who sees this has been pretty impressed also. I got a fellow off the internet to draw these up after I got the building done. He only charged me I think it was about $35 for both pages. I put a booklet together to show how it's done but have nearly given up on the idea of selling the booklet. I still think that it is a great method so that is why I am sharing most of the information here.
It is really not a faux log. You are just reconstructing logs by combining boards. It's a whole lot better that using log siding don't you think?
As far as the R-value goes I understand that wood has an R-value of around 2 per inch depending upon the species of wood. The real factor with log structures is their thermal mass and my walls are as thick as many log home kits.
One big factor with log structures is air infiltration and this method is really tight in that respect.
You could also make smaller buildings using this same method by using smaller lumber like 2" by 6s". (Playhouses, Sheds etc.) anythiing with a shorter roof to bring it to scale.
Thanks for the comments.
|
|
steveqvs
Member
|
# Posted: 2 Oct 2010 10:22pm
Reply
It never amazes me how ingenious people can be.... although it never seems like my ideas are that good. Nice looking idea.
|
|
Jpropes
Member
|
# Posted: 4 Oct 2010 10:43pm
Reply
Great idea, I know that you said the walls were up in 10 days. Did that include laminating the logs? Also did you use dimensional lumber? Is there any way that I can get more information from you on this construction method? I am very interested in trying this myself.
|
|
Stoney
Member
|
# Posted: 5 Oct 2010 06:34am
Reply
The ten days to build the walls did include laminating and nailing the logs. We only worked about six hours per day and put up about two courses of the 13 courses. We used four sets of the jig that is shown in Cad 2 and I also used a long 2" by 2" as a guide so that I didn't glue or nail into an are that I didn't need to.
The full length logs go together pretty quick so we built several of them ahead of time and set them aside until they were needed
I would be happy to answer any questions and I will include more photo's that might help. There are quite a few photo's so if you need anything specific I probably have it for upload.
One suggestion that I would make is to not unband the lumber until you are ready to start build. Once unbanded dimensional lumber will warp and bend some on its own and it is much easier to get a real straight log with straight lumber.
I definitely did use dimensional lumber. There are many advantages to this. It is kiln dried so this minimizes shrinkage. It is in uniform dimensions so it is easier to build tonque and groove logs with just spacers insted of measuring. You don't need a kit since the materials are locally available. It is cheaper since you are not paying for a lot of mill work and trucking long distances. If you make a mistake you can just build another one.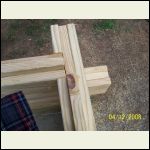
Log_Garage_00132.jpg
| 
Log_Garage_00127.jpg
| 
Log_Garage_00126.jpg
| 
Log_Garage_00121.jpg
|
|
|
Gary O
Member
|
# Posted: 5 Oct 2010 08:57am
Reply
Stoney, that is fantastic!
I flirted with building a stack wood structure at one time (Mother Earth News, years ago), but never made the attempt.
However, your method far out weighs most 'log' wall designs/kits in regard to price and availability. And like you say, it's the real McCoy.
You really should stick with getting something published (I know it's tedious).
Any tricks to the beginning/ending/gable courses?
Gary O'
|
|
toyota_mdt_tech
Member
|
# Posted: 5 Oct 2010 09:21am
Reply
Quoting: Gary O You really should stick with getting something published
Or more like "patend pending", killer deal. Using the "butt/pass" log method on the ends. I like it!
|
|
|
Stoney
Member
|
# Posted: 5 Oct 2010 09:25am
Reply
Gary,
When I came up with this idea I researched everything I could find on the internet. One blogger kind of hinted at the idea with stacked wood but never really came up with this method. I am really suprised that no one has come up with this before now.
I considered publishing my booklet but I would have had to sell a whole lot of them just to recover my expenses so I opted out of doing that.
For your top course If you build as I did with 2" by 8" lumber, you would use a 2" by 6" board as your center tongue. This would give you a flat top plate for trusses or rafters.
The sill plate would need sill seal under it and then attach the 2" by 2" as shown in Cad 2 with adhesive and screws as the starter tongue.
I get a lot of satisfaction knowing that I can help people.
|
|
Xplorer
Member
|
# Posted: 5 Oct 2010 10:42am
Reply
I'm really impressed. Very nice of you to share this with us.
|
|
Jpropes
Member
|
# Posted: 5 Oct 2010 11:37am
Reply
Thanks for the info. I appreciate your time in sharing the information. The pictures help out a lot. Did you secure the logs to each other with screws similar to what is done in conventional log construction?
|
|
Stoney
Member
|
# Posted: 5 Oct 2010 12:02pm
Reply
The logs are not secured with screws. They are just secured with construction adhesive and nailing the the bottom of the log into the tongue of the log that is below. This locks everything together.
You might be able to see some of the nails in the bottom of the logs in the photo if you enlarge it.
When the cabin is complete the nails kind of make it look like knotty pine. I don't find the exposed nail heads offensive in any way.
|
|
steveqvs
Member
|
# Posted: 5 Oct 2010 01:04pm - Edited by: steveqvs
Reply
Maybe if you published an e-book. Not as much cost there.
|
|
Little Feather
Member
|
# Posted: 10 Oct 2010 12:52pm
Reply
Another cheap log cabin construction method can be found if you have
a saw mill in the area.
Ask about buying their old "cants".
Cants are the small section of tree left on the sawmill when they "can't" cut another board from the log because it is too small. These rough cut sawmill cants are roughly 3x4 inches.
If the sawmill cuts hardwoods you are in real luck. Cants sell cheap, depending on how many they have on hand. I know some of the local sawmills, and can get cherry, oak and walnut cants for about the price of a 2x4, and they will just give me poplar and softer lumber for about $20 a pickup truck load.
|
|
Stoney
Member
|
# Posted: 10 Oct 2010 03:15pm
Reply
Thanks for the suggestion.
With the green lumber you are back the the same problems as with all green lumber. It shrinks a lot, is not always uniform in size and is not planed to get good adhesion as with my method.
It would definitely be cheaper but I wouldn't expect to get results that would look as good.
|
|
olfool
|
# Posted: 11 Oct 2010 03:54pm
Reply
Wow, very nicely done and looks great! One of those why didn't I think of that ideas. I 2nd doing the e-book, and if you do I'll be one of the 1st in line to buy it. Thanks for taking the time to share.
|
|
Stoney
Member
|
# Posted: 11 Oct 2010 05:18pm
Reply
After I got started on this idea it really even amazed me that I came up with such a good idea and that it had not already been suggested. I guess because that it seemed so simple to me surely someone has done this before. Well, if they have they kept it to themselves.
I will include a few more photo's since they really help out a lot more than words. I also hope others who want to try this will offer some suggestions to improve it.
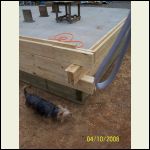
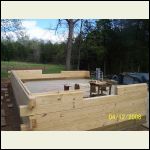
As you can see in the first photo I made the first course of logs out of treated lumber. This wouldn't have been necessary if I built on a foundation or piers.
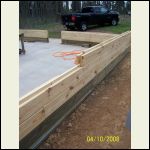
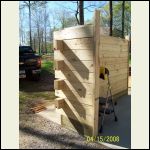
In the second photo you can see where I removed the tongue for the window openings. A 2" by 6" jack stud would go on each side of the window and door openings to frame them and enclose the log ends.
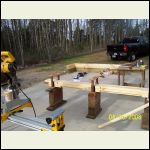
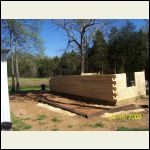
The third photo shows a jack stud that is along the door opening. This should be above the treated sill and not touch concrete. A concrete pad also provides more thermal mass for the building to absorb more heat in the winter.
The tongues that are removed for the overhanging logs are saved and used as the fill pieces for under the logs that extend beyond the walls.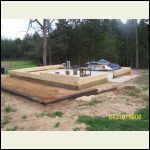
Log_Garage_00124.jpg
| 
Log_Garage_00131.jpg
| 
Log_Garage_00136.jpg
| 
Log_Garage_00134.jpg
|
|
|
Kush
|
# Posted: 13 Oct 2010 05:49am
Reply
Man this is an amazing idea i am sold but I need an instructioal a to z tutorial I would be more than happy to purchase one if you created an E ook hehe I guess I 3rd the notion of the instructional
|
|
Stoney
Member
|
# Posted: 13 Oct 2010 03:56pm
Reply
OK, I'm not totally convinced yet on the ebook idea but I will make a few of my booklets available on EBAY for awhile to those who may need more instruction. It includes many of the same photo's but goes into greater detail and offers many more suggestions with the CAD drawings needed to submit to your building inspector.
It's listed under "Lumber Log Structures"
I hope this is OK
|
|
olfool
|
# Posted: 13 Oct 2010 05:35pm
Reply
That's great, thanks for putting it on there. I just bought a copy!!
|
|
T
|
# Posted: 16 Oct 2010 09:31pm
Reply
Stoney,
This has to be the most innovative idea I've ever seen on owner built, designed cabin construction.. It is so simple yet brilliant! I will be building on my wooded property in 2 years. This idea, or style of yours has me very excited. I will be building my cabin 100% alone and without financing. One question; What about building codes?
Congratulations, you are an inspiration!
|
|
toyota_mdt_tech
Member
|
# Posted: 16 Oct 2010 10:58pm
Reply
Quoting: olfool That's great, thanks for putting it on there. I just bought a copy!!
I just bought a copy also! ;D
|
|
travcojim
Member
|
# Posted: 17 Oct 2010 12:23am
Reply
Great, I have to agree with everyone else, so simple, yet very well designed way of building. I am going to buy your book also off ebay, I have a question, could this be used to build something along the lines of a wee house style structure? something maybe along the lines of 24x40 with a semi flat roof or shed style roof?
http://weehouse.com/#%20%20%20%20%20Marfa
|
|
Stoney
Member
|
# Posted: 17 Oct 2010 12:17pm
Reply
T,
Abviously this technique does not fit into the normal building codes but most areas are becomming more open to alternative construction methods.
In my case I had to get an engineer to approve the technique before the building inspector would allow it to be built. I suggest that you take the CAD drawings and speak with them and see what they require.
|
|
Stoney
Member
|
# Posted: 17 Oct 2010 12:23pm
Reply
travcojim,
I think that you could probably build something that looks like the weehouse but I am not really familiar how it is built. You would definitely need center supports for a roof that wide having a shallow pitch. You will probably need an architect to sign off on your plan.
|
|
olfool
|
# Posted: 18 Oct 2010 06:36pm
Reply
Received the booklet today and read part of it. I can say it is easy to understand and very well done.
I'm going to build a small place in the 14'x24' or close to that size next summer, and just may use this info to do so.
Thanks Stoney, and I'll be sure to take pics!
|
|
Stoney
Member
|
# Posted: 18 Oct 2010 07:21pm
Reply
Olfool,
Thank you for the feedback. I was hoping that I made everything clear enough to easily understand. That's why I included many photos.
I'm looking forward to seeing your photos. I'll be happy to answer any questions you may have if something isn't covered or isn't explained well enough.
|
|
nathanprincipe
Member
|
# Posted: 20 Oct 2010 04:02pm
Reply
Hey Stoney,
I agree with the others, what genus idea! I am building a cabin in tx as we speak, but have been thinking about adding a small bunk house on the property for guests. My thoughts were to use landscape timbers to achieve the log home look, but your interlocking system looks much more sound and secure. One question I have been thinking about is how to hide the electrical??? or is there no way around it?
|
|
Stoney
Member
|
# Posted: 20 Oct 2010 04:47pm - Edited by: Stoney
Reply
Nathan,
I have thought a lot about this issue. I did my garage in conduit and did not conceal it. On a house I think I might use a router along one of the horizontal grooves and imbed the conduit or cable through that and then cover it with a 1' by 4" as a chair rail. I think that it would blend in nicely. It could also be run along the baseboard and enclosed in a similar manner.
I have seen cabins done with landscape timbers but I would hesitate to use them due to the chemicals that they put into them.
|
|
MtnDon
Member
|
# Posted: 21 Oct 2010 05:07pm - Edited by: MtnDon
Reply
I agree the idea is inventive. I like the appearance. However I know that in many areas there will be an issue not yet mentioned here when applying for a permit to erect a residence using this technique.
More and more areas in the country are requiring submitted home or cabin plans to meet minimum energy use codes. If your area has this requirement three layers of 2x material will not come close to meeting those codes.
First some info on this. There is a calculator available online for calculating whether or not a plan meets energy code. The codes change over the years and not all localities use the same code. When I built our cabin I had to meet the 2006 IECC code. The permit department required the plan data to be run through the calculator and a printed out page from the program submitted with the request to approve the plans.
Wall types included vary from stick frame, SIP, ICF, steel frame, masonry block and logs. The software has built in adjustments for wall mass. Note that wood wall mass does not really become a factor until the thickness reaches 7 to 8 inches. The calculator provides the result as a % above or below the selected energy code. It makes it easy to trade more of one thing for less of another or different types of construction to see how code results are affected. The calculator can be downloaded at http://www.energycodes.gov/rescheck/download.stm
Even if one is building in an area that does not yet require energy code validation the tool can be interesting to use as a design tool.
Example: I ran our cabin build through the RESchek calculator. We ended up with a plan that was 5% better than what the code called for.
I loaded that file of our cabin into RESchek, but substituting log walls for my 2x6 walls with R19 infill insulation. The minimum log wall thickness in the calculator is 5 inches so I used that instead of the 4.5 inches that would be three layers of 2x material. The results came out as being 42% below the energy code I was using. Code was not fulfilled until the log thickness was increased to a 12 inch thickness.
Just something that was not mentioned yet, but I thought important.
|
|
| . 1 . 2 . 3 . 4 . 5 . 6 . 7 . 8 . 9 . 10 . 11 . 12 . >> |

